
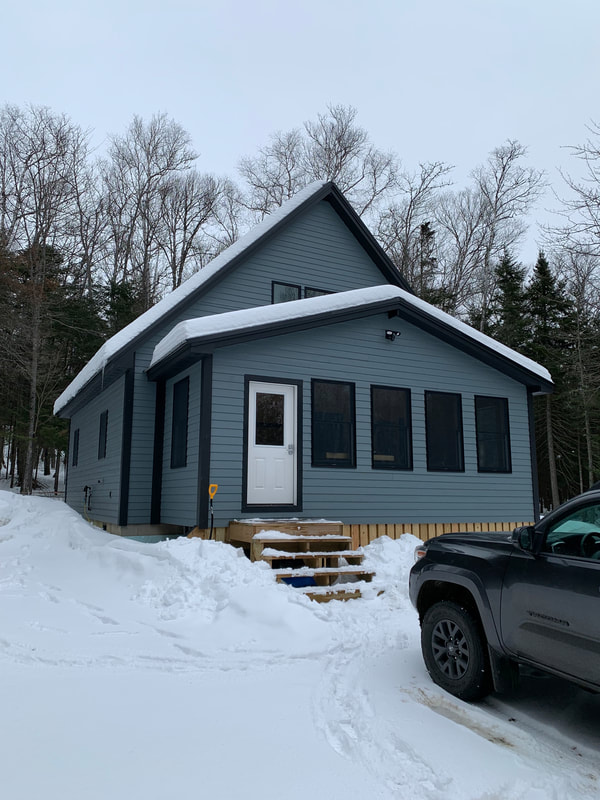
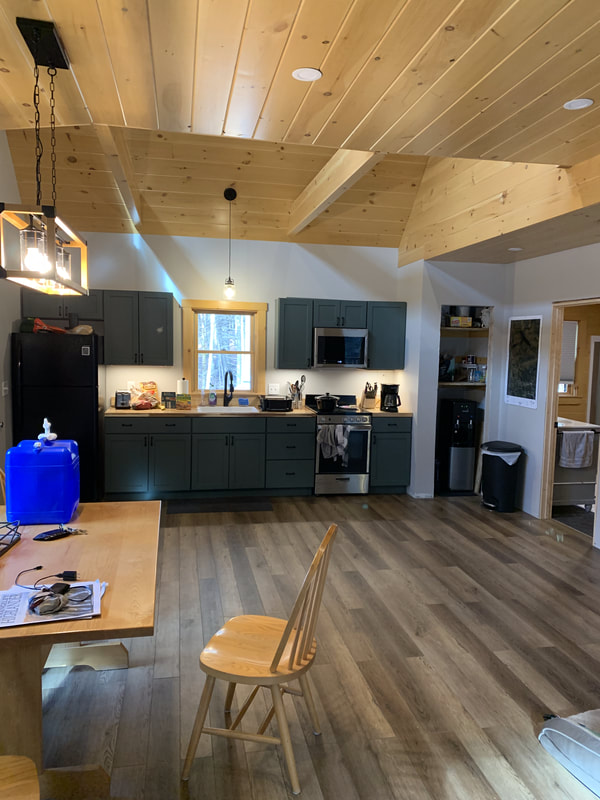
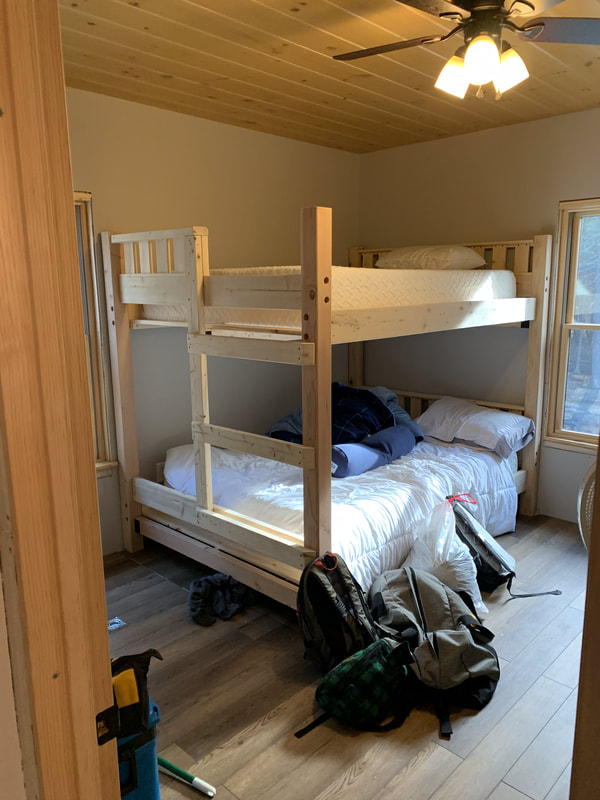
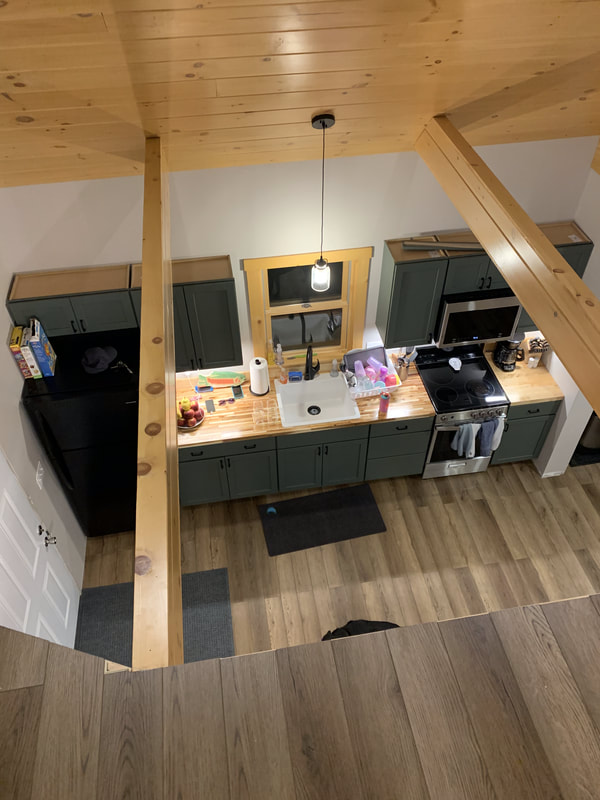
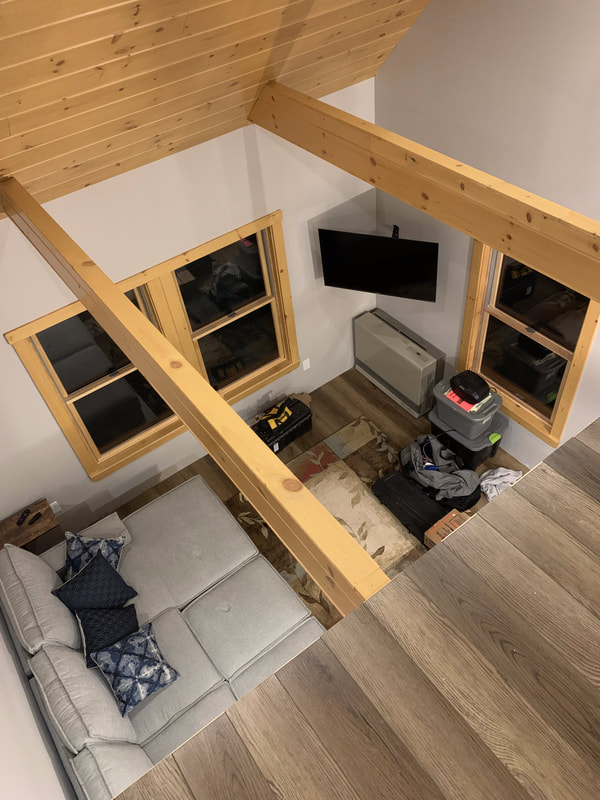
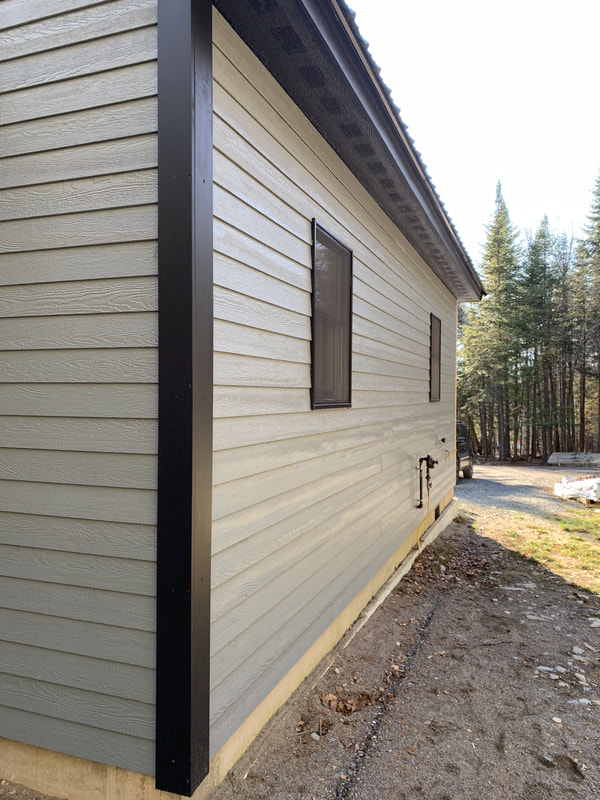
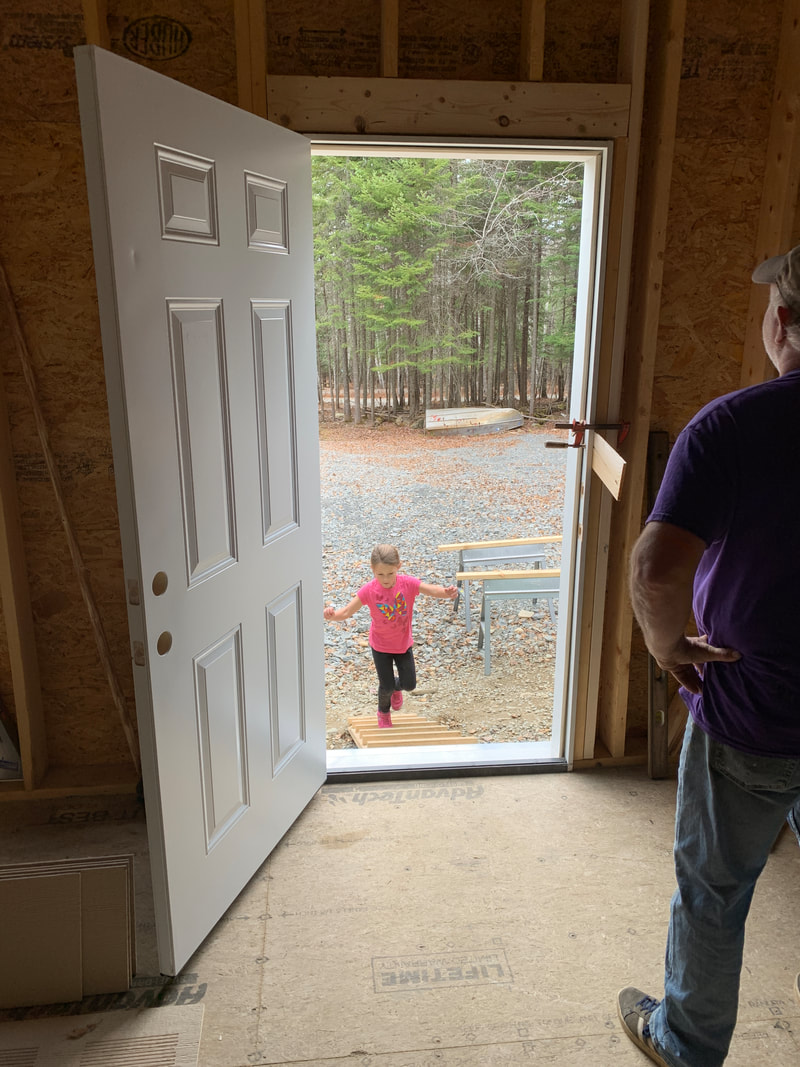
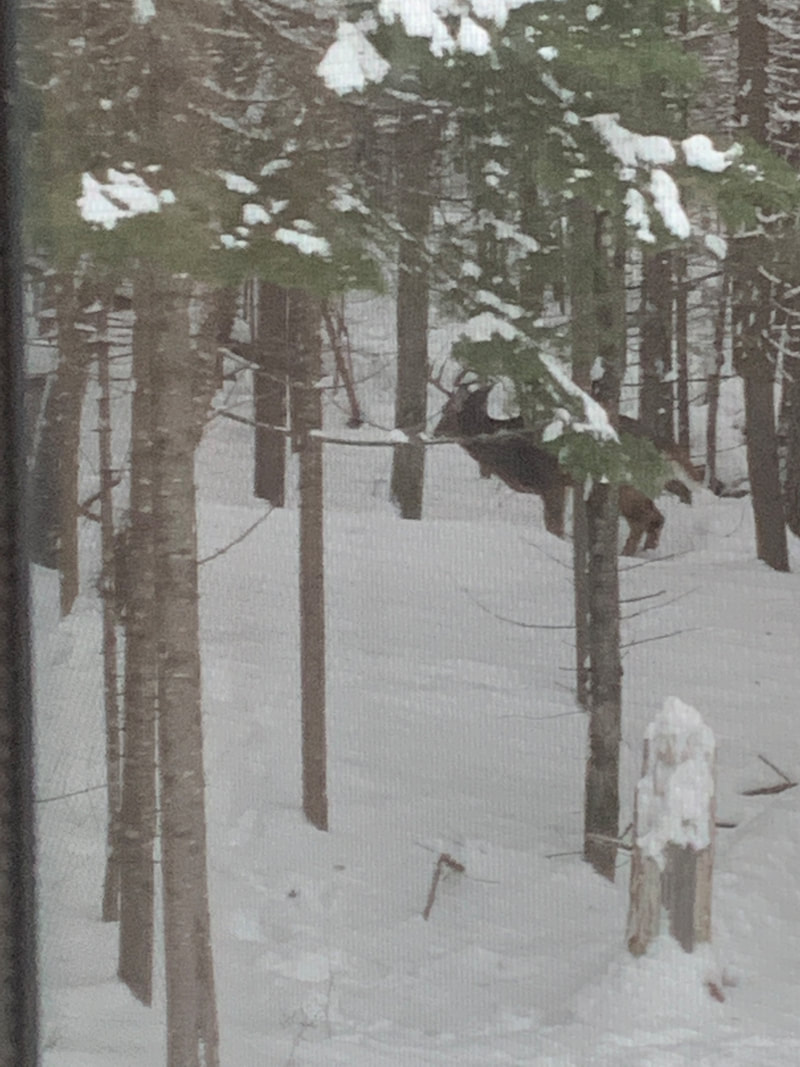
 What a crazy ride! We started this build with a tiny 16x22 foot plan in early 2020. The final dimensions for the camp were 26x28 and the porch is 8x24. Through supply chain issues and crazy fluctuations in building materials, we navigated our way and we are DONE! Originally, we were going to have an incinerator toilet with basically no plumbing. Well, that all changed when we discovered that we love winter in Rangeley, and want to be up there as much as possible. It's basically a 950 sq. ft house now with a full kitchen, a 3/4 bath with a shower, a downstairs bedroom with full sized bunks, and a loft that has a queen and a twin. The couch pulls out to a full also. We have WiFi and TV, mostly for the kiddos, but we find that TV is rarely turned on at camp. There is too much to be doing elsewhere. We built a sweet catwalk that has a fly tying desk. I've been tying up there watching the wintering deer herd, and hope to have folks tie a fly or two before their day(s) on the water for years to come. We offer housing to our clients for a VERY cheap rate. Check out our lodging page for more info. Here are some photos of the finished product below! 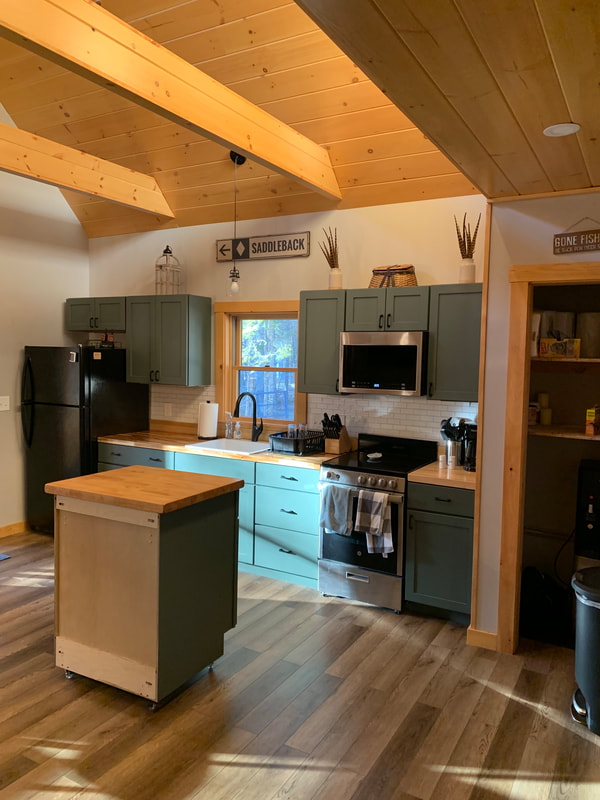 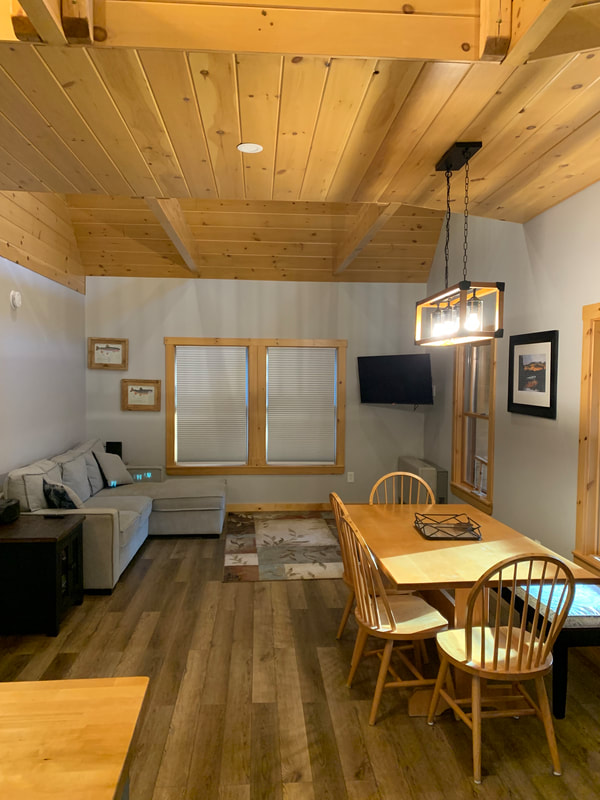  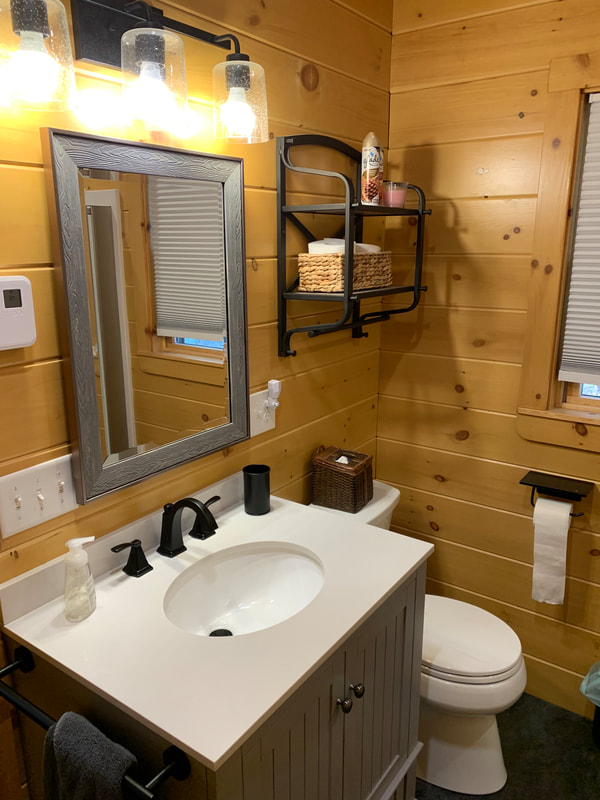 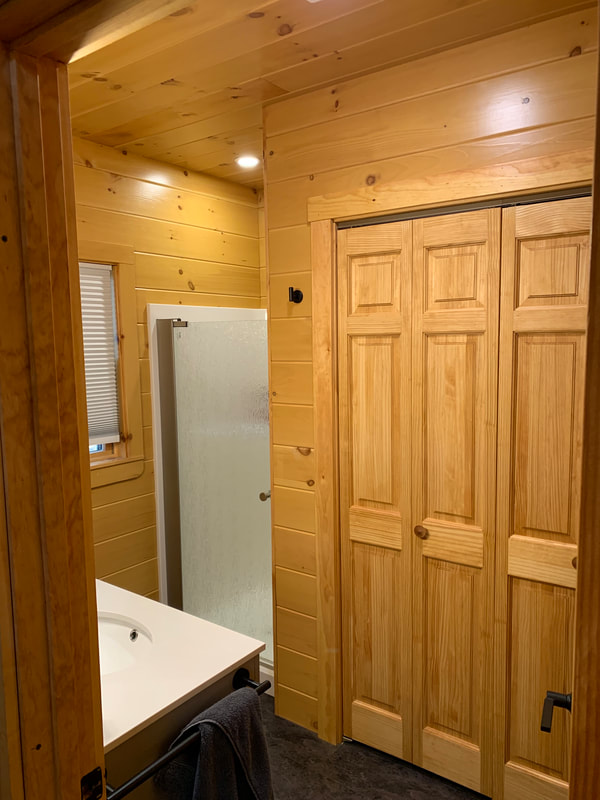 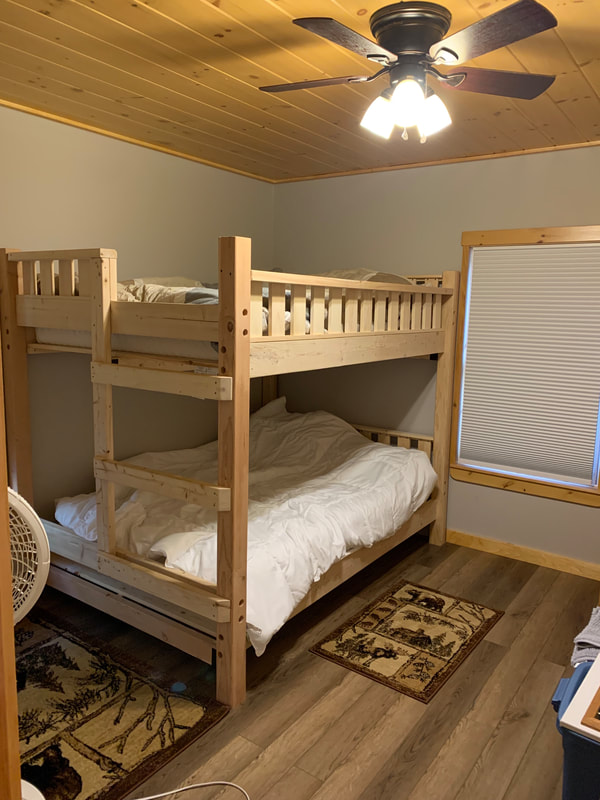 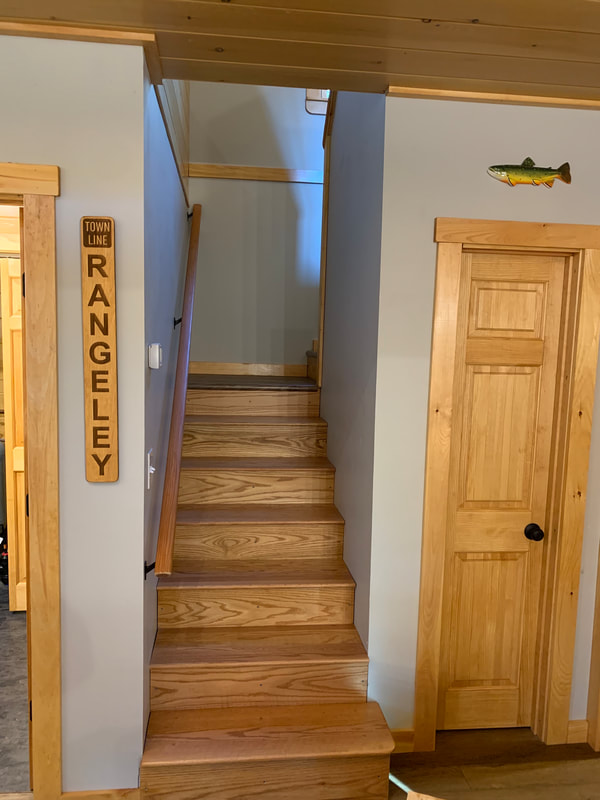 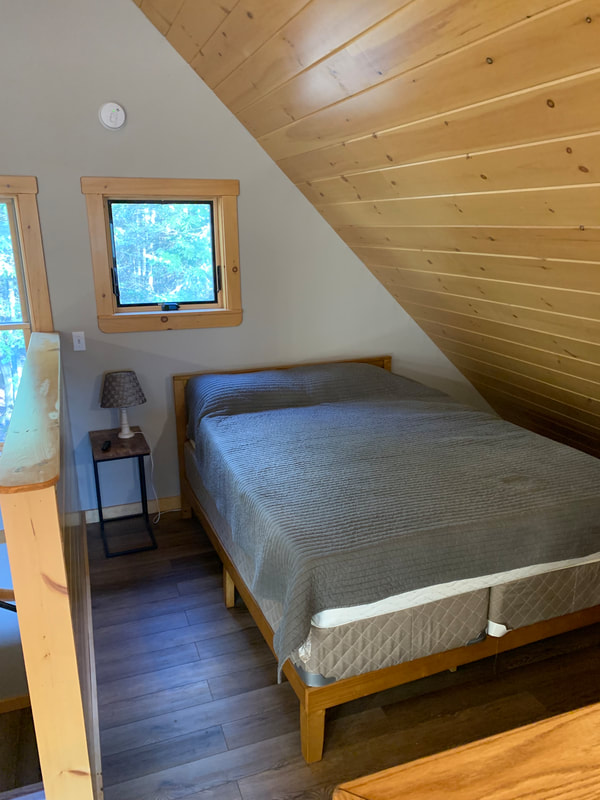 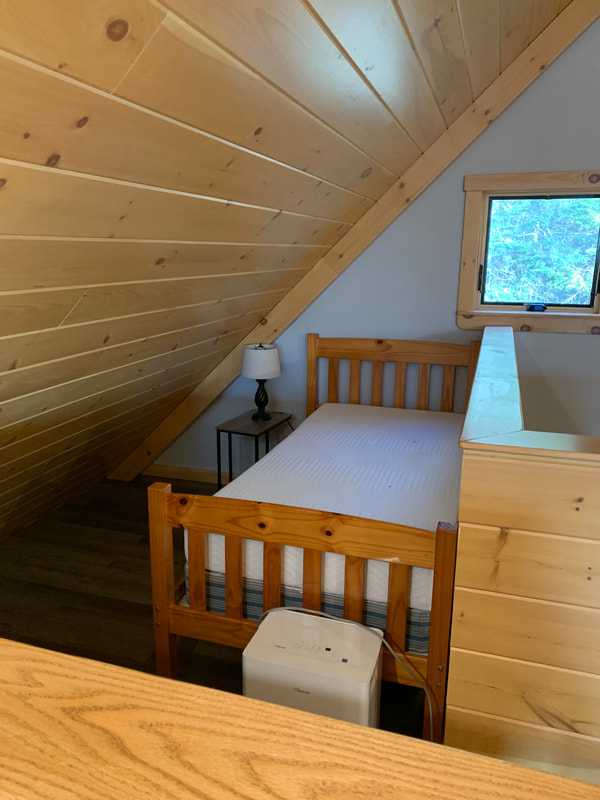 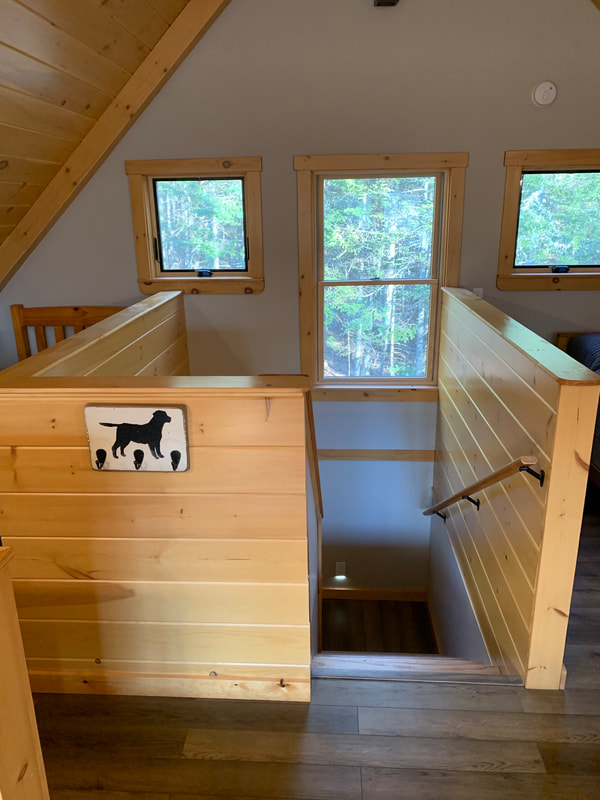 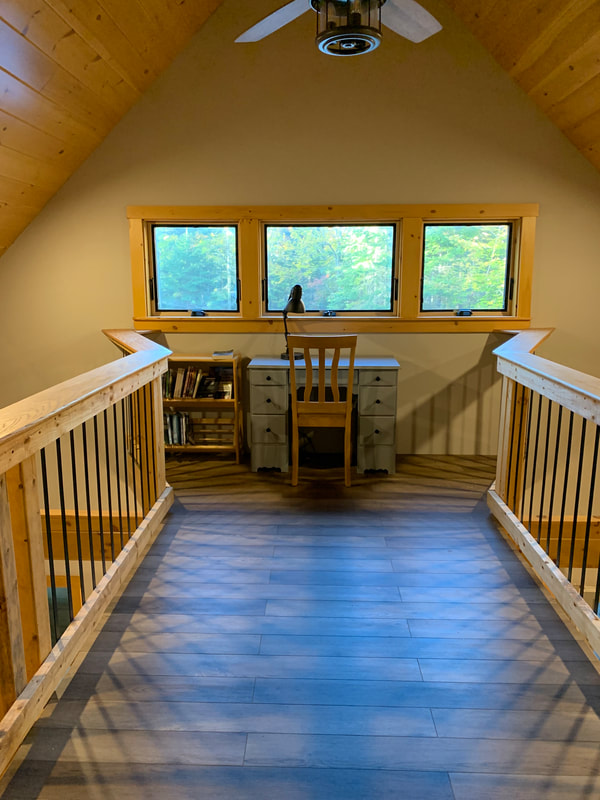 We had originally wanted to install a screened in porch, but because we are enjoying winter in Rangeley we decided to insulate and close off the porch. We have an electric baseboard heater, which we turn on when we're there to dry out our wet gear. It's such a special place. I hope I'm able to share it with many folks for years to come! 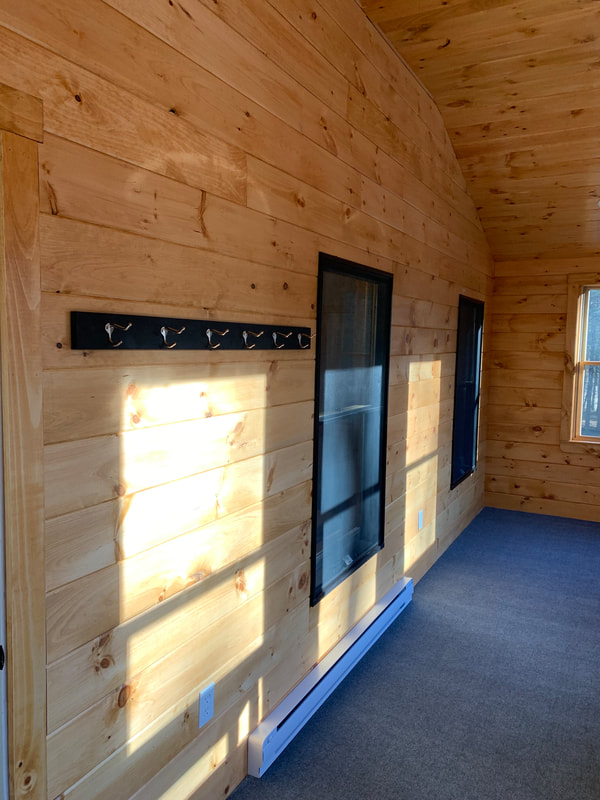 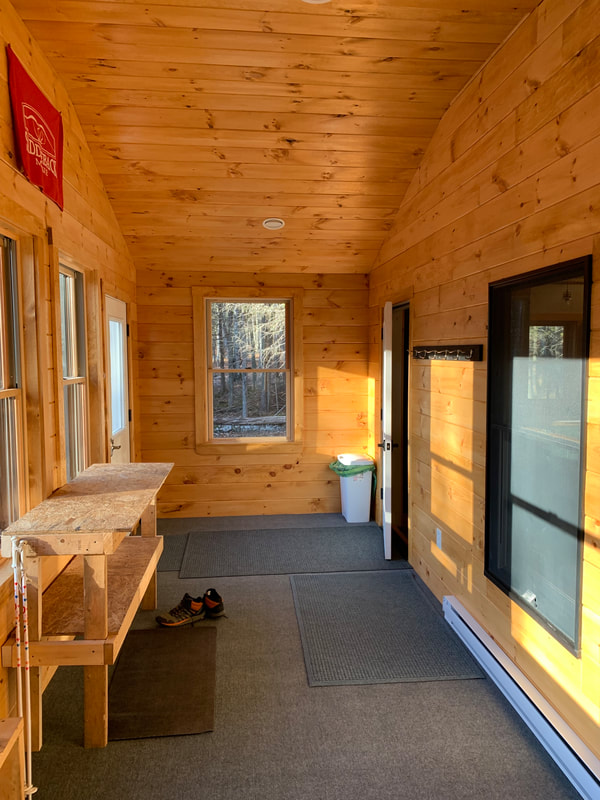
1 Comment
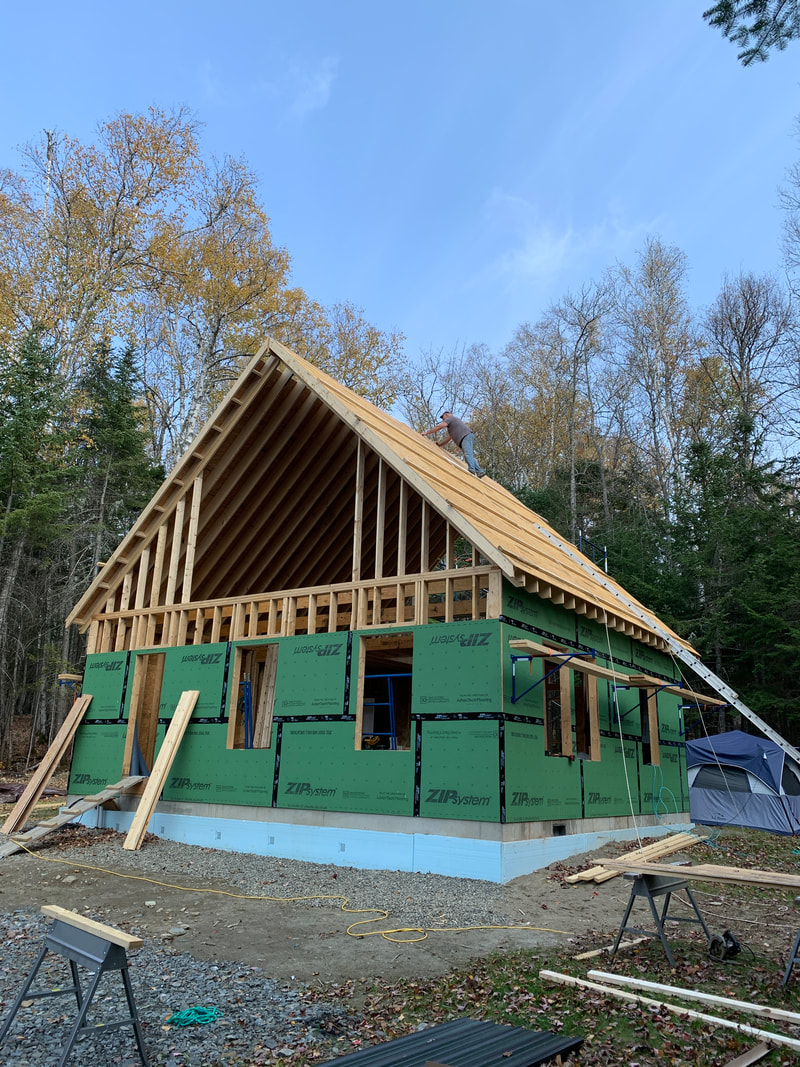
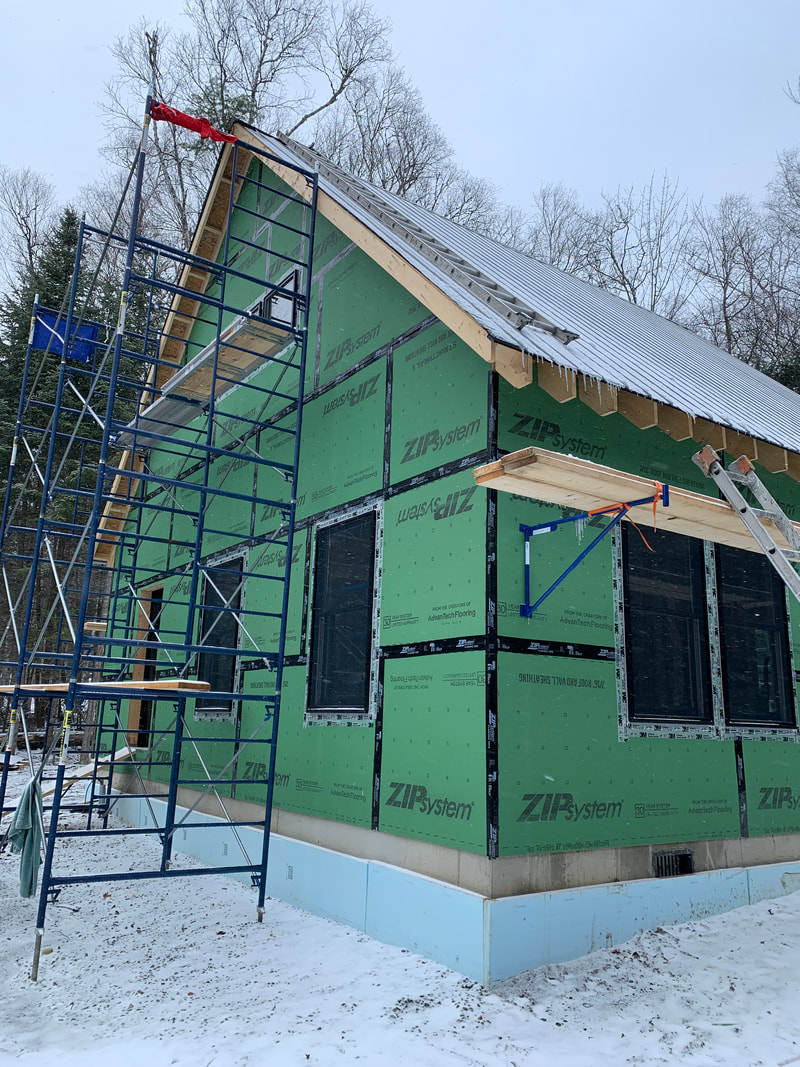
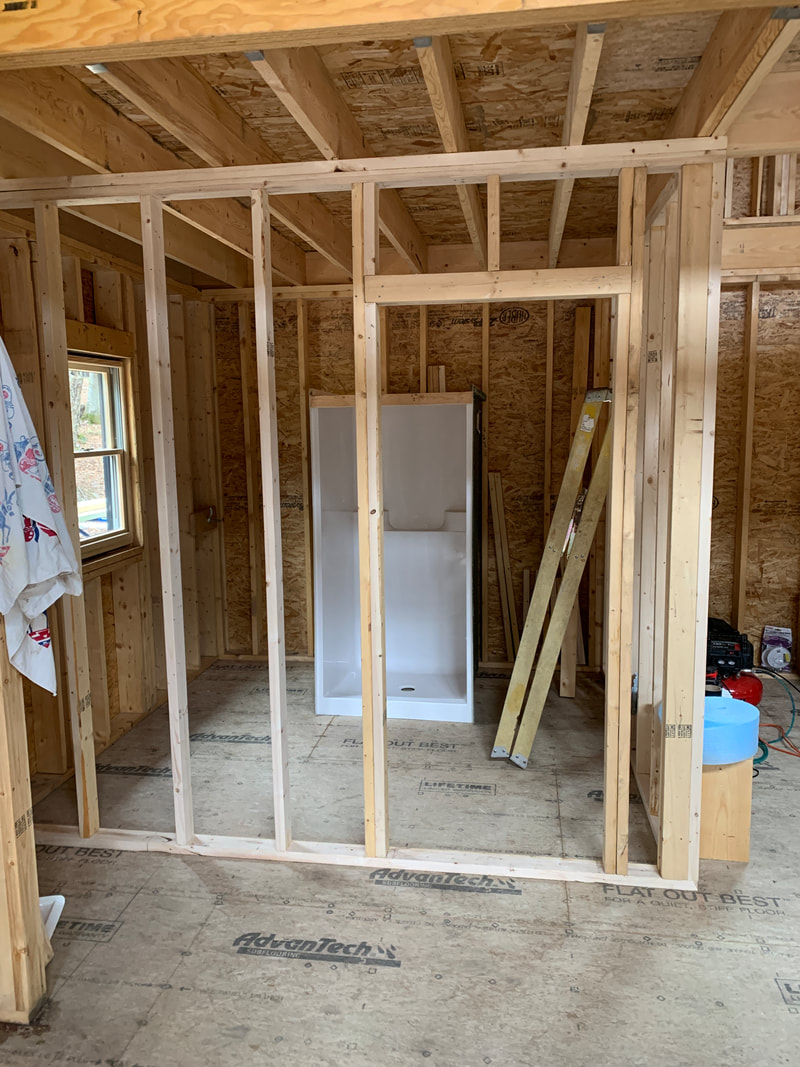
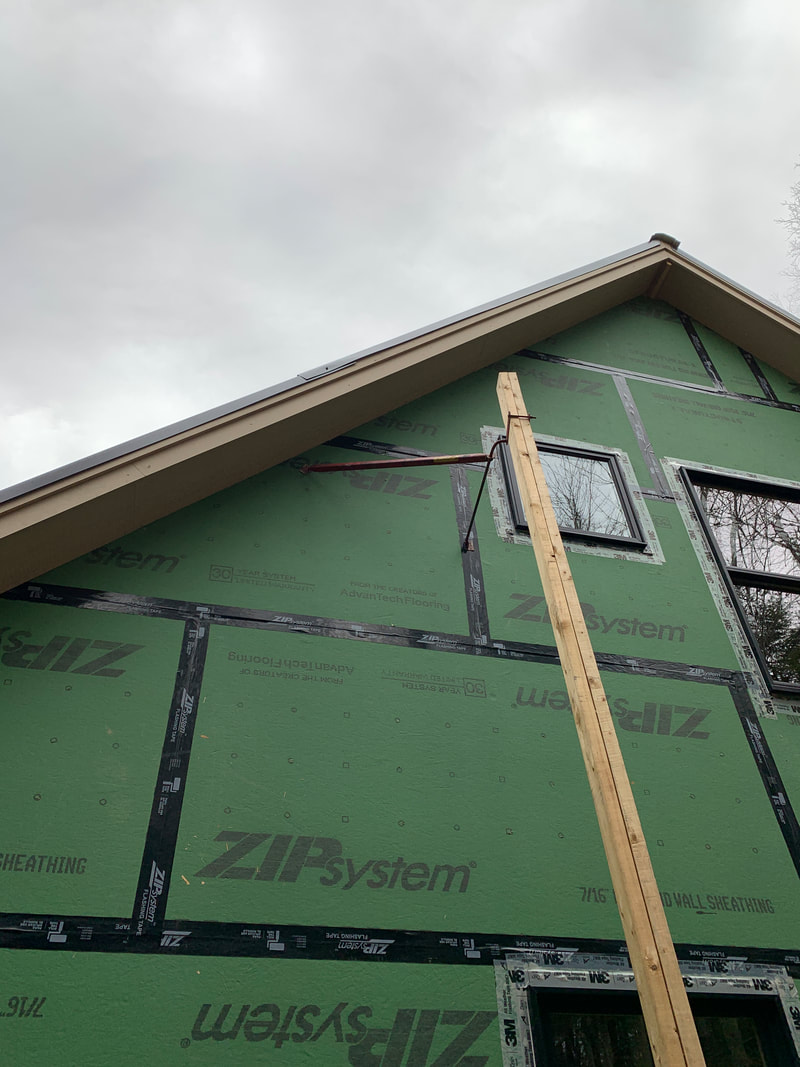
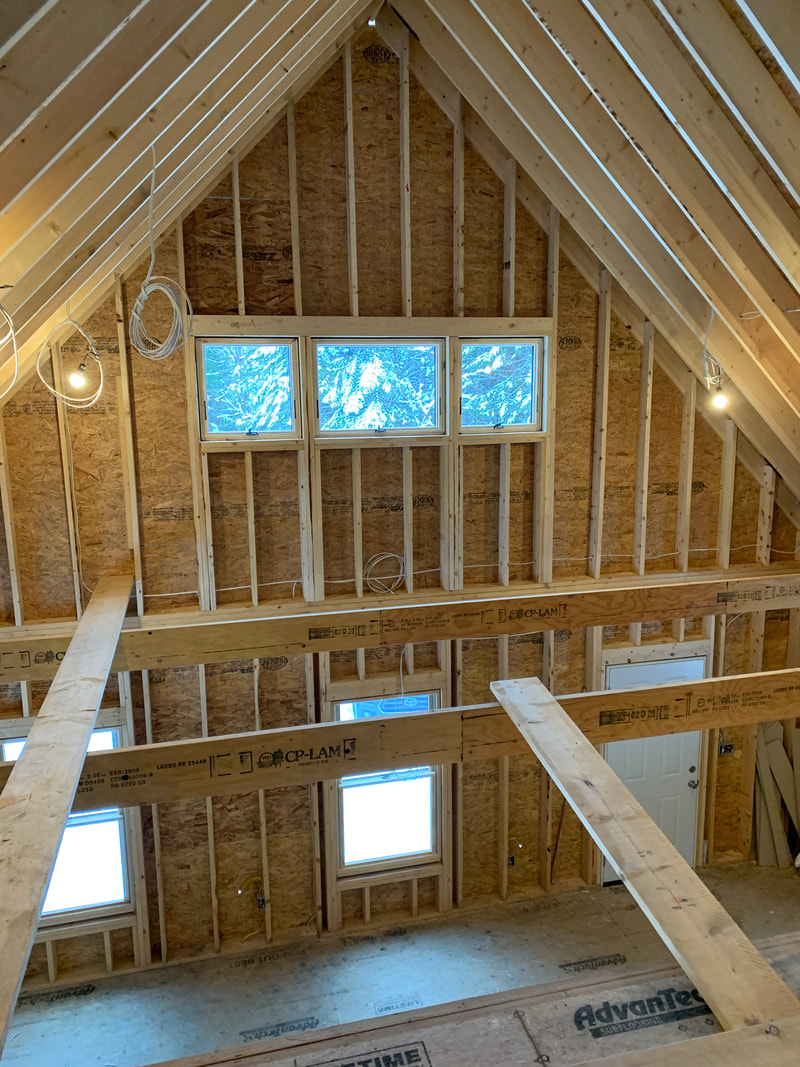
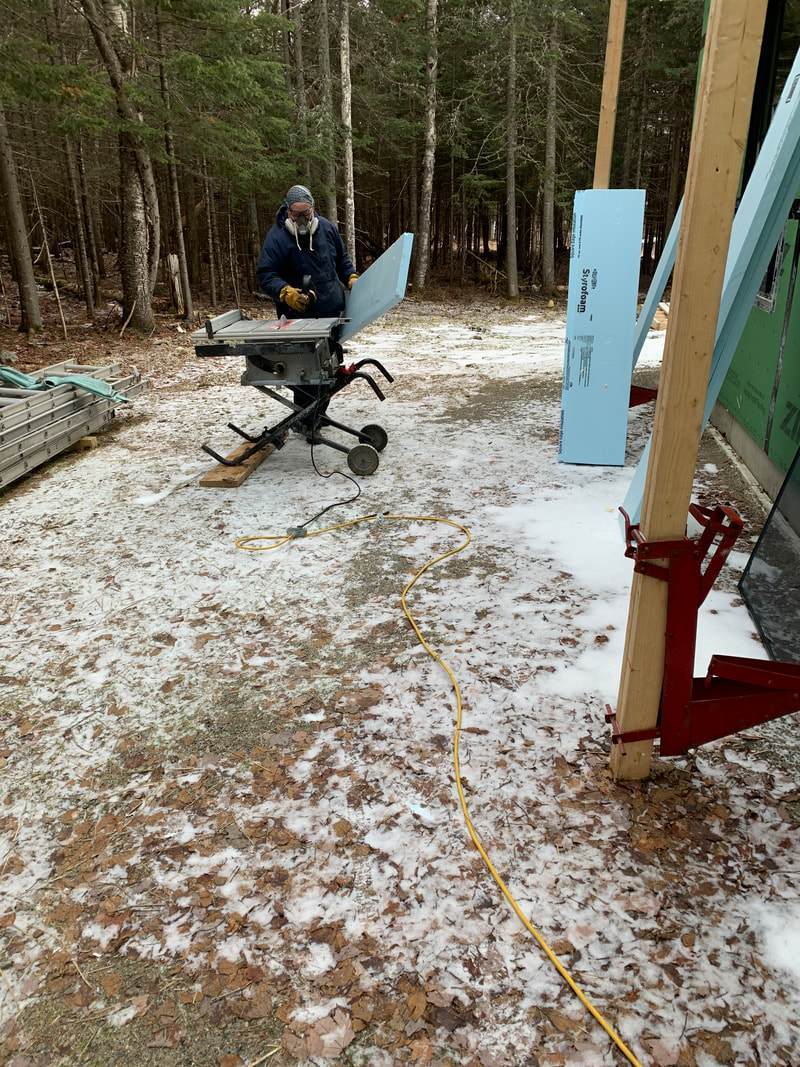
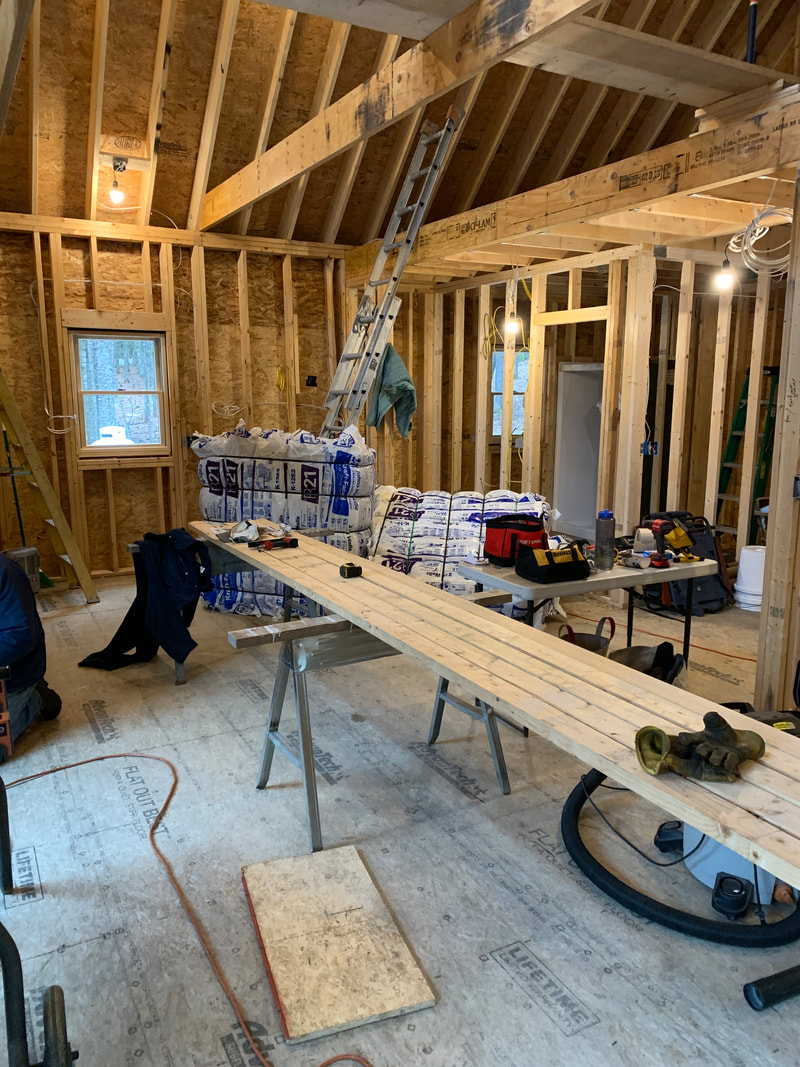
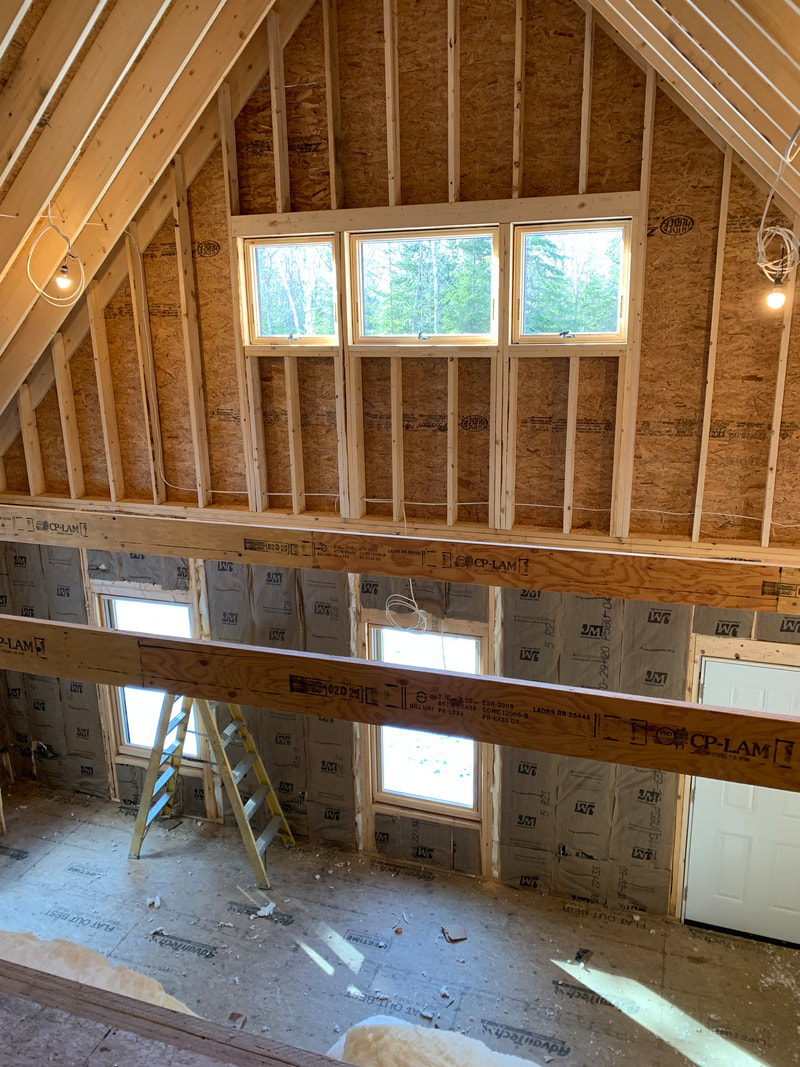
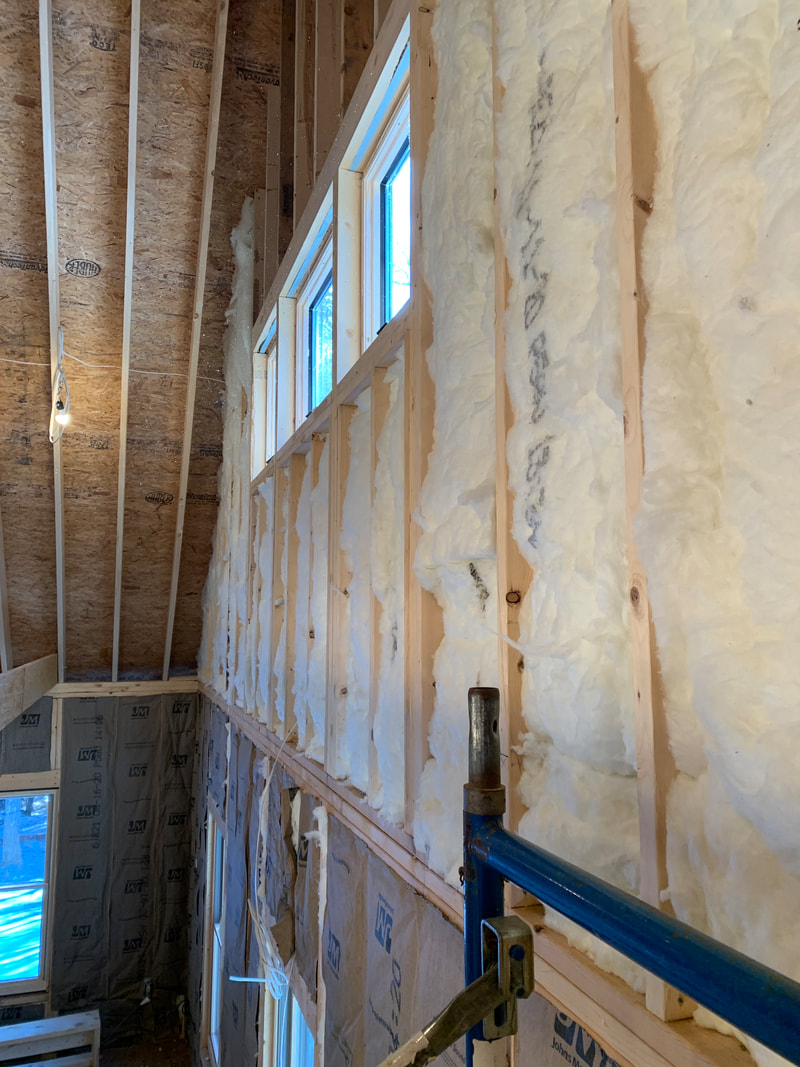
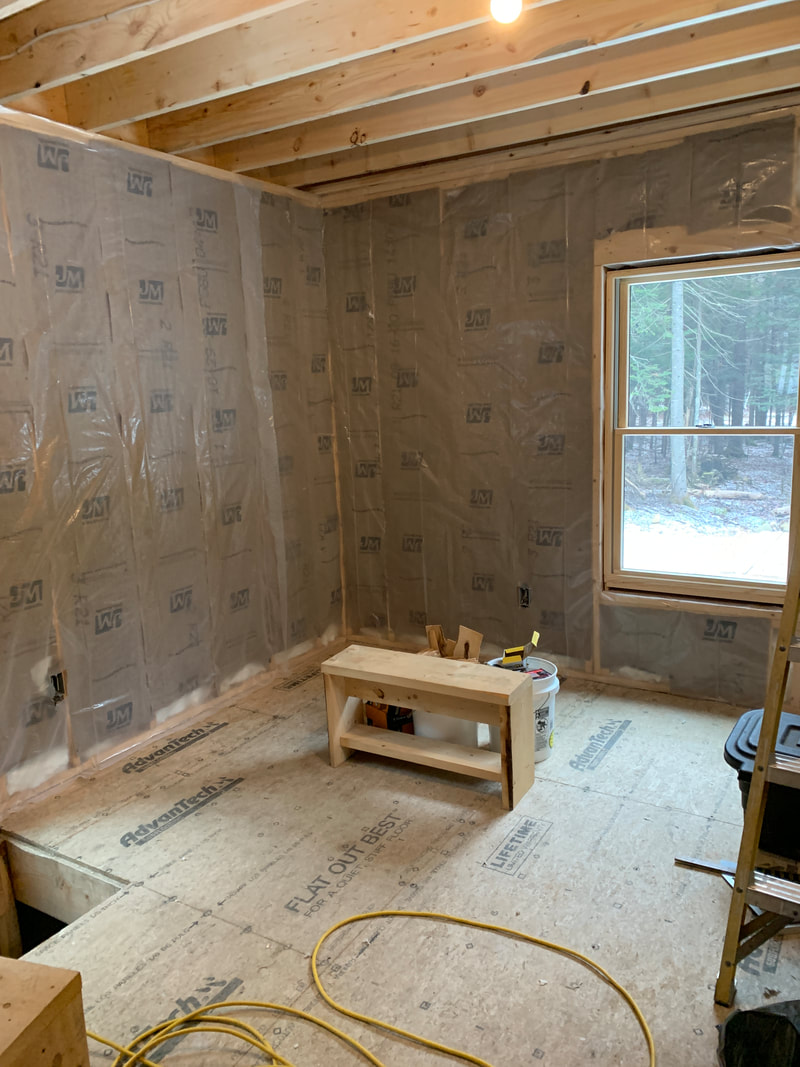
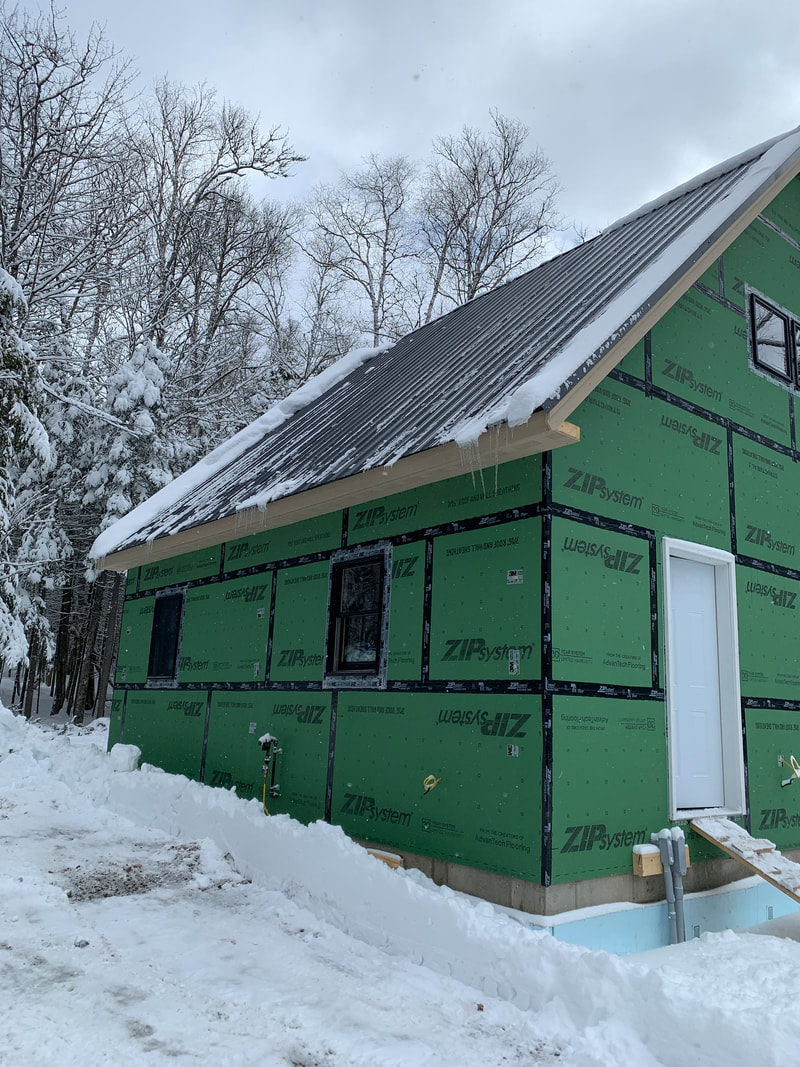
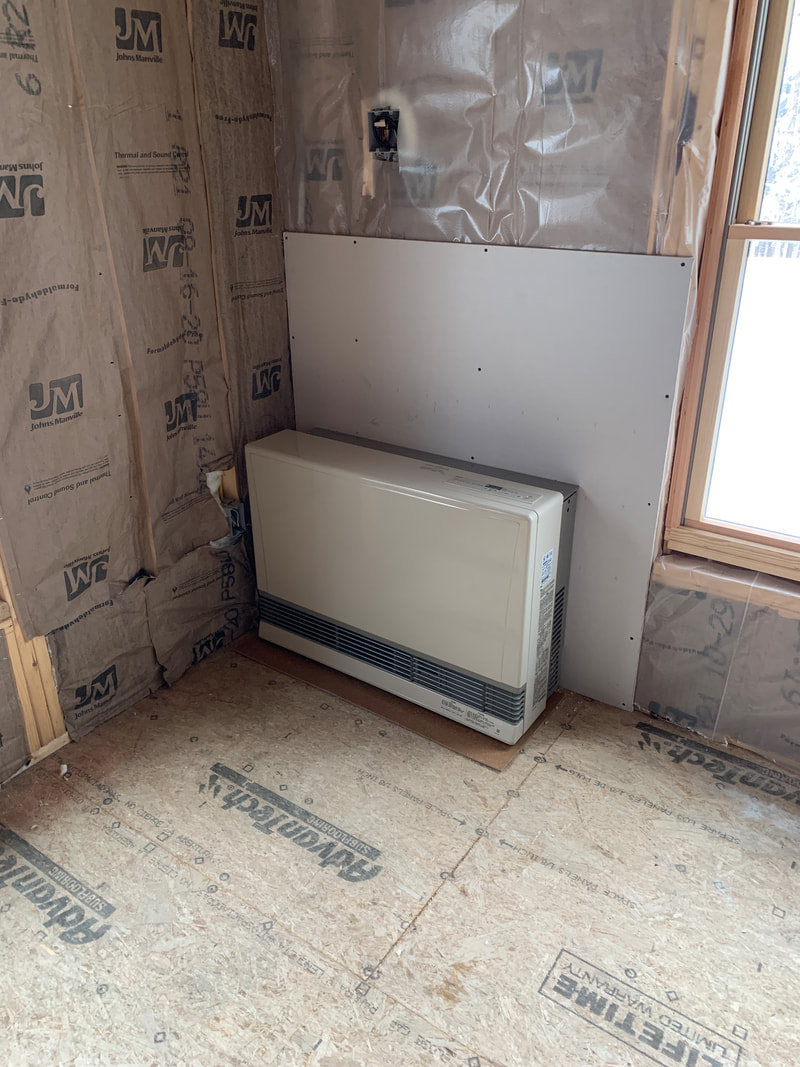
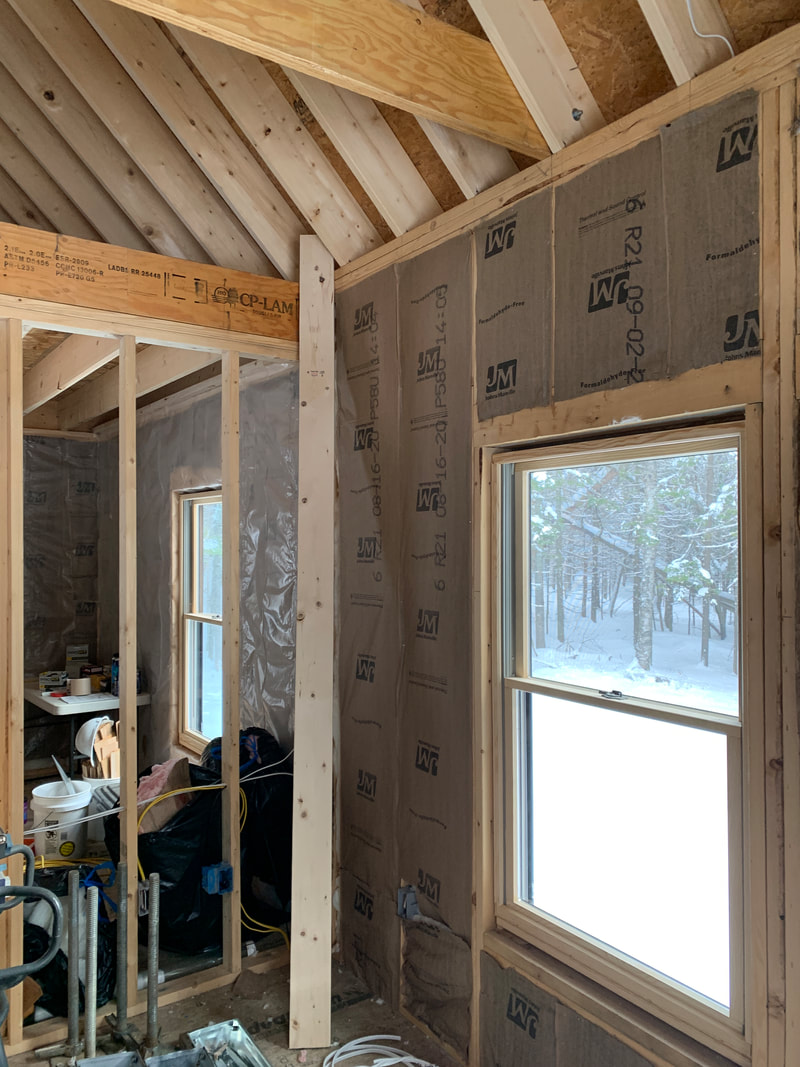
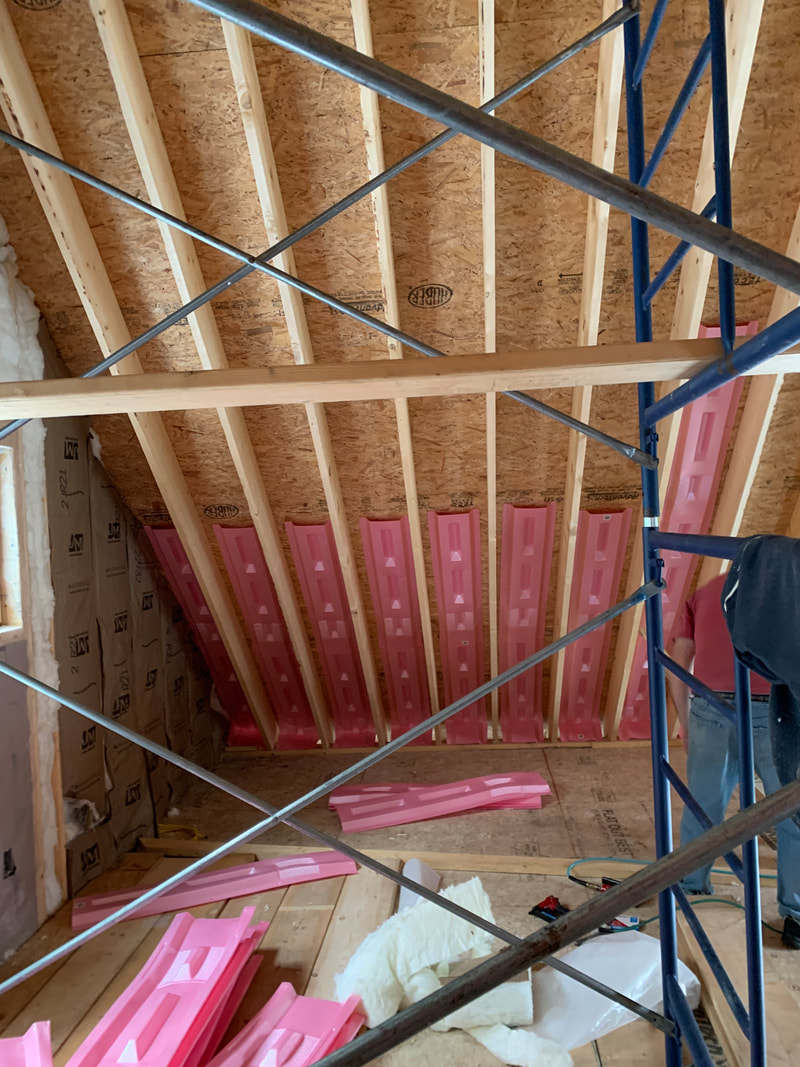
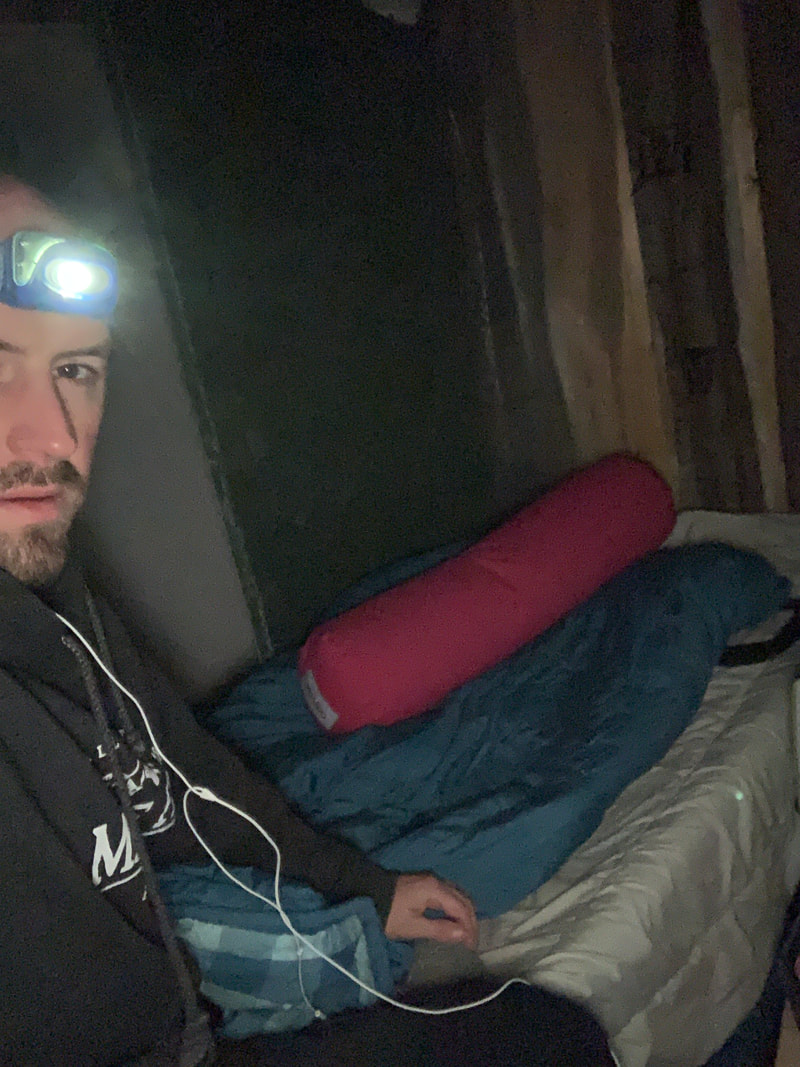
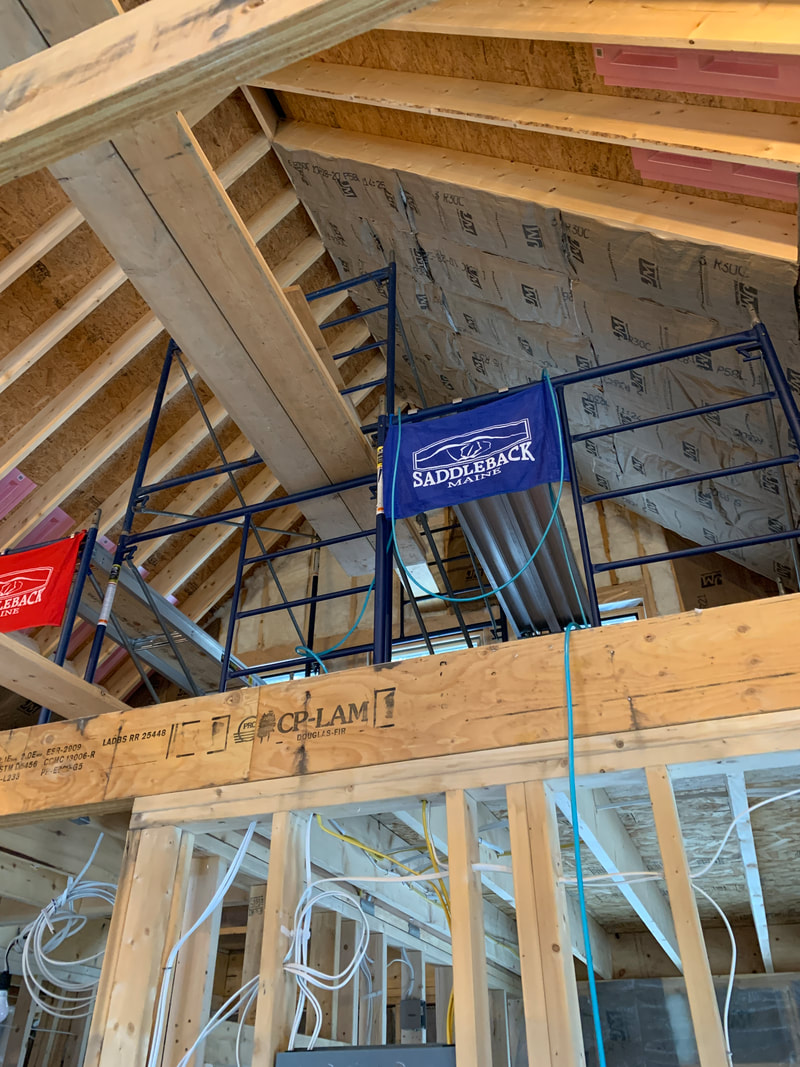
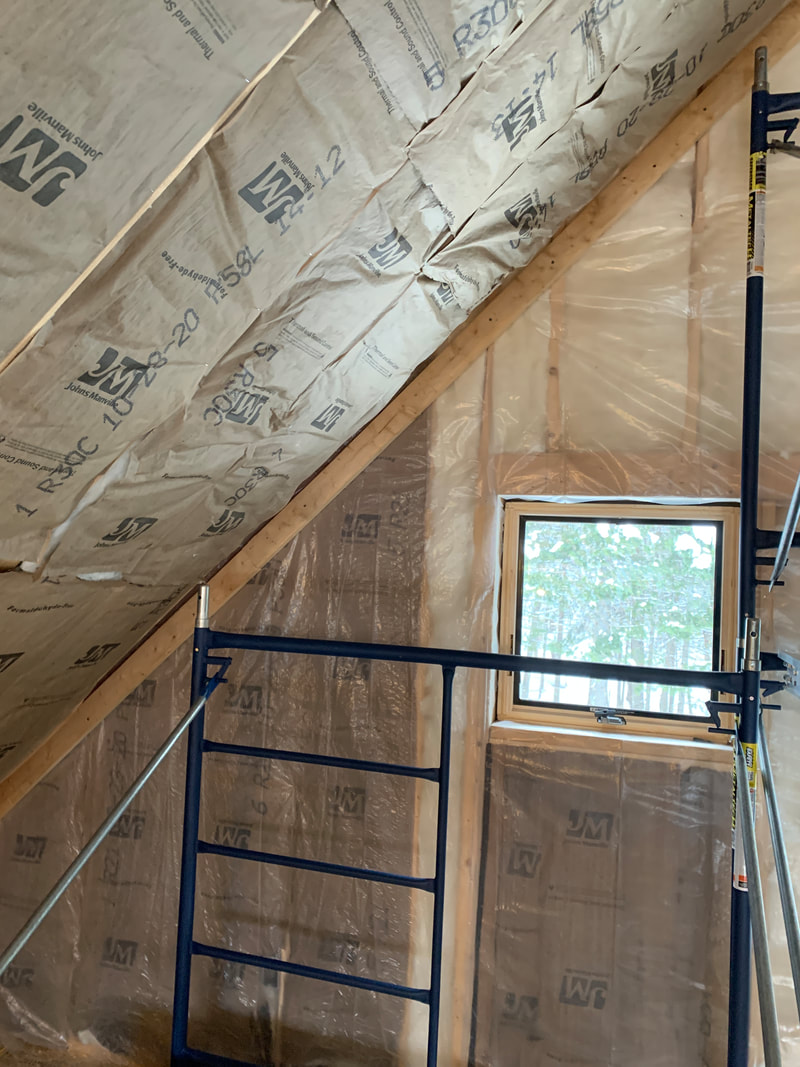
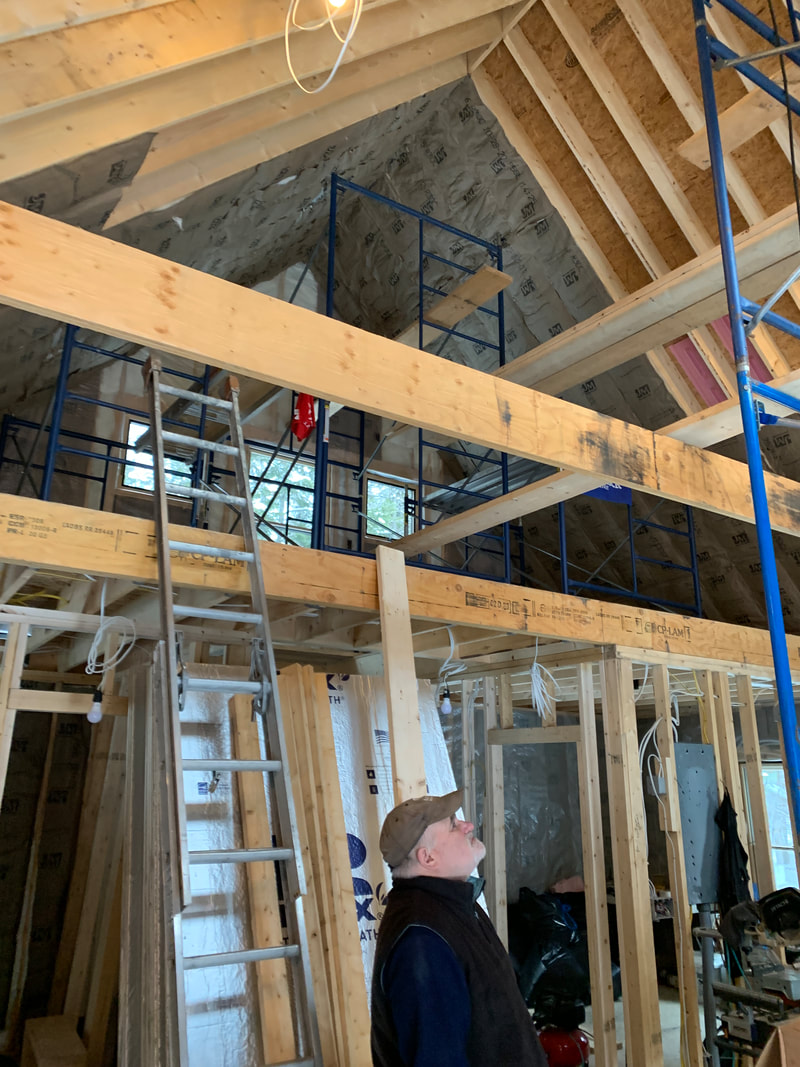
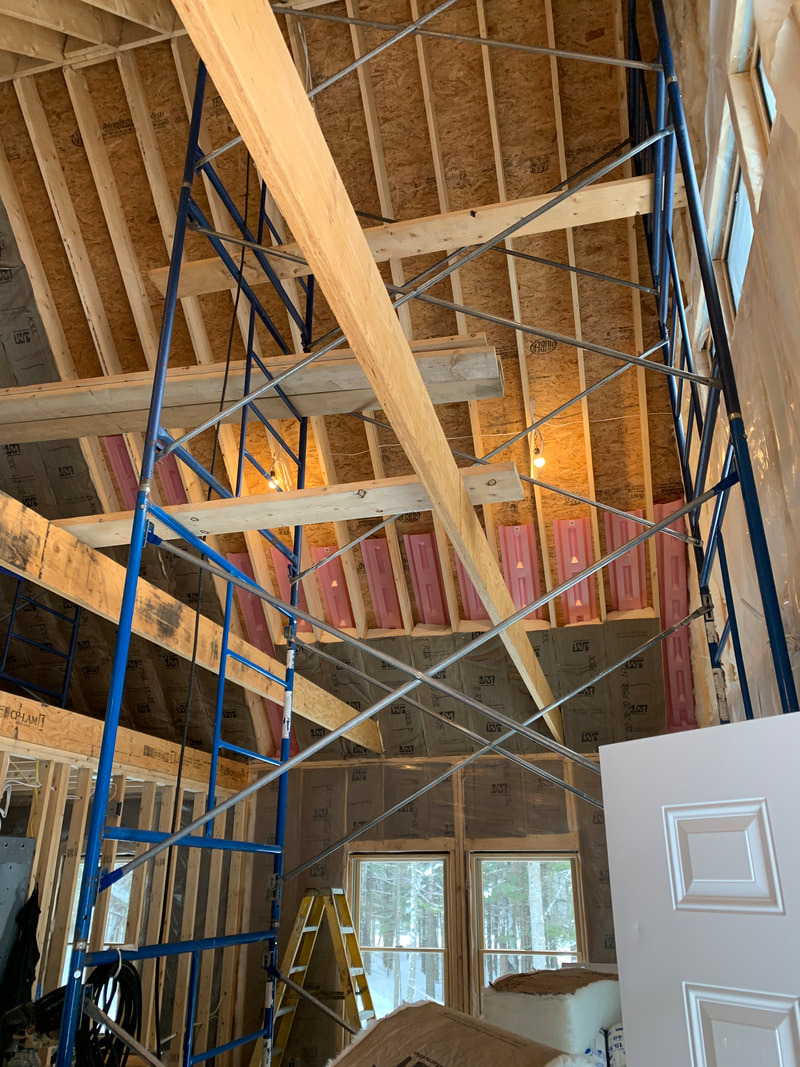
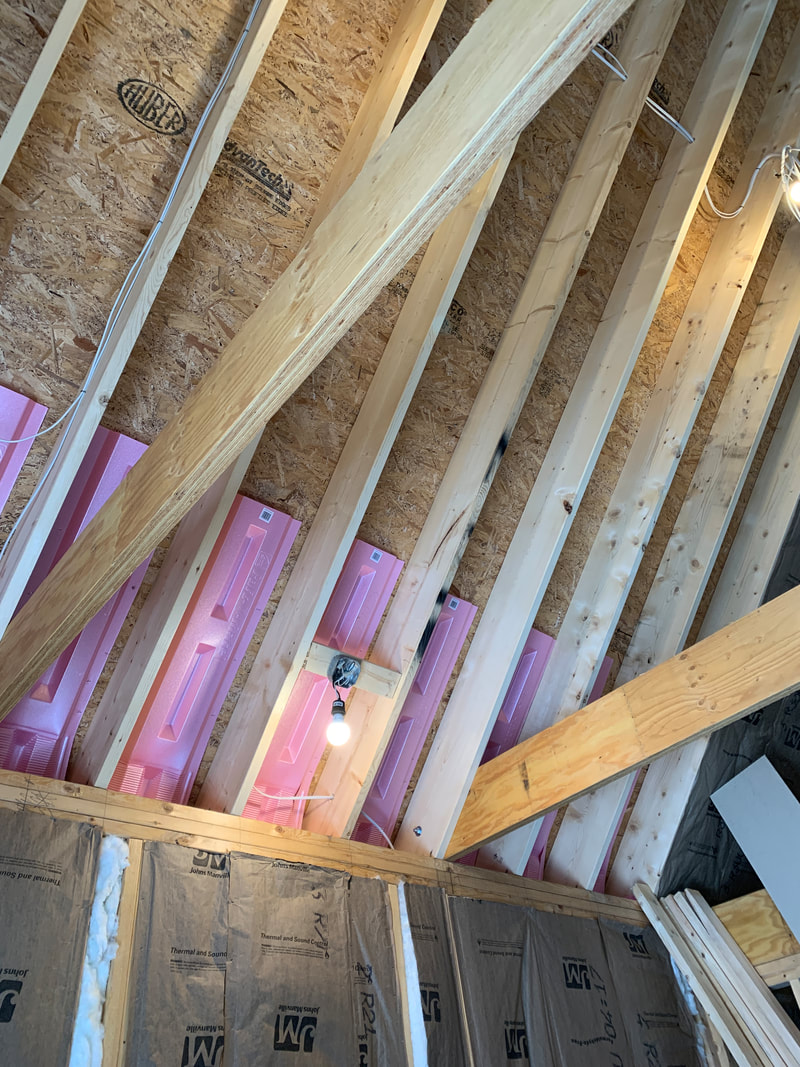
As the new year comes upon us, we're exciting about putting the finishing touches on the camp. We got so close to getting the finished porch on, but the weather held us up so we're waiting until the spring. The deck and stairs are on, but ultimately we'll have a full length enclosed porch with multiple windows. A great spot to hang out in the evening or sip your morning coffee, as well as hang up wet gear to dry out. We're hoping to finish the interior up this winter. We mostly have trim work to be done on doors and along the floors. A couple of closet doors need to be installed, stained and polyed. We'll put the finishing touches on our stairs and install a modern looking railing for the catwalk. If you haven't seen the catwalk, it's a 6 foot wide open hallway that goes from the back loft to the front of the camp. There's a fly tying desk with windows that overlook the front of the property. Great for deer viewing in the winter while filling up the fly boxes! The basement insulation is all complete and the camp is holding heat efficiently for the winter. We have a Rinnai propane monitor heater in the living room with electric baseboard heaters in the bathroom and bedroom. I found a cool product called MarCELL Pro that is hooked up to Verizon's wireless service and will alert me of any power outages or temps below 40 degrees in the camp. We intend on using the camp in the winter quite a bit and spending time over at Saddleback Mountain on the ski slopes! For those of you following, which is probably nobody, I apologize for the poor updates on the camp project! Between a busy fishing and guiding season, and just hammering through work, sadly this was not a priority for me, but now I have some time to go back and post pictures/updates. Several new and repeat clients stayed at the camp this spring as we had a full working bathroom, electricity, fridge, propane stove and beds available. A big thanks to those of you who stayed with me this spring in a half finished/half construction zone! If you're not familiar with my goal for the camp (cabin for those not from New England!), I plan on offering free lodging to folks who come fish with me for two days in the Rangeley region. My rates do not change. Instead of paying $300-$400 for two nights lodging in the area, why not spend that on a second guided day to increase your fly fishing skills and more shots at some of our big, native brook trout and landlocked salmon? My last post from the winter had pictures of us installing the roof insulation over the Raft-R-Mate. I'm going to post pictures in order from that last post below with brief descriptions. After we got the Raft-R-Mates up, we insulated the ceiling. I didn't love this process as a lot of insulation particles were constantly in your face, and wearing a mask with the heat rising from the propane monitor heater was not always a fun thing. We used a compression gun stapler which made the job a lot quicker than using a hammer stapler. We also opted for finishing the walls with plastic instead of using the paper insulation. It saved us money and it wasn't any more time consuming. 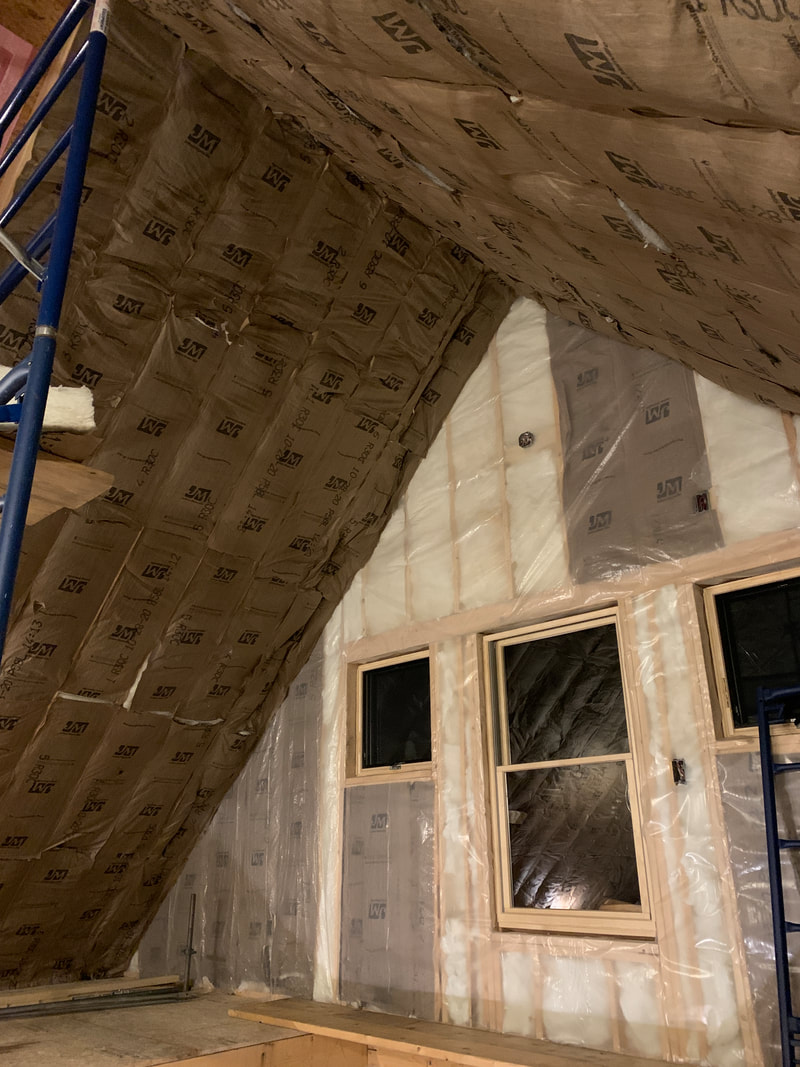 We used one inch foam board over the R30 ceiling insulation to increase insulation. You can see that we used our T-square to draw lines down the studs so we'd know where we were nailing. 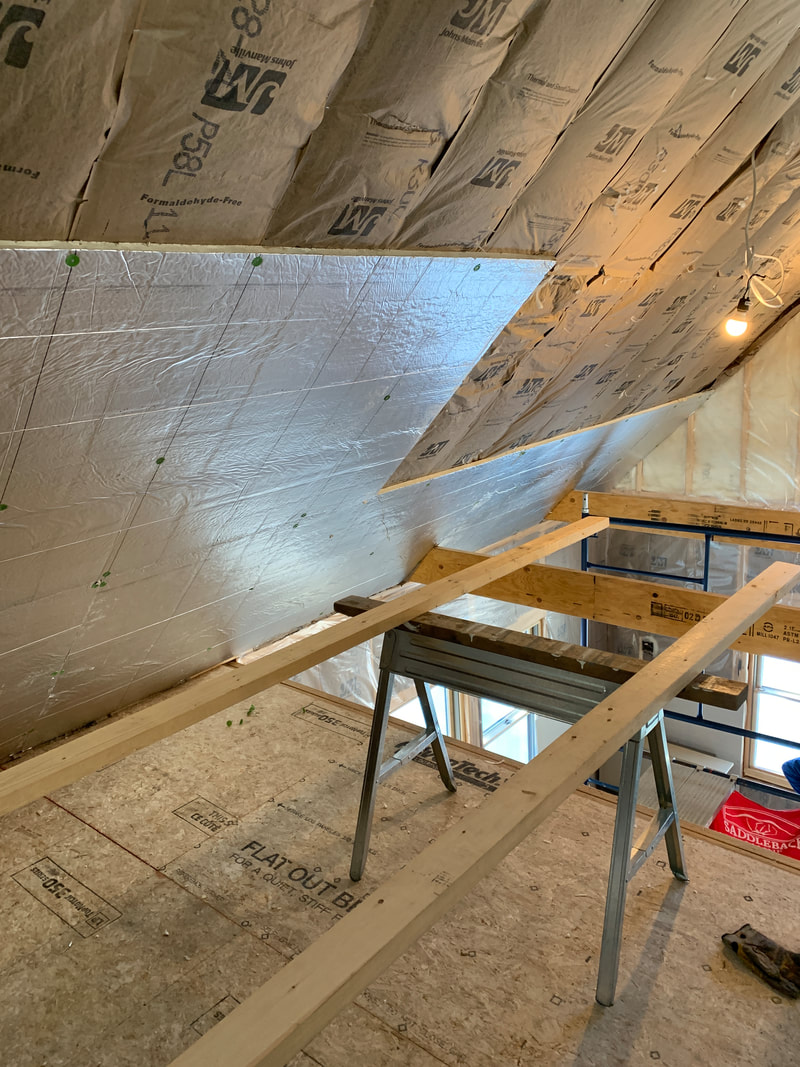 This picture was taken in January after a decent snowstorm. The insulation, black metal roof and 12/12 pitch are working as planned!  This picture below has the strapping added for our v-match that will go horizontally. The key with putting this stuff on is really screwing it down so that the foam insulation is nice and tight. The staging, which seemed like it was there forever, is where the "catwalk" will go. The catwalk is going to extend from the loft to the front of the camp to access the windows. It will be utilized as a fly tying area so folks can tie their flies the night before a trip and catch fish on them the next day!! 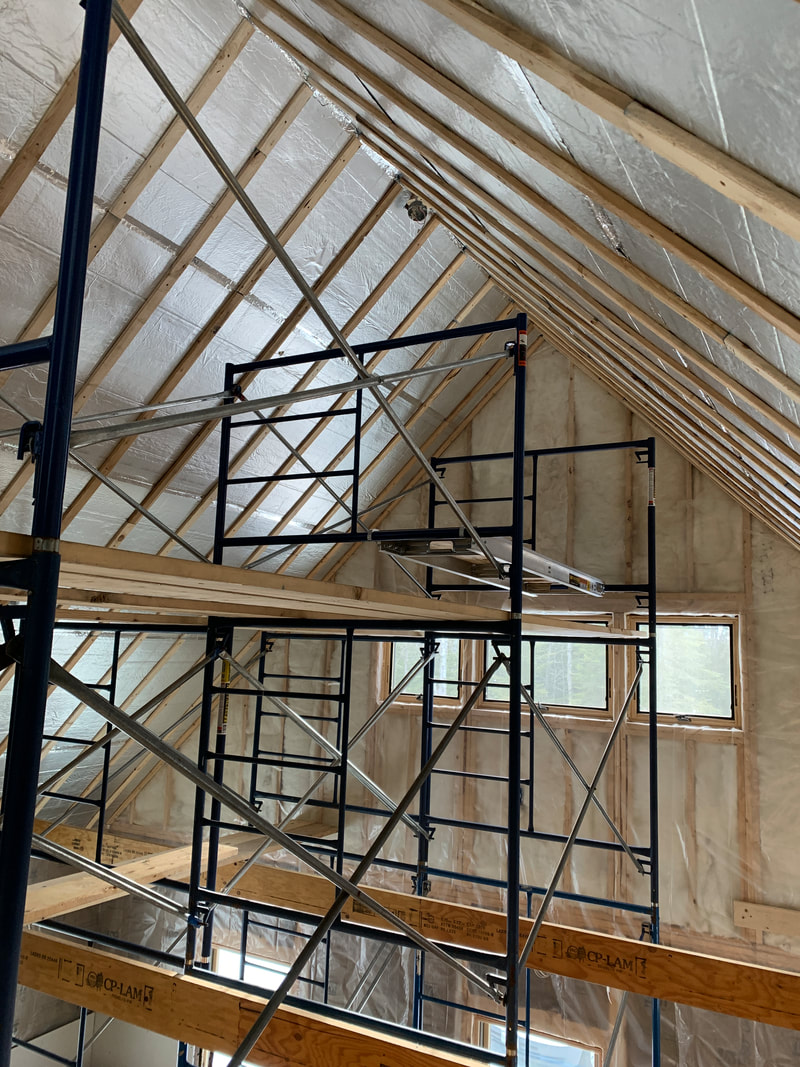 Next up was drywalling. I have to say, my LEAST favorite part, was by FAR doing the drywall. John and I didn't have much experience with it. Hanging wasn't too bad, but our inexperience showed when it was time to mud. We hung the drywall sheets on some walls from bottom to top, and that left us with 3-4 inch strip on top, which just meant more mudding. You SHOULD hang from top to bottom on 8 foot walls, so if there's any gap it'll be on the bottom where you put baseboard trim! Thankfully, my friends Lane and Jeff are more experienced with drywall and they did almost all of the mudding. They did a great job, but unfortunately had to leave after 2 days, which left me with doing a good bit of sanding and "attempting" to feather out the rest of the seams. I virtually had no idea what I was doing, so I probably sanded a lot more than I needed to, which led to some long nights (as you can see in the last picture). In hindsight, I really should have hired out drywall to professionals and let them do their thing! 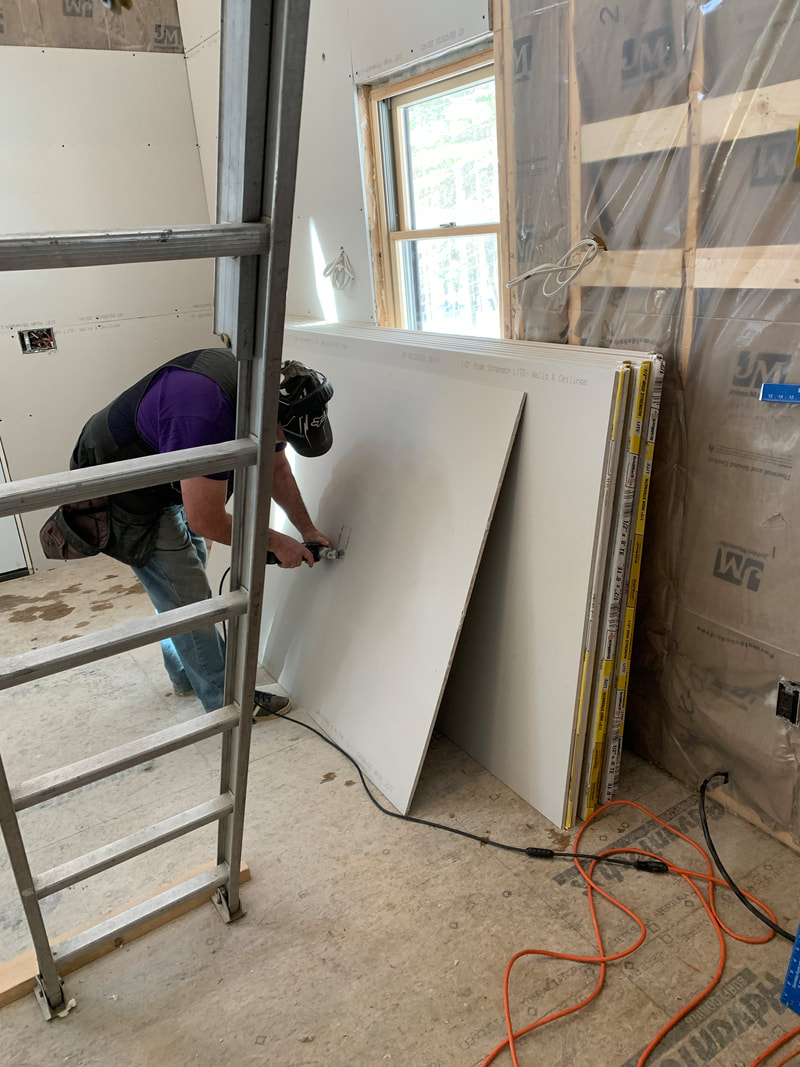   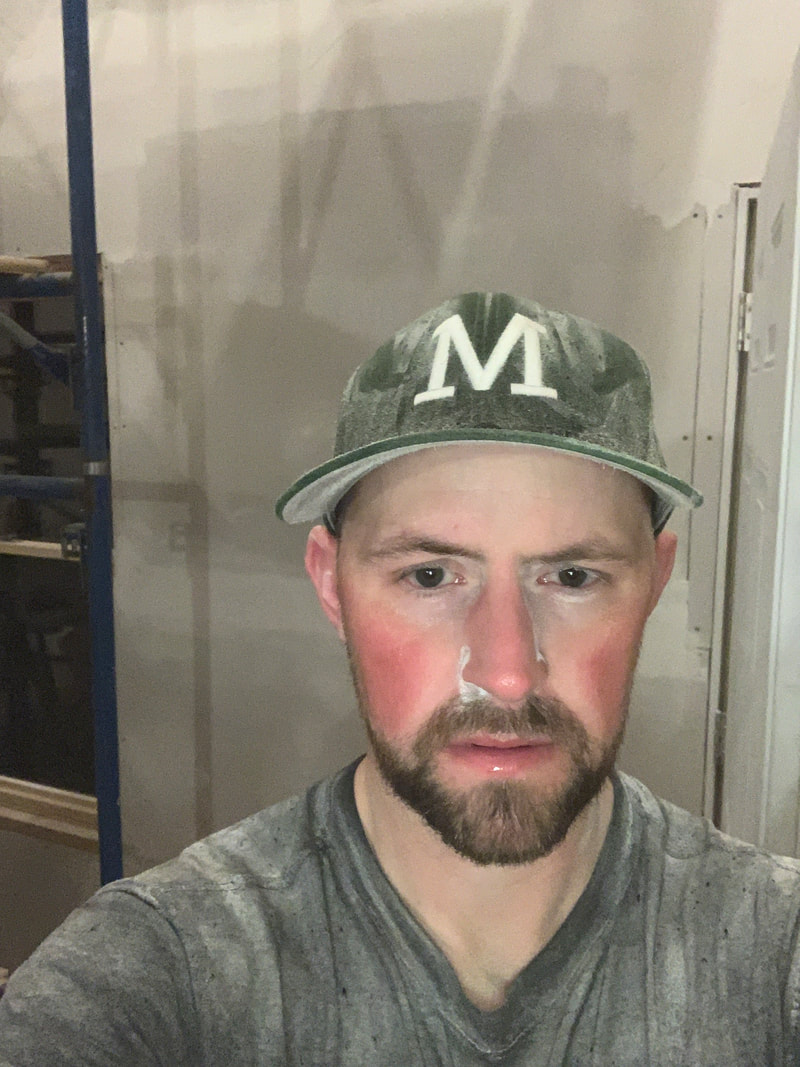 Our stairs to the loft are in the back of the camp in between the bathroom and the bedroom. They go up on the left side to a landing and then up on the right side to the attic. There will be a closet door underneath the right side and room for additional storage underneath the stair landing. Notice the placement of the Advantech slogan on the top of the left stairs. Maybe they'll give us an endorsement ;0) 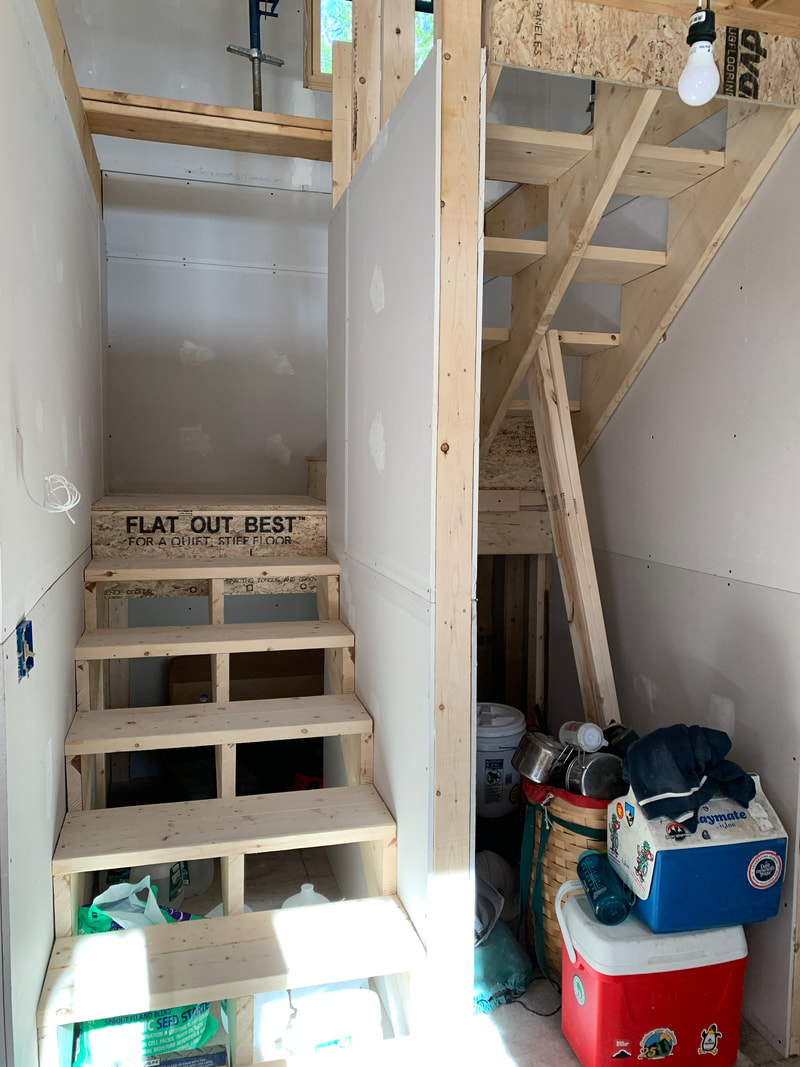 We ordered prefinished v-match pine in a honey oak color. If we had to stain and poly all of the boards, it would have taken us weeks. We also did not have enough room to work on boards and let them dry. The camp is about 850 square feet with the loft, so it's tight. The tricky thing was storing this stuff outside during the months of March and April, but it held up great off the ground and stored under tarps. After getting around the LVL beams, getting this stuff up went pretty quickly. One guy cutting and passing up boards, and two guys nailing it in. We had temporary lights put in and then went with these flushmount lights which were way easier to install than recessed lights. 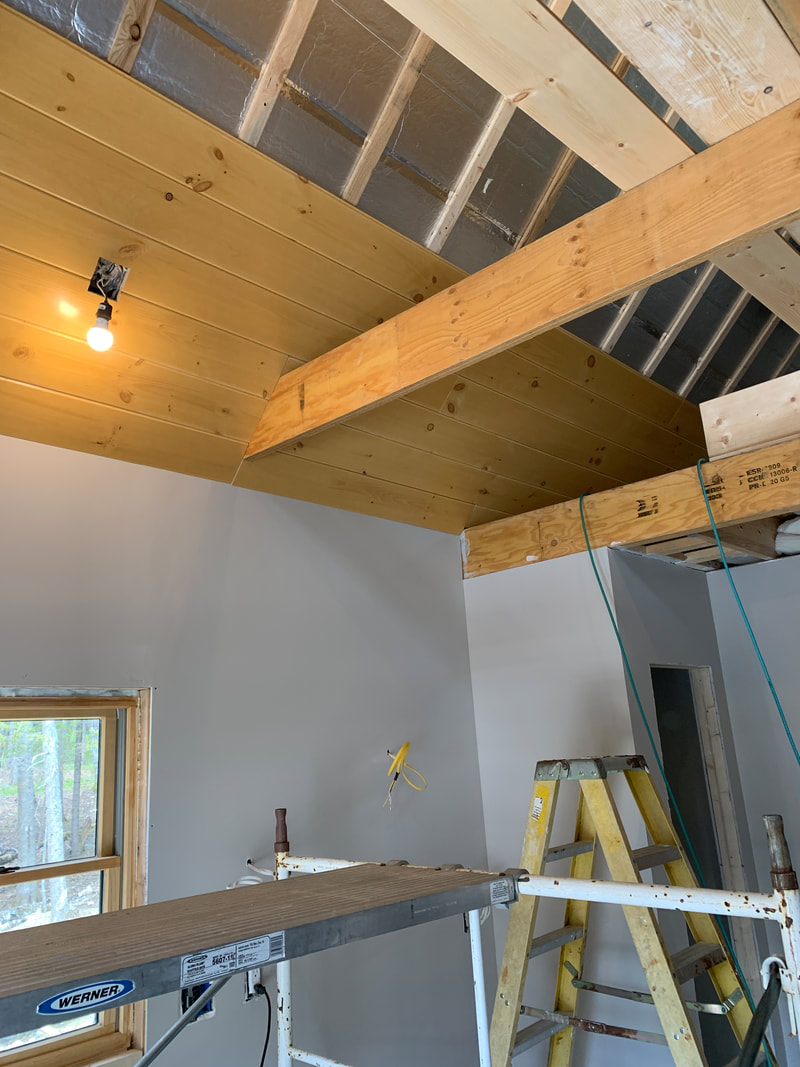 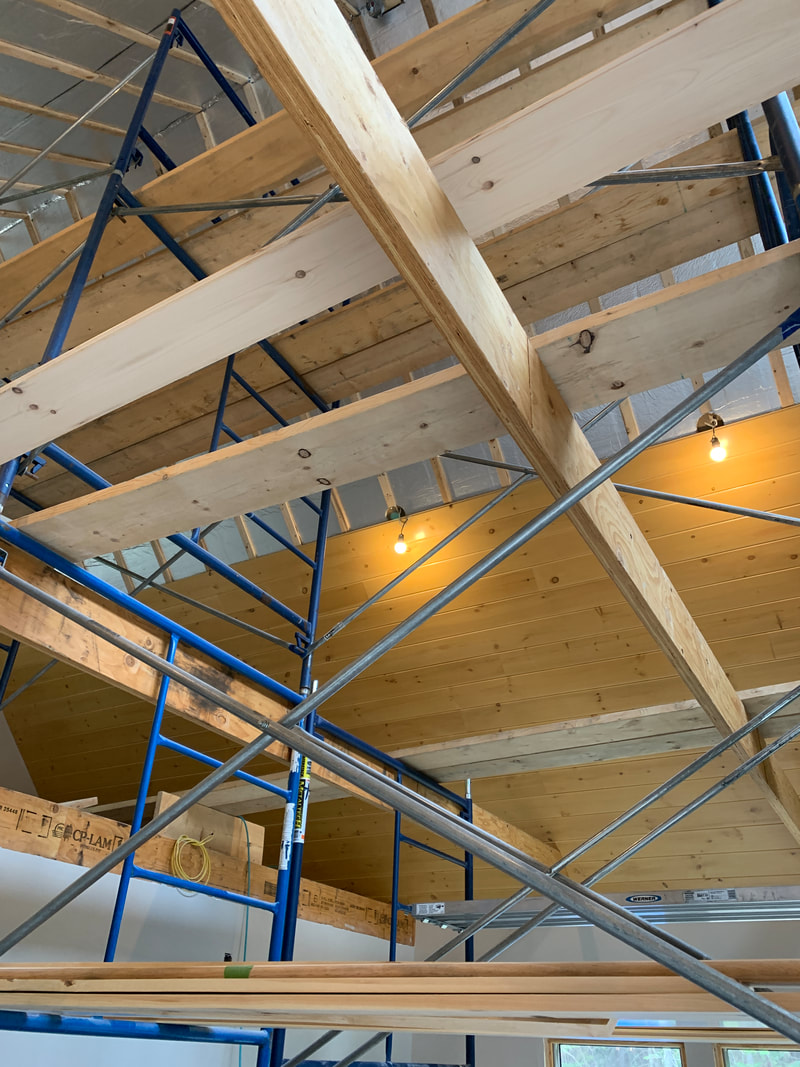 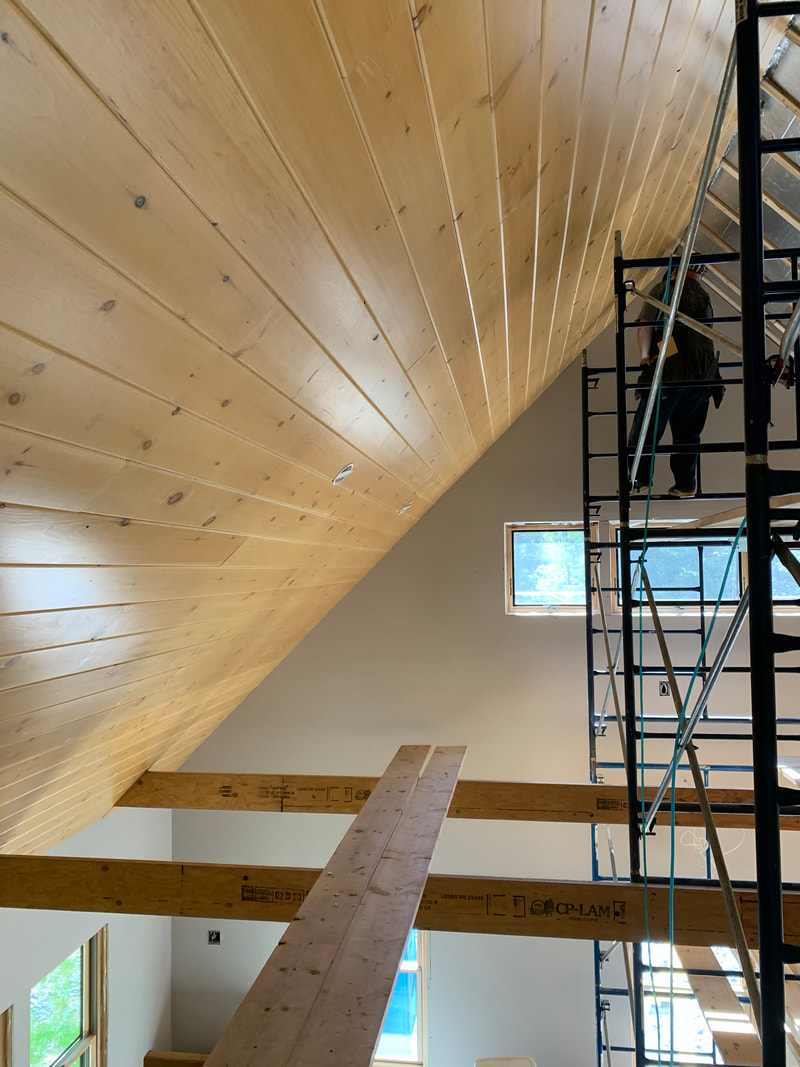 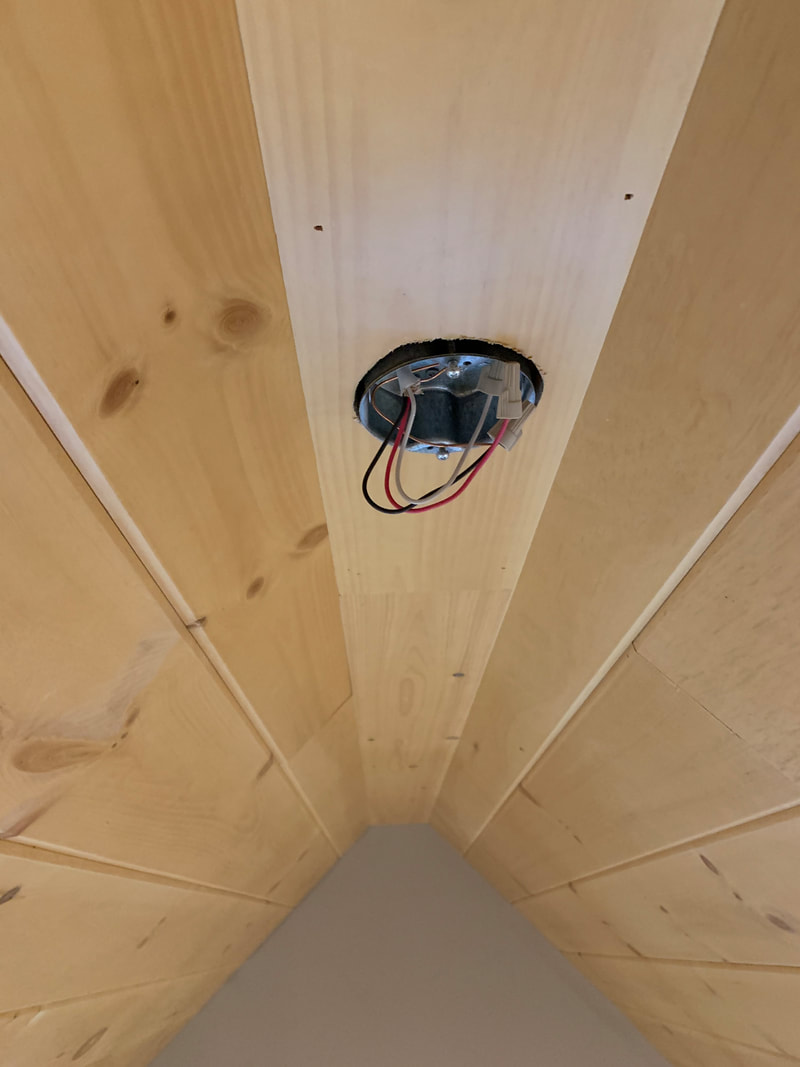 We had actually painted before putting up the ceiling. We went with a color that was a light grey/white. It's actually really close to the color of drywall and it looks great with the honey pine v-match. After painting the bedroom, we put up the v-match ceiling in there. There will be a ceiling fan in the bedroom with a dimmer light switch and dimmer fan switch. We bought a lot of the v-match and are utilizing it for everything. The bedroom also has the trap door for the basement with a closet for clothes and storage. 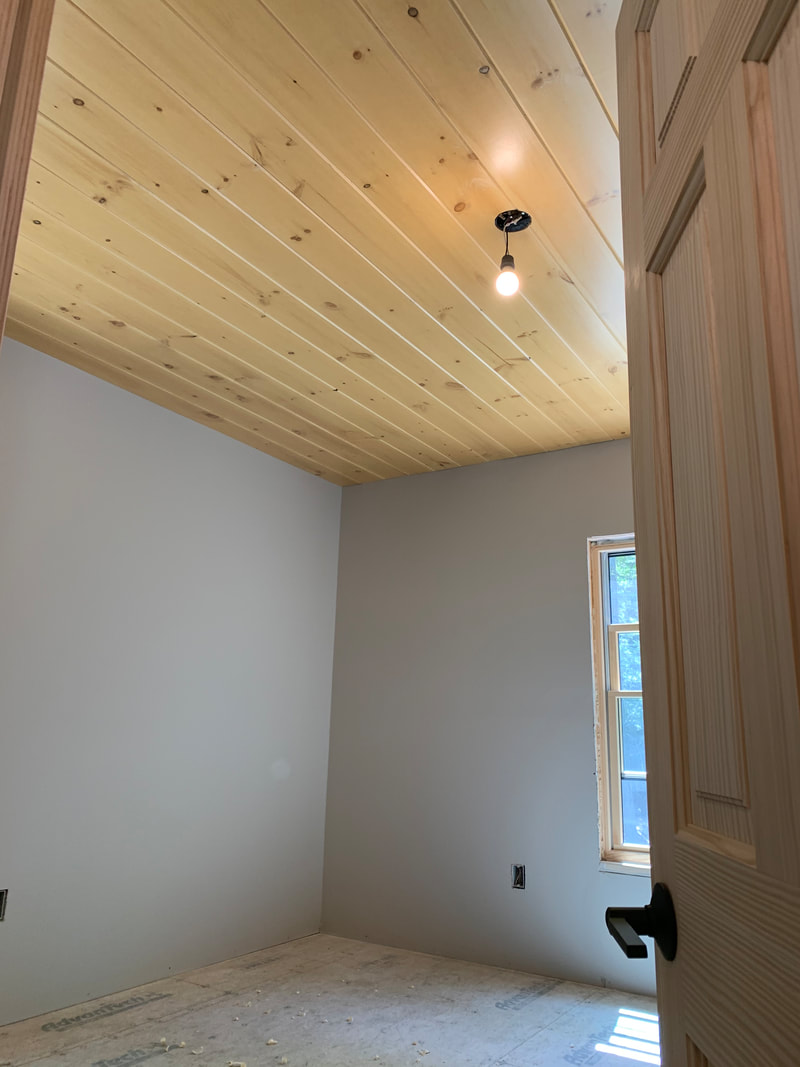 We finished the bathroom in v-match and used WIDE vinyl plank flooring, which I highly recommend because it just means less work. We were able to fit a 30" vanity with the toilet in the corner. We installed a glass sliding door for the shower also. Our window trim throughout the house is made from the v-match scrap, so that was great not having to stain and poly trim. Our systems are pretty simple with a pressure tank and a Rinnai on-demand water heater. There is some arsenic and manganese in the water, so we'll be putting in a whole house filtration system as well, but I just bring up 5 gallon jugs to put in the Primo Water Cooler Station for warm and cold, safe drinking water which is in the pantry in the kitchen! All of the pipes are designed with valves to shut off in case if I want to quickly drain water before leaving camp in the winter months. I'm not sure yet if I'm going to leave heat running or not for this upcoming winter when I'm not there. 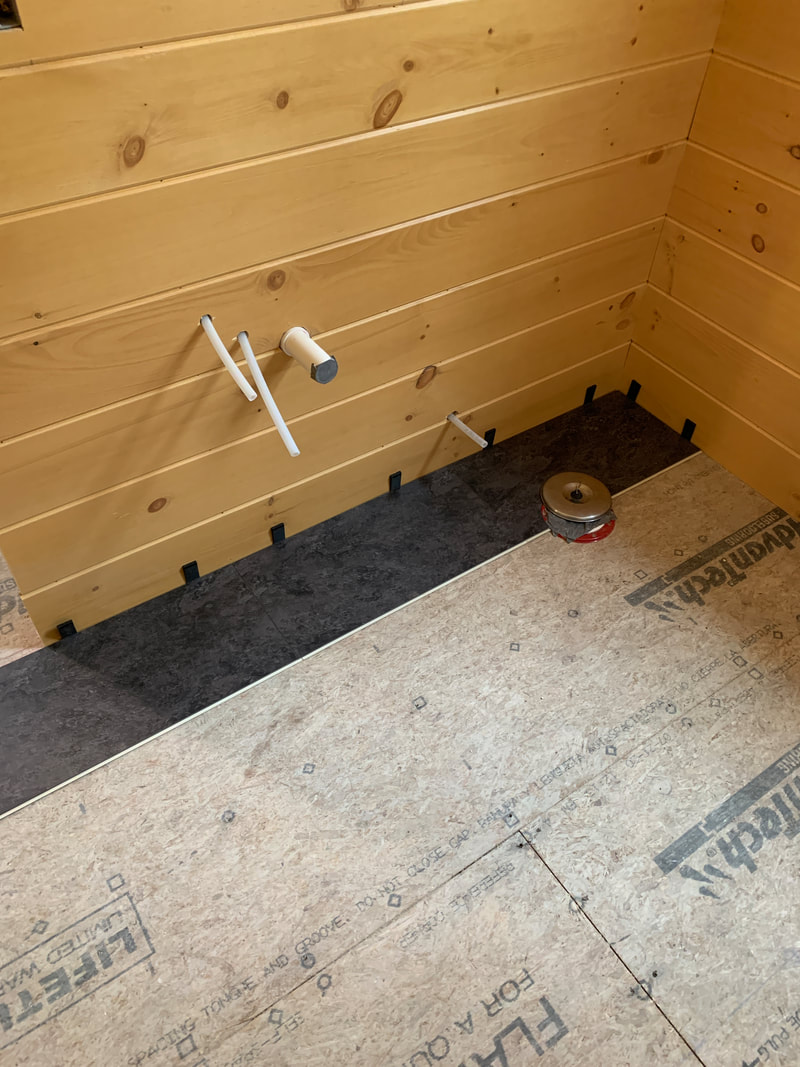 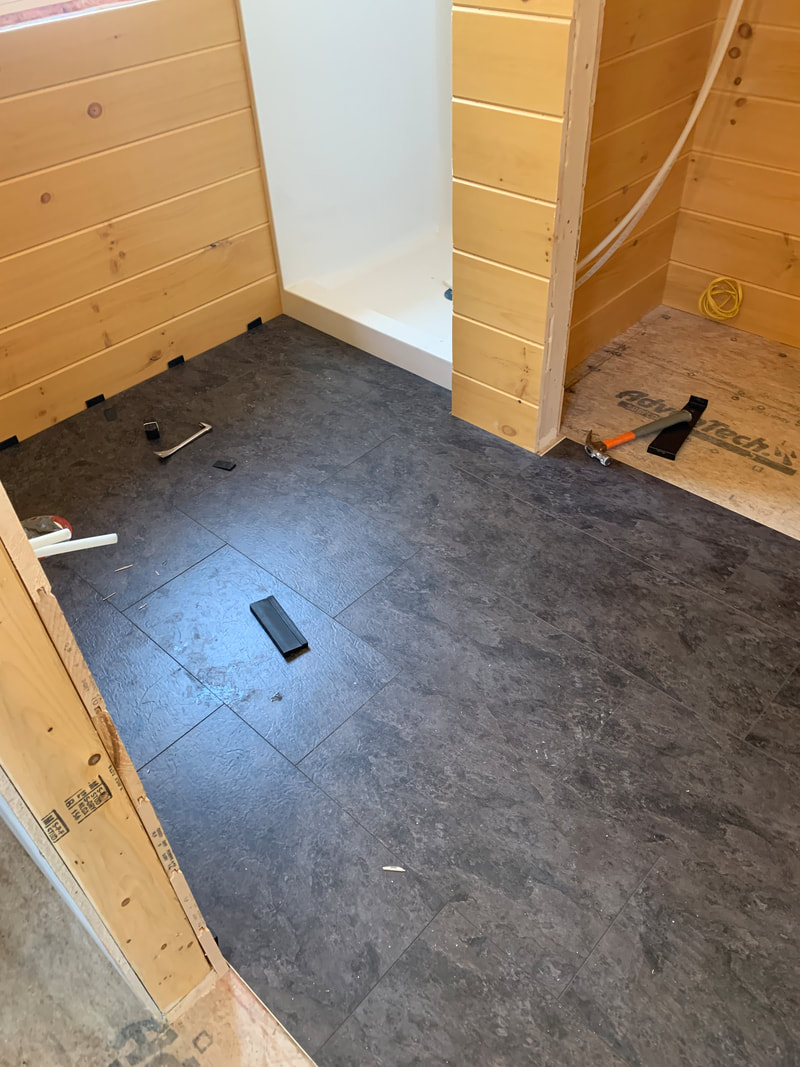 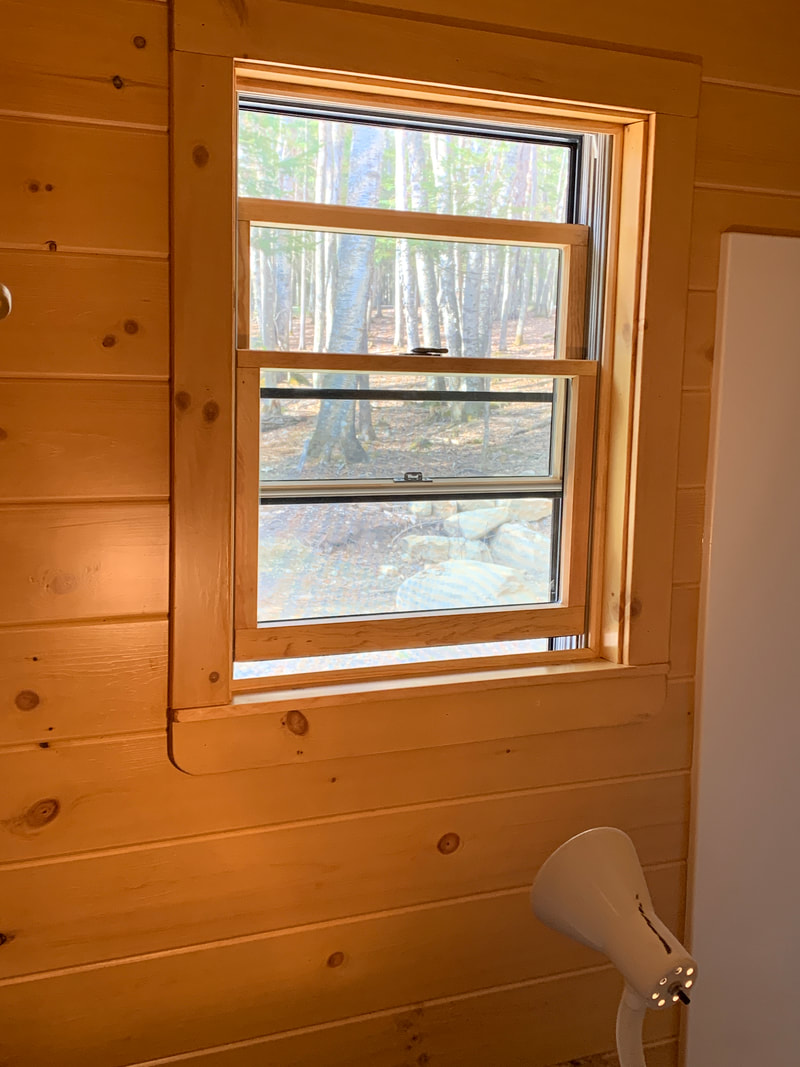 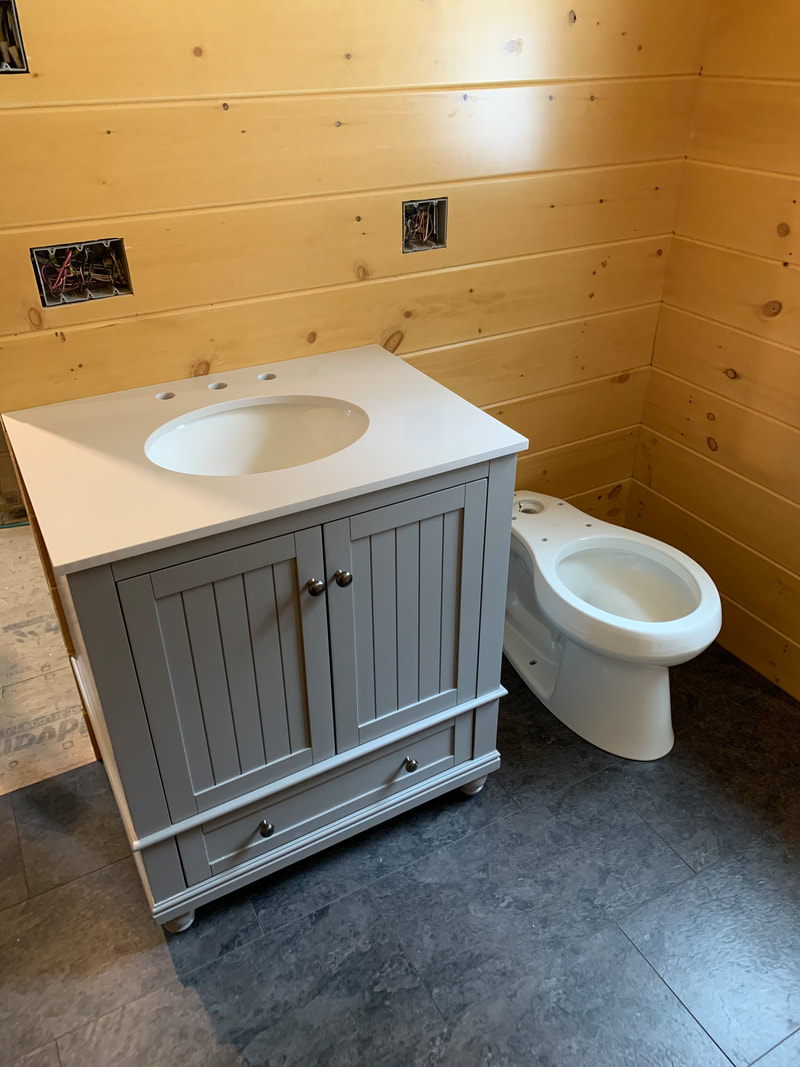 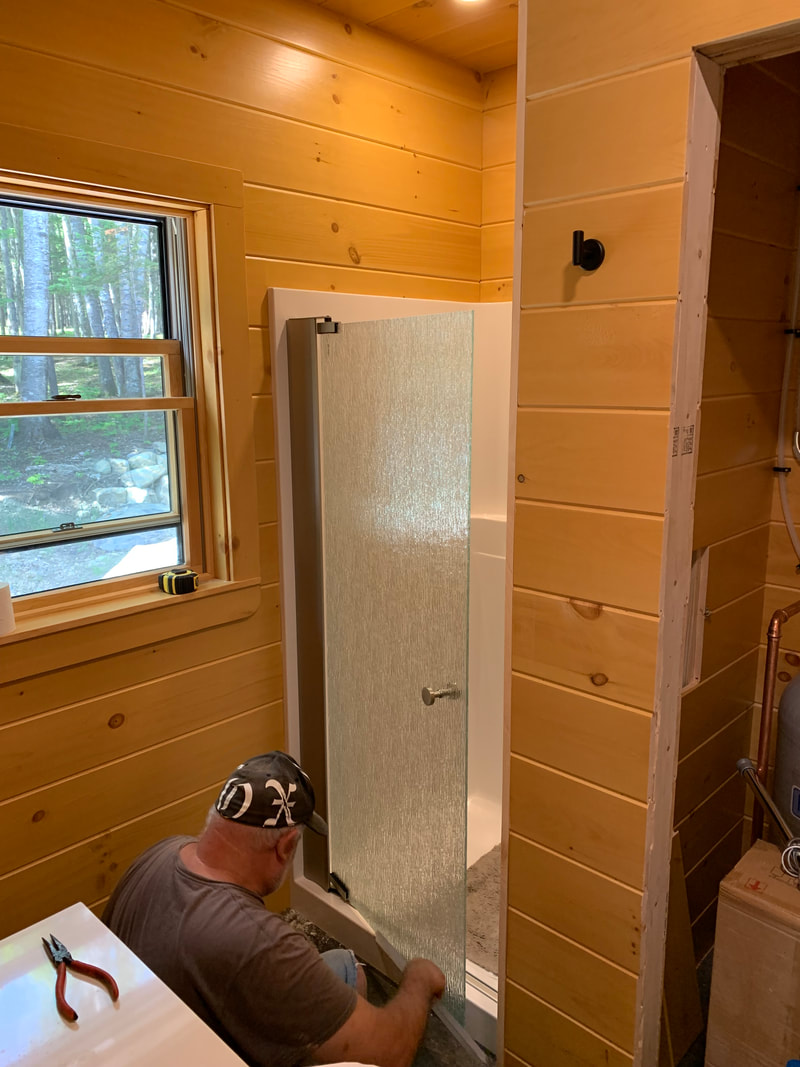 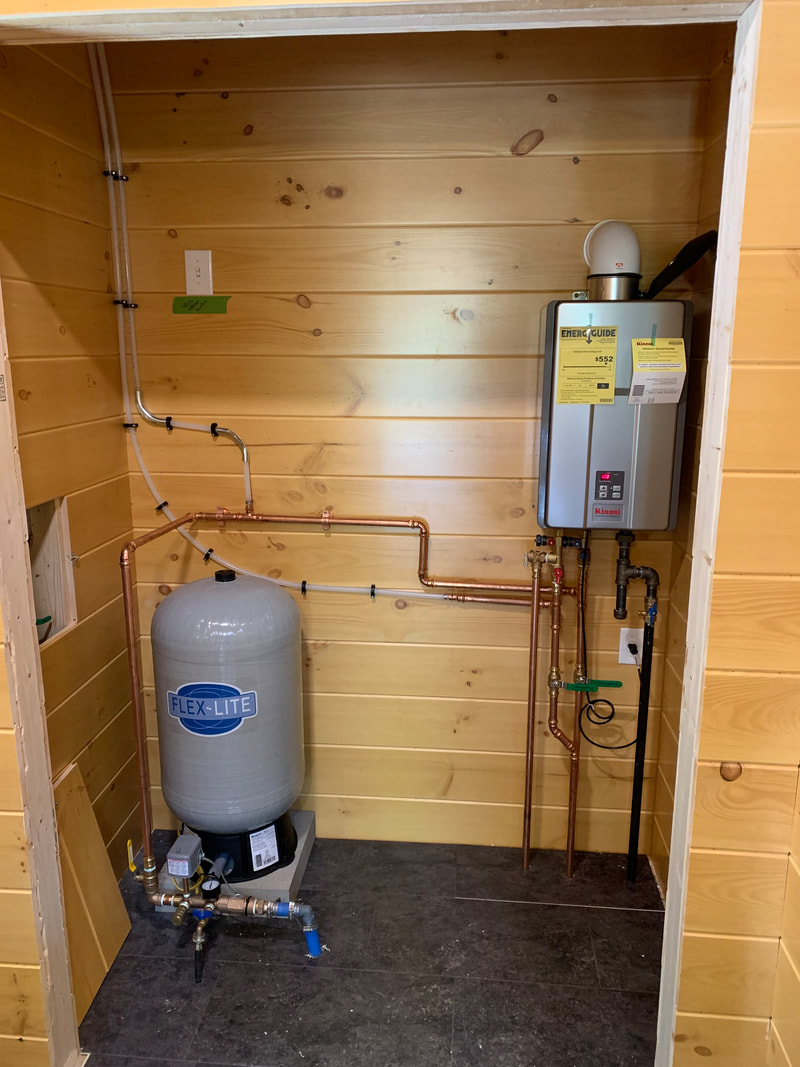 Here is a quick shot of the basement. As you can see I used 2 inch foam board and attached with a special foam board spray in all of the bays. I used spray foam on all of the borders and any openings. "She's tight" as a button down there!  It's now early spring of '21 and Marc came up to help out and do a little fishing. You can see us using the staging to hang our waders. It's a game changer having a working bathroom, instead of using buckets to wash your hands after using the Porta Potty! 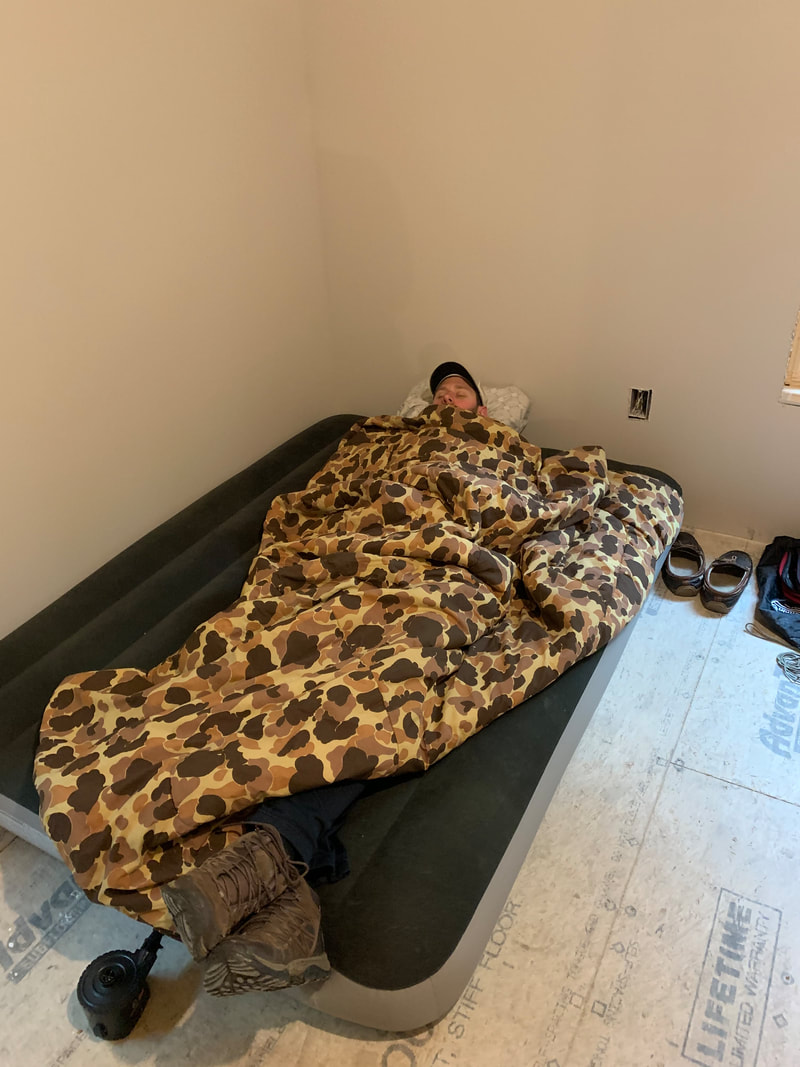 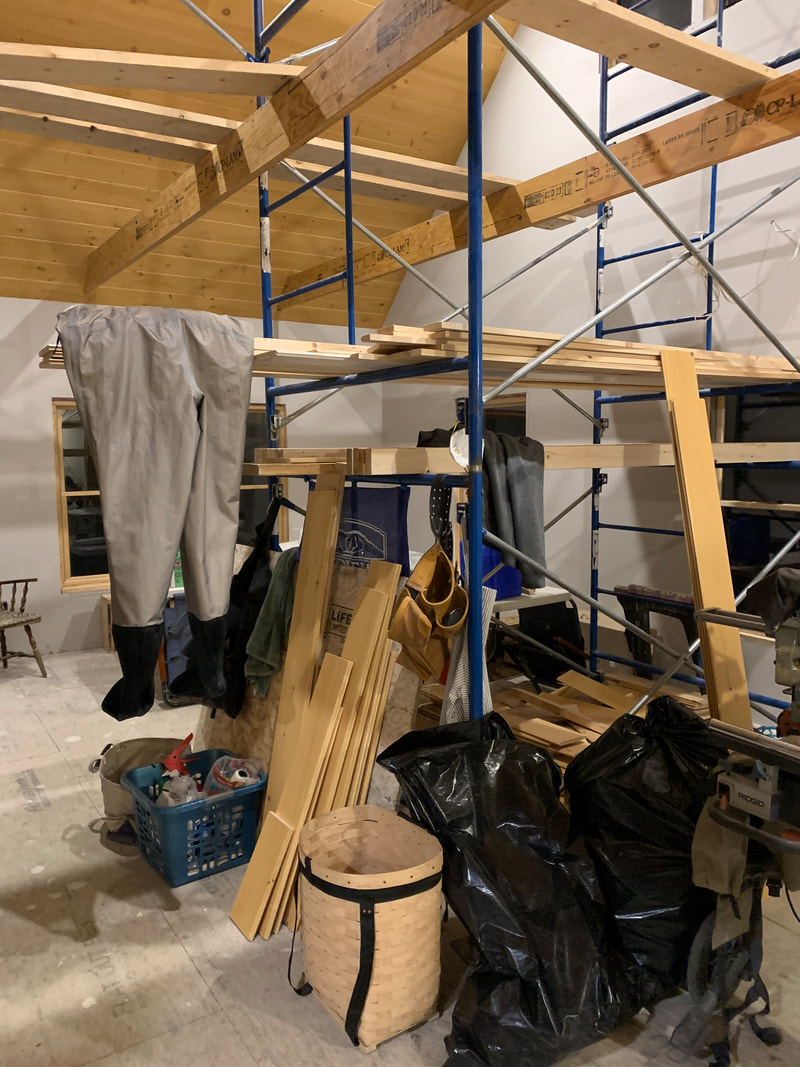 The pictures below show the catwalk all framed up. We went with 6' width, which I was hesitant about at first, but once it was up it's a really great space. There will be two lights underneath on dimmers and a hanging kitchen light as the kitchen table will be right below the sitting area of the catwalk. You can also see the "stink pipe" boxed in as it runs along the ceiling in the first picture below. We weren't able to go straight up through the roof with it. You can also see that the loft railing is all framed up and finished with v-match, as are the LVL beams and the window trim. The last picture shows the catwalk finished with the v-match and the ceiling fan up above! 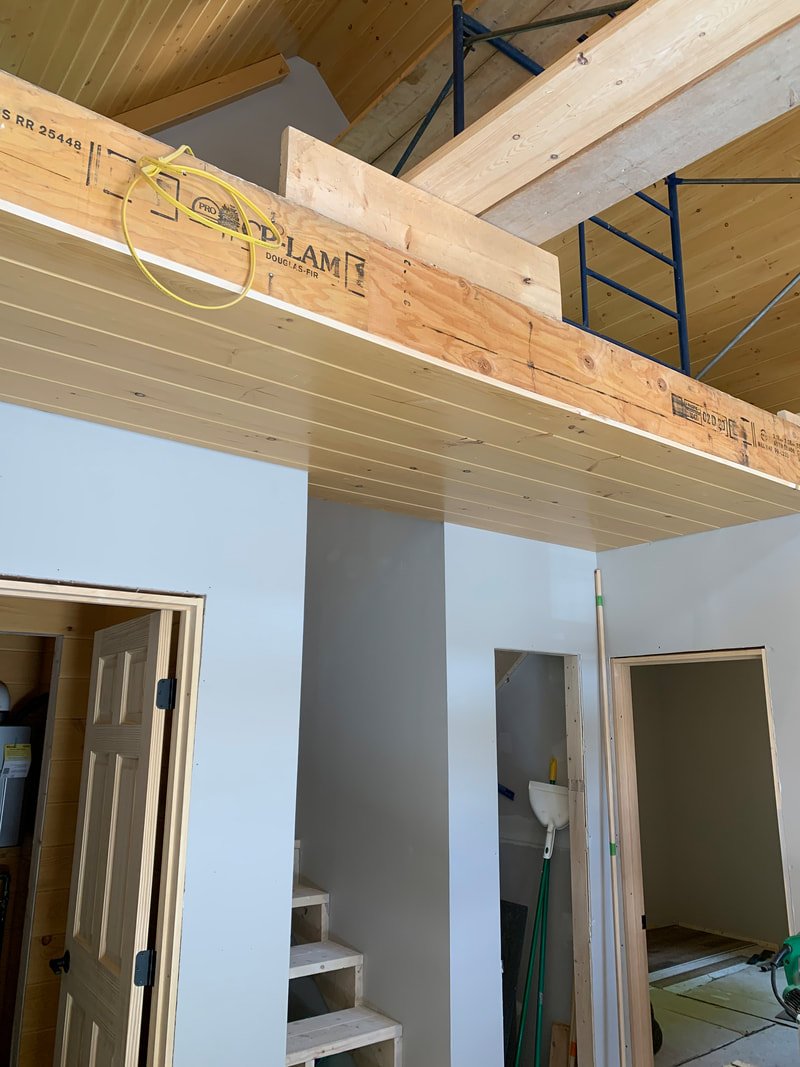 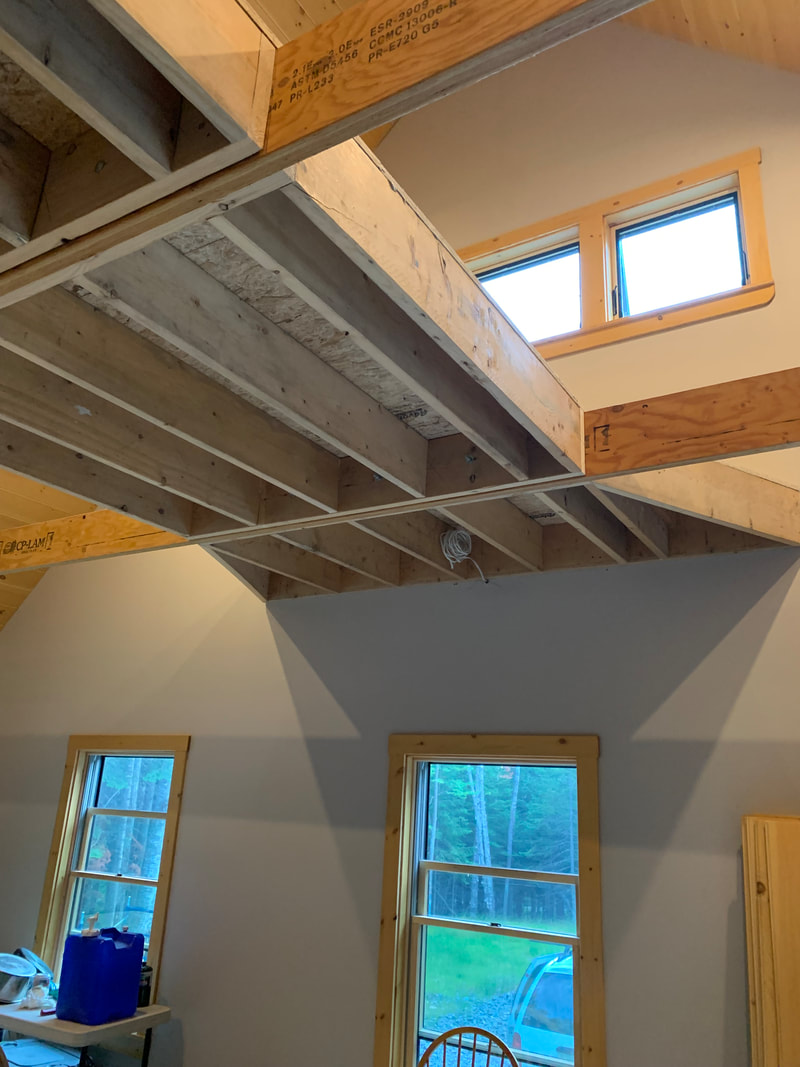 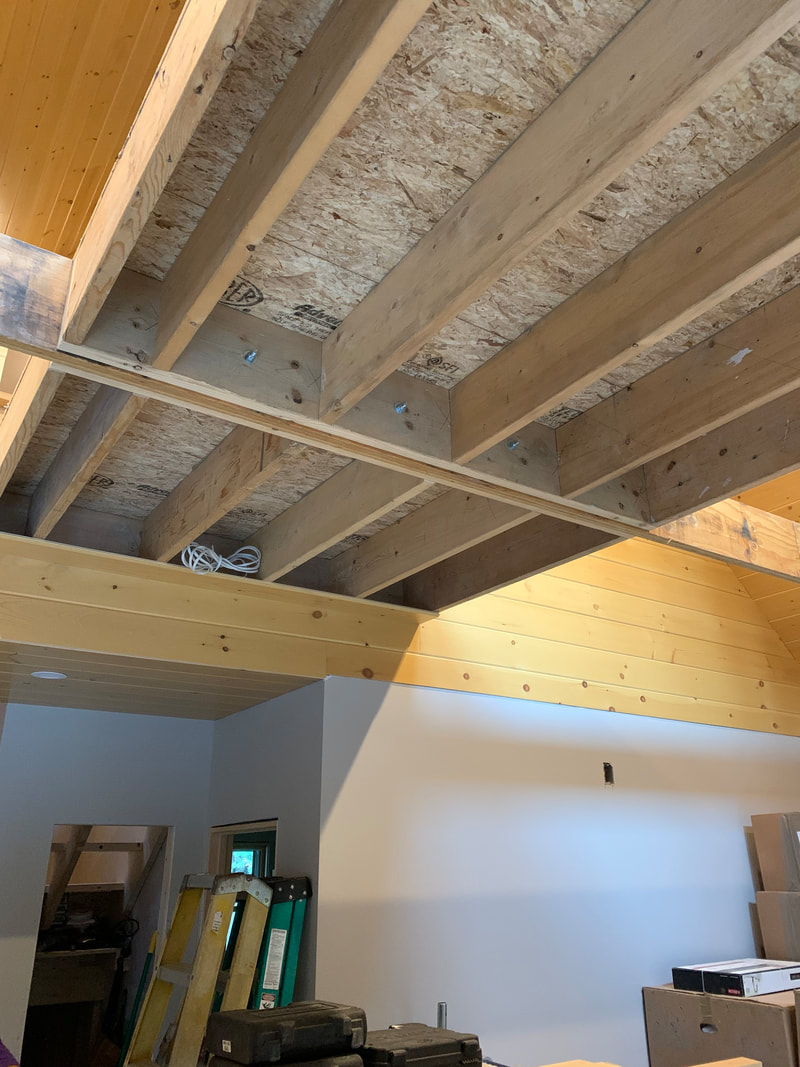  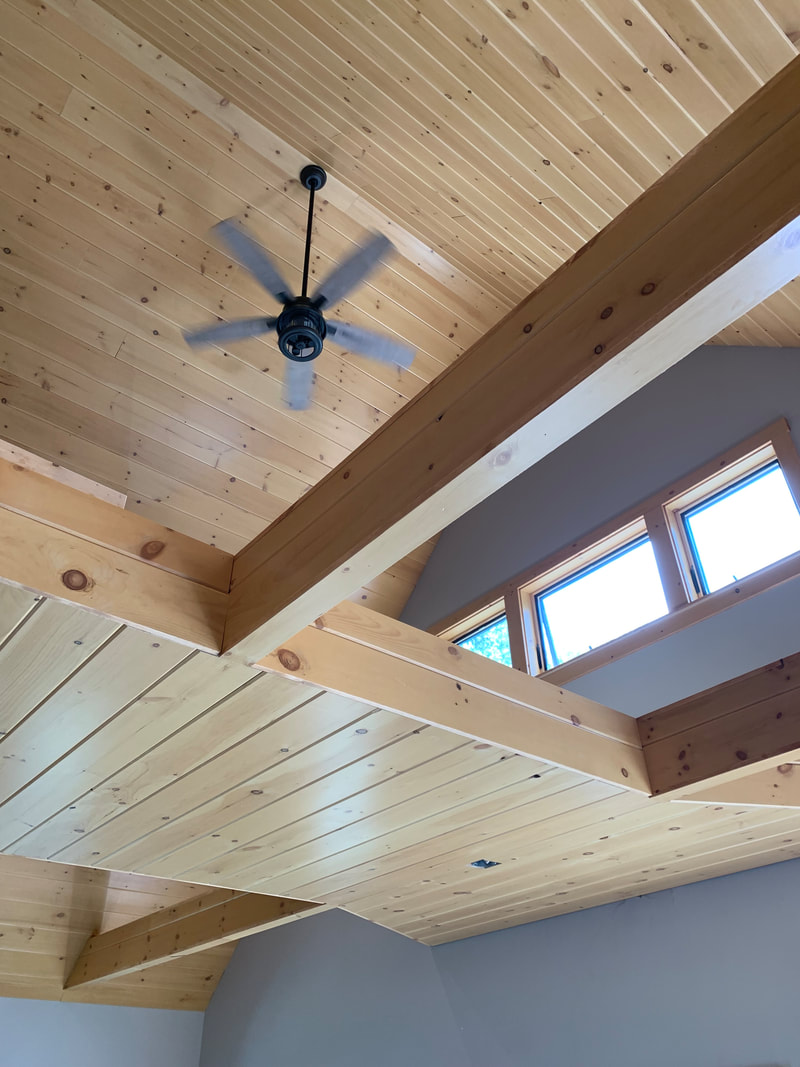 Our cabinets came in around Memorial Day, but we weren't able to get to them until July as fishing season was in full swing! I'm pretty proud of myself because I installed these all by myself with no prior experience. John was busy working on other projects, so I tackled this on my own! 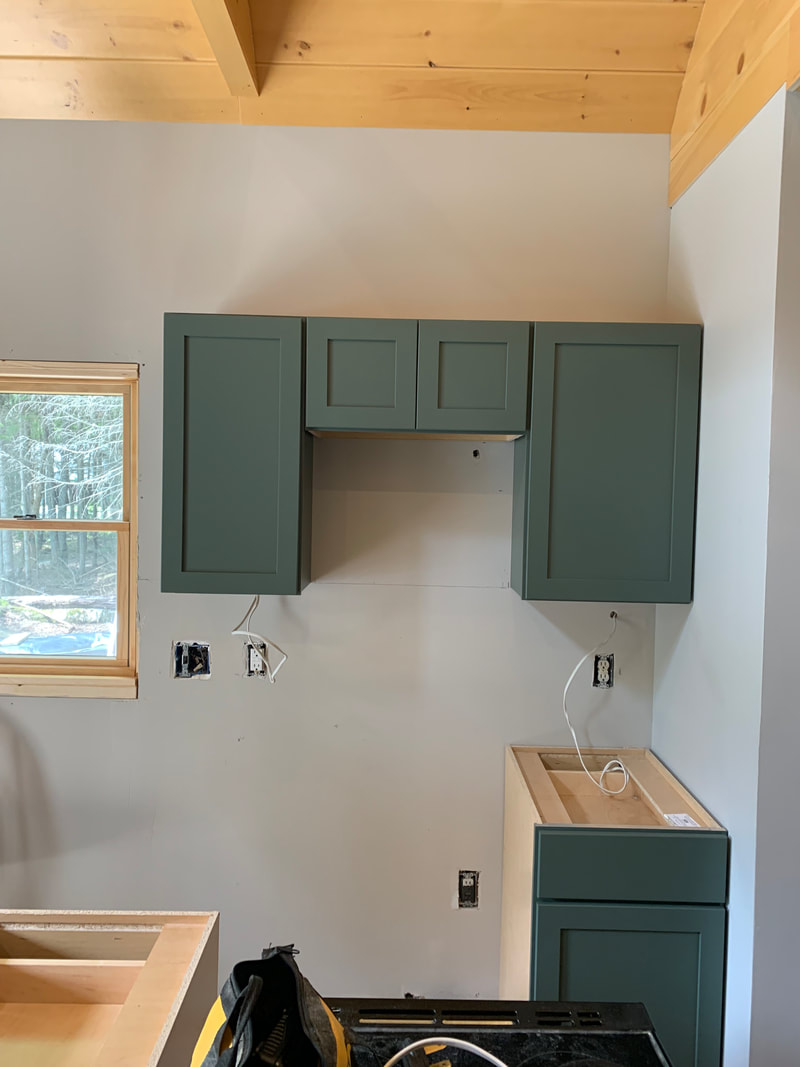 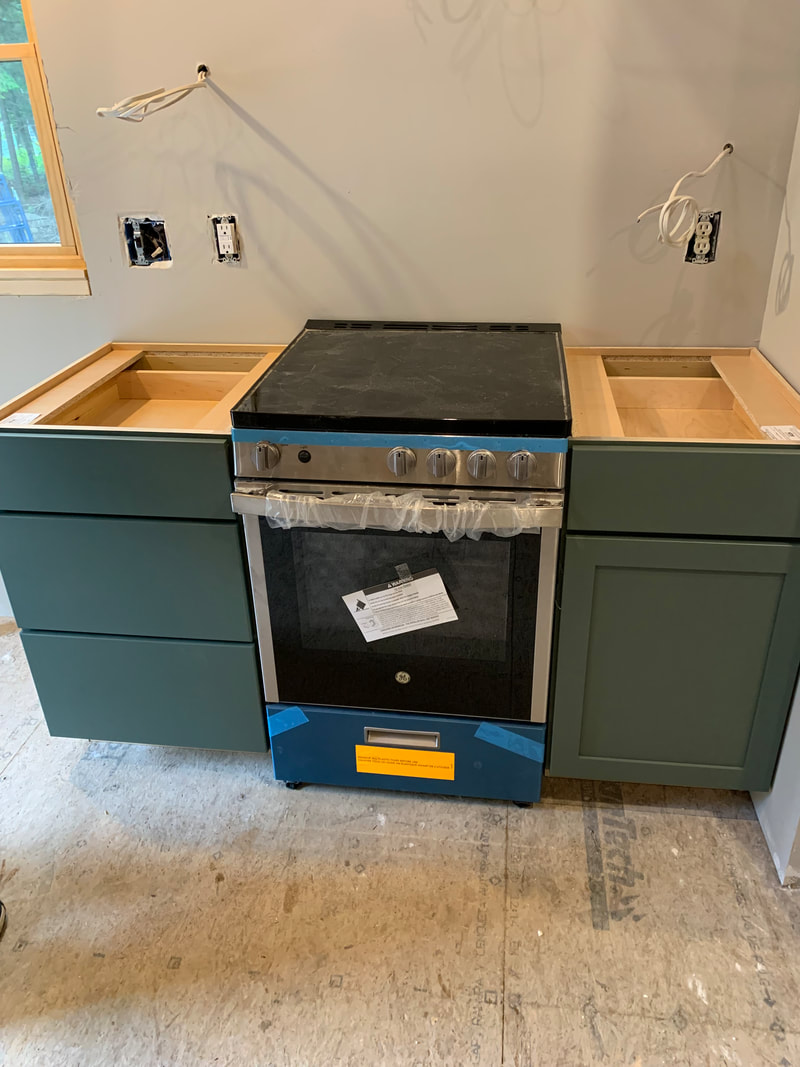 Now that cabinets were installed and the staging is officially out of the camp, it was time to tackle the floors. These went in so fast, but my only regret was using skinny boards. It looks GREAT, but just takes longer. Below are some shots of the flooring going in and the kitchen cabinets installed with a dry fit of the butcher block counter top we chose. 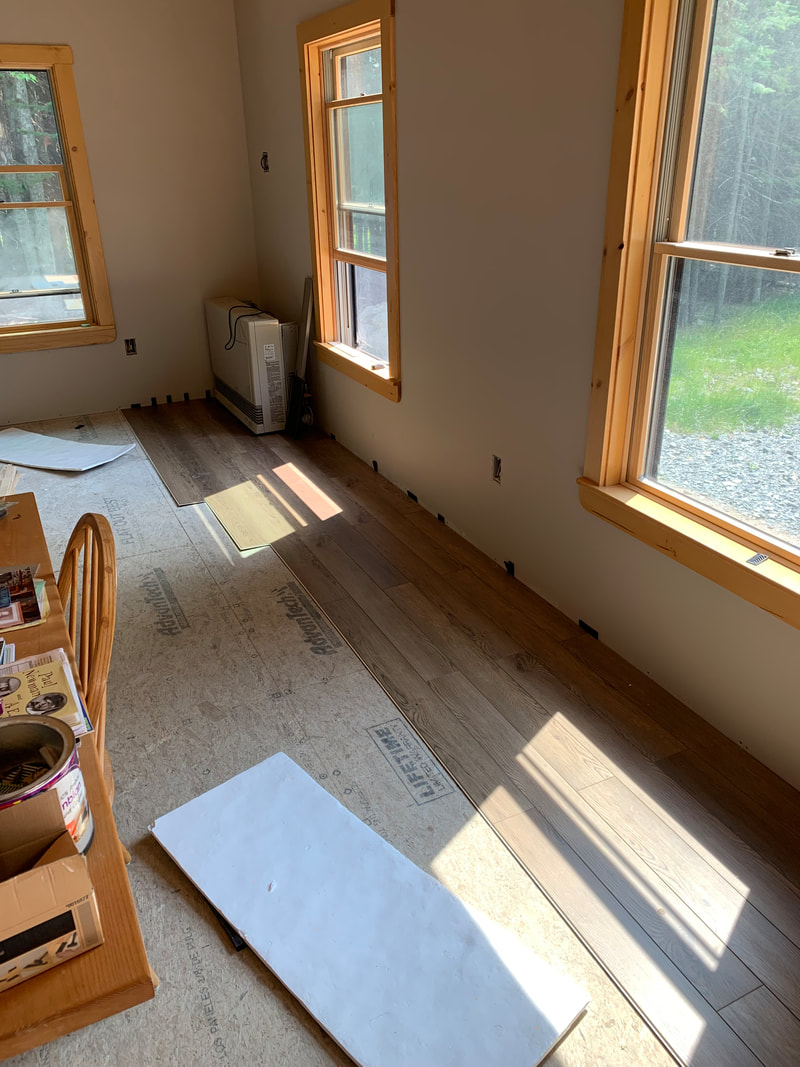 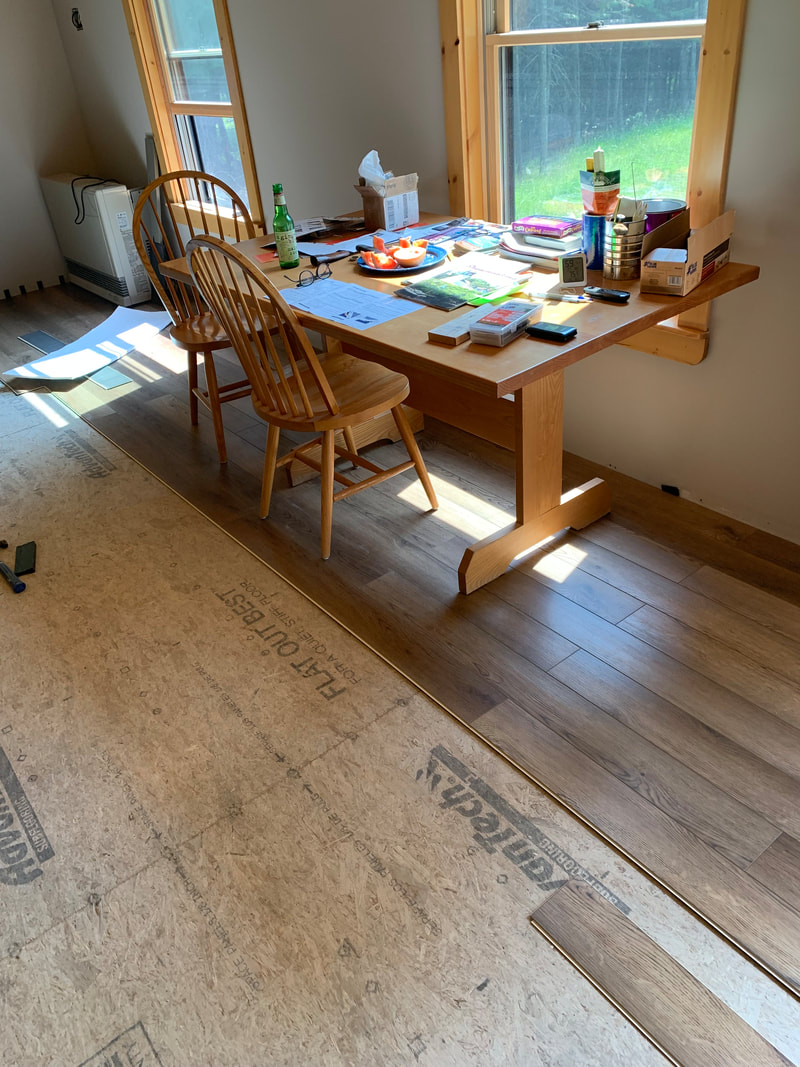 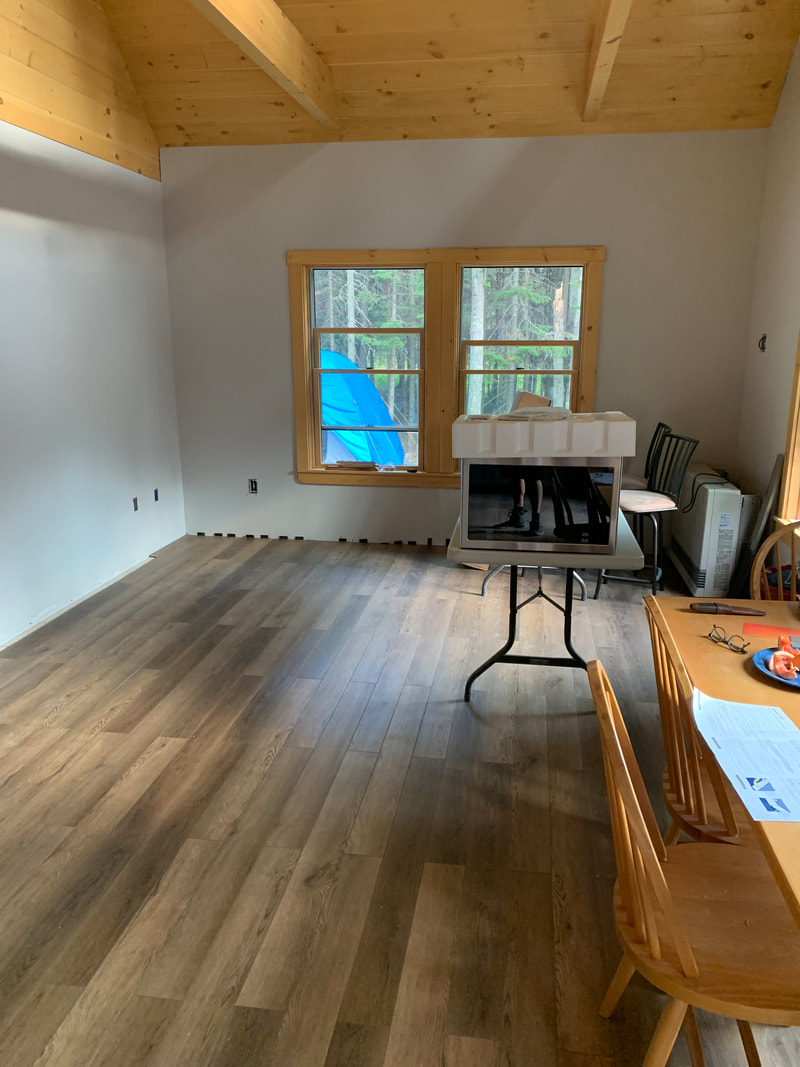 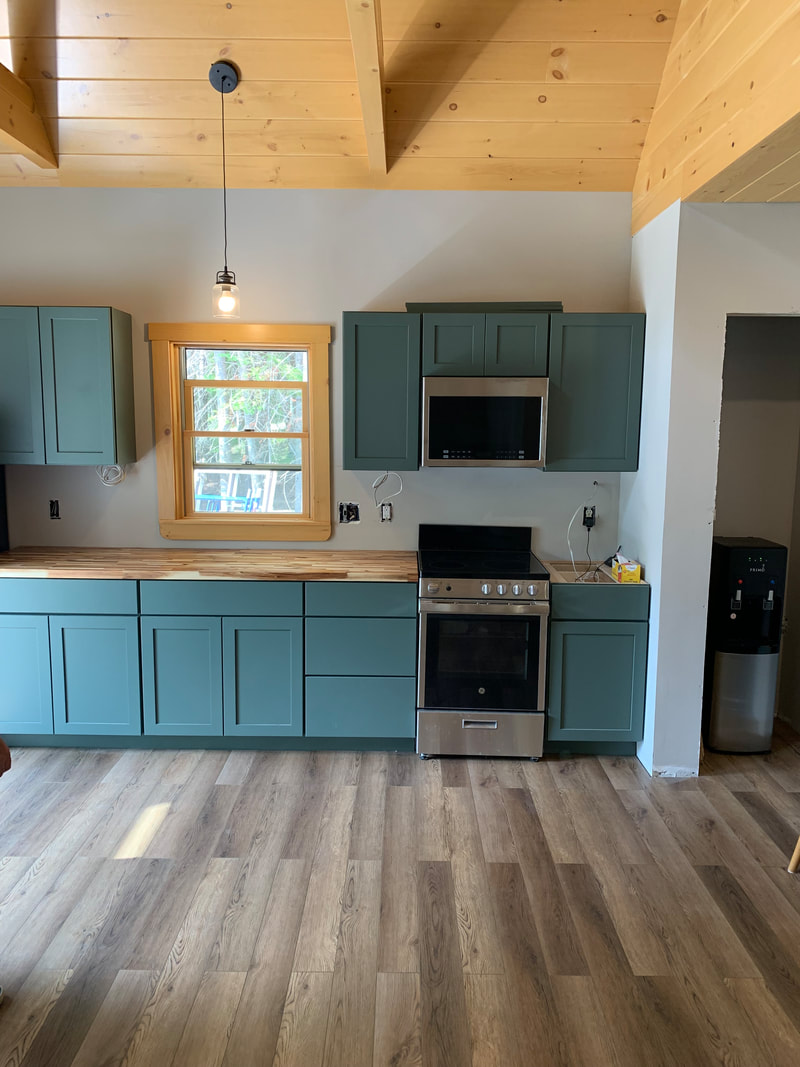 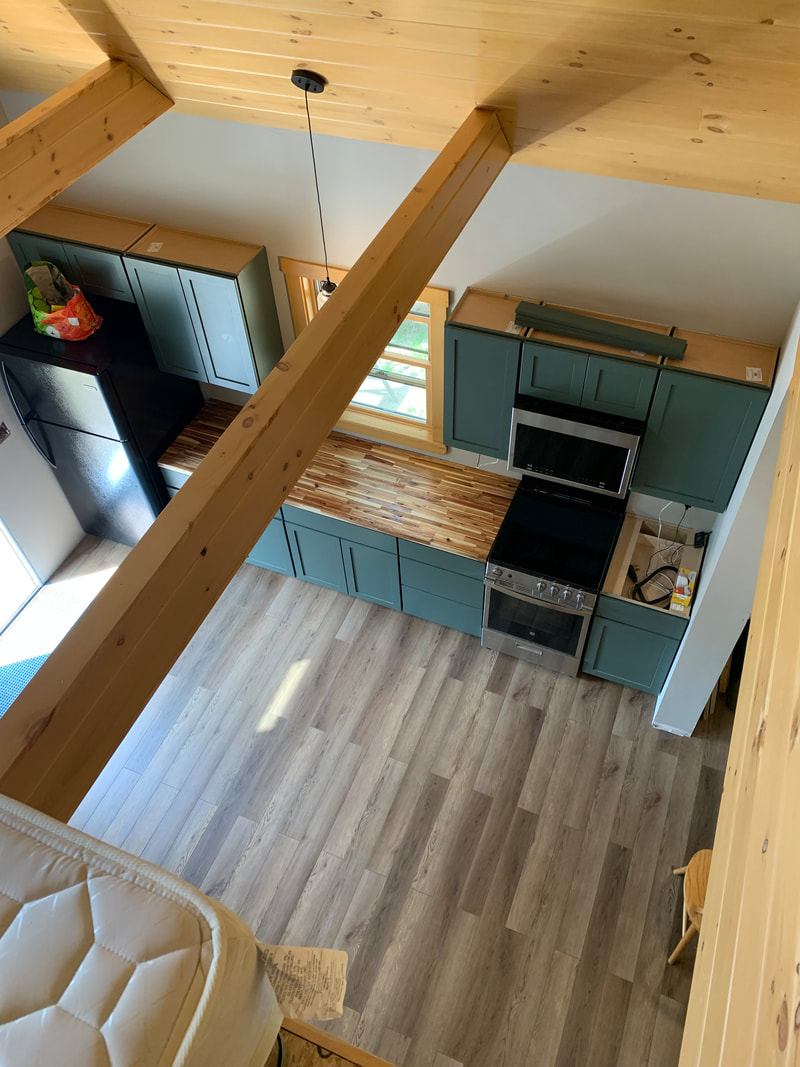 We began putting in the floors upstairs, but ran out. Back to the store to buy more. There's also a shot of the catwalk. It will have 4x4 posts on the sides with cable wires running as the slats. The flooring will be the same as it is downstairs. There's a shot of the stairwell also, which just needs stairs and railings! 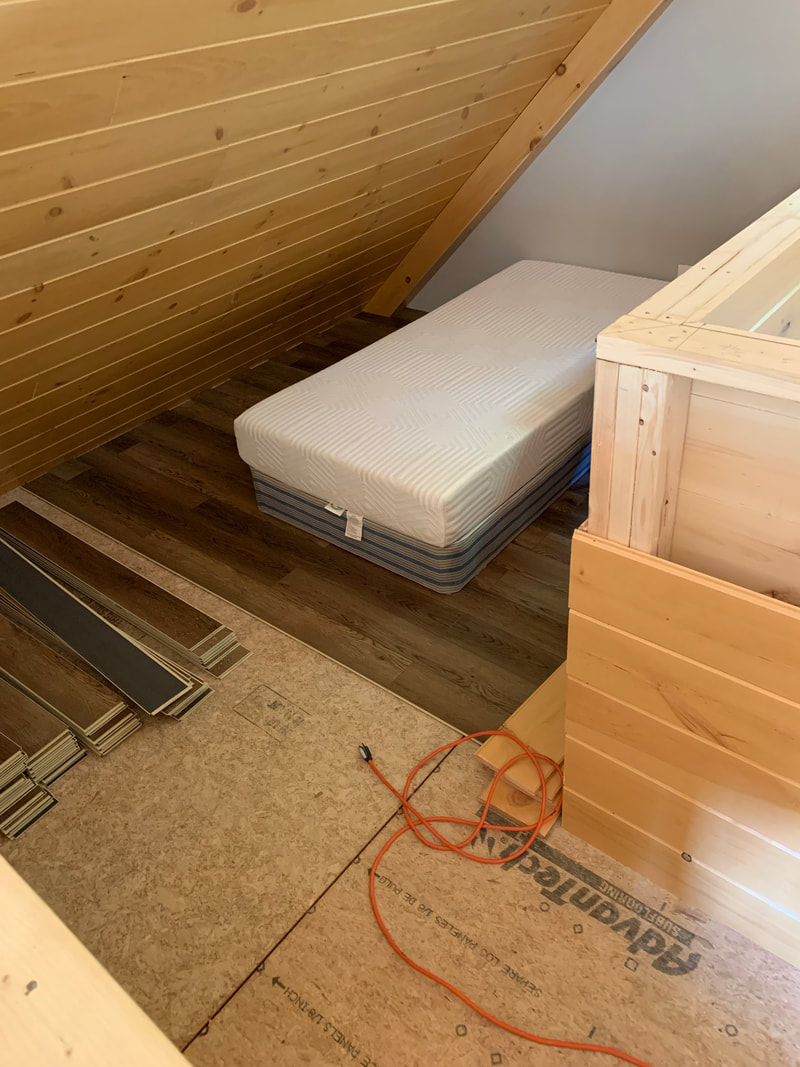 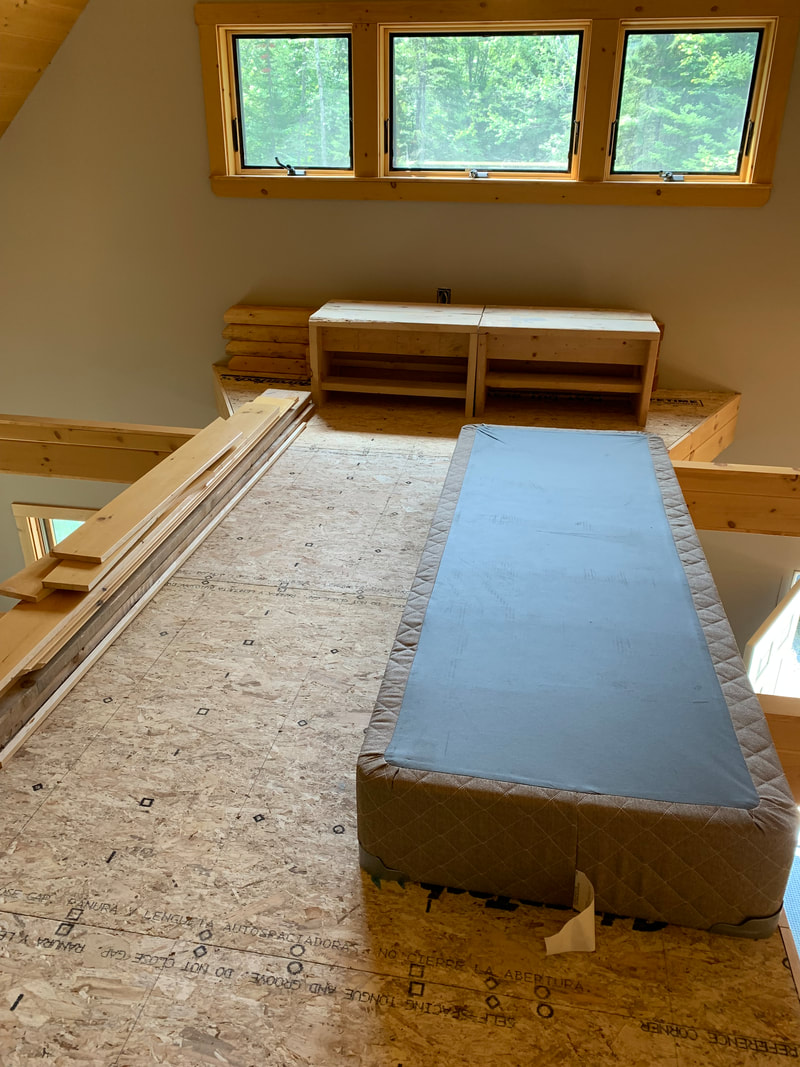 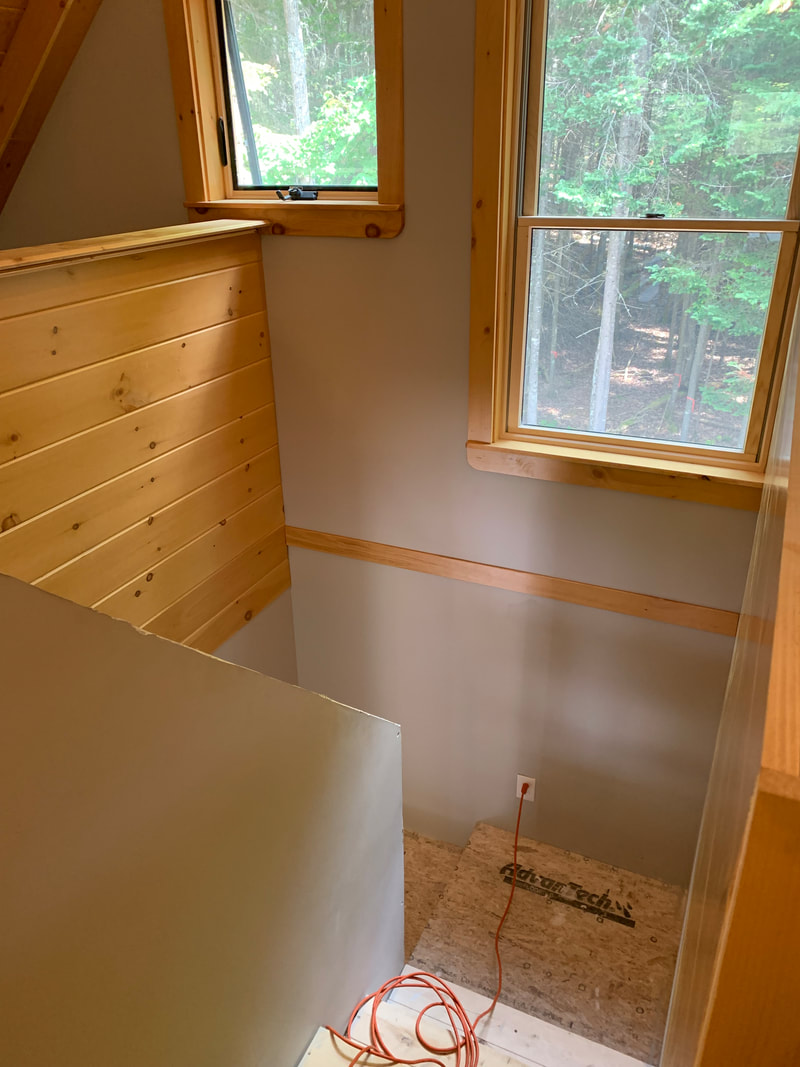 While John and I worked on the flooring, my dad came up to help out with some yard work and help build the fire pit. After many hours of deliberating and moving tons of stone at Lowes, I came up with a design that is the perfect size and look for camp! 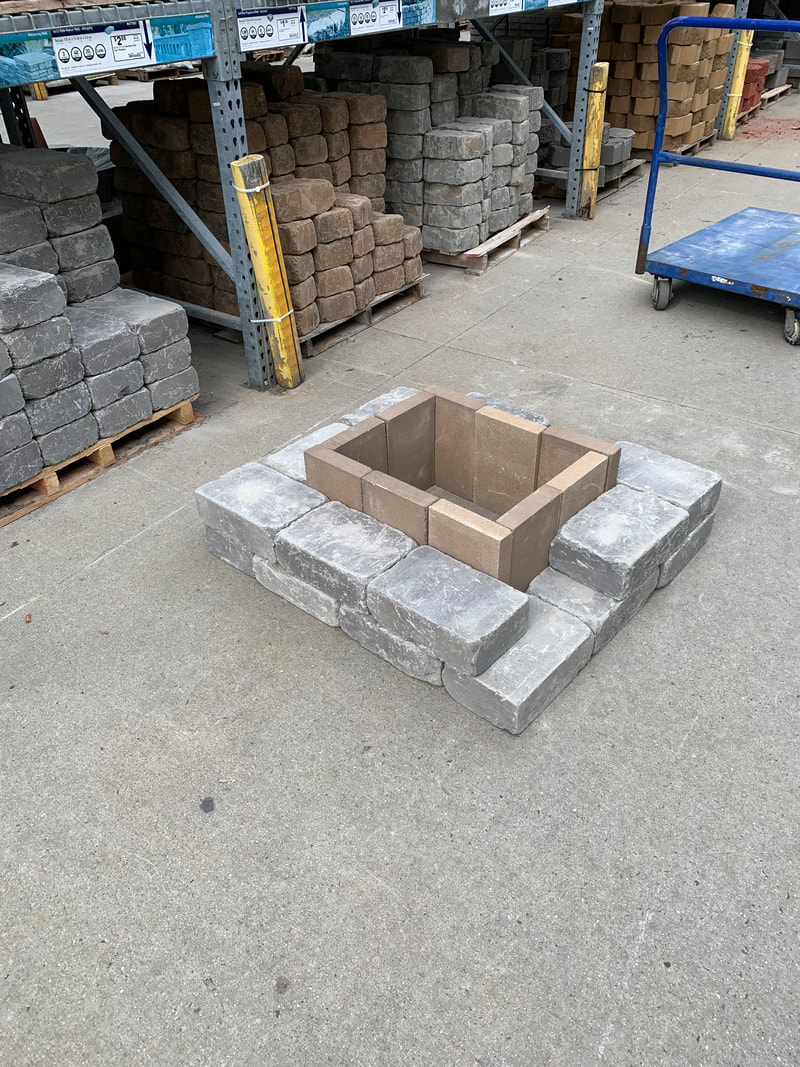 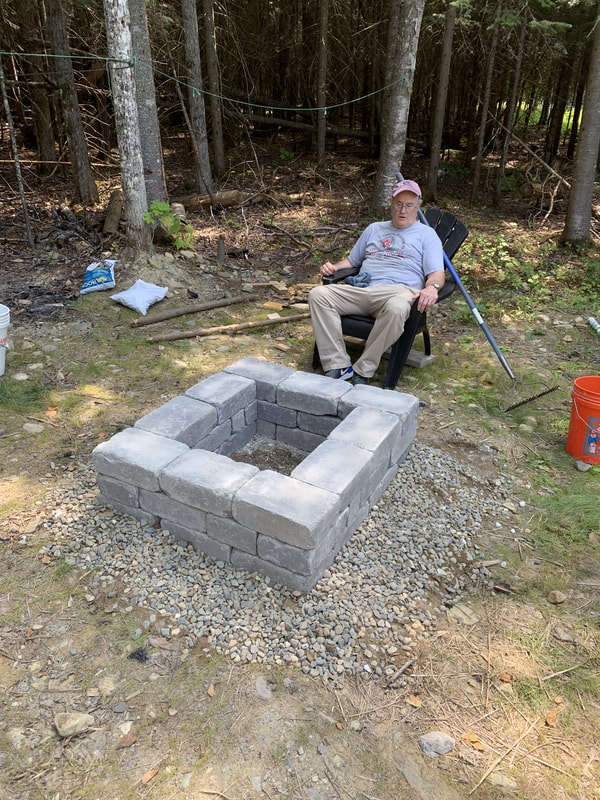 Here's a not so great picture of the bedroom with the full over full bunkbed that my good friend Marc built from some dimensions that I gave him. It came out really, really great. 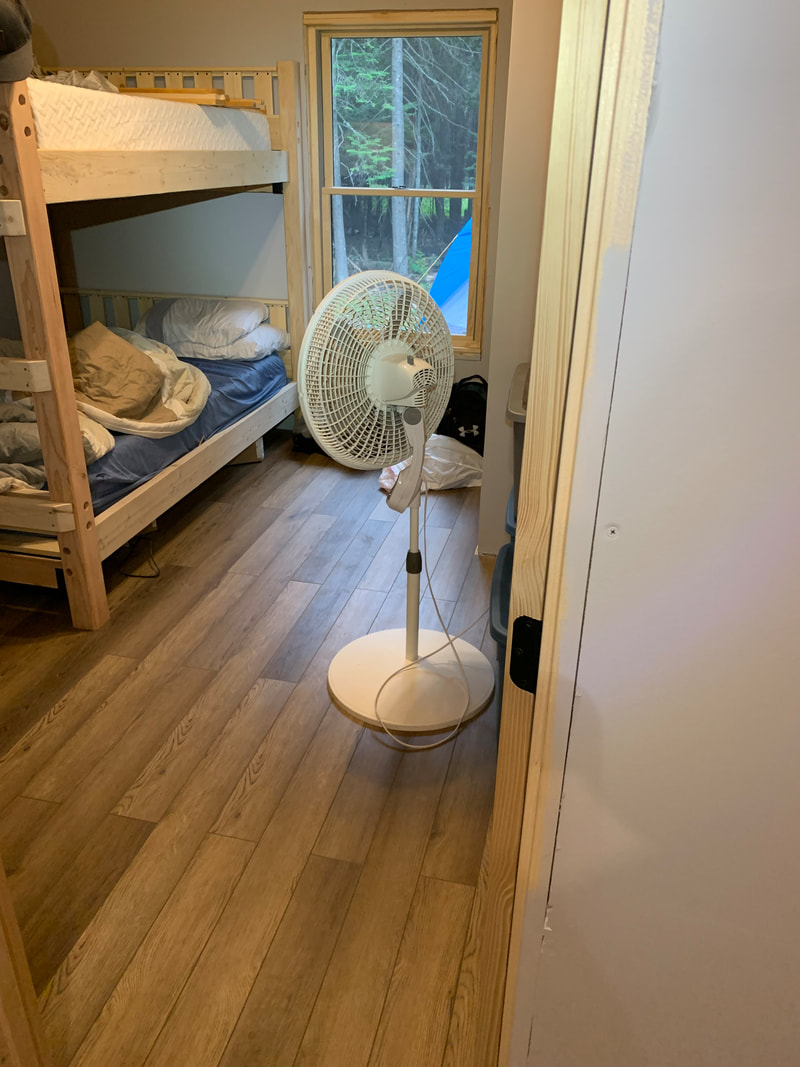 I've been working on restoring a desk that belonged to my uncle when he was in high school. I forgot the "ugly" before picture, but here's a picture of it sanded and mostly finished! 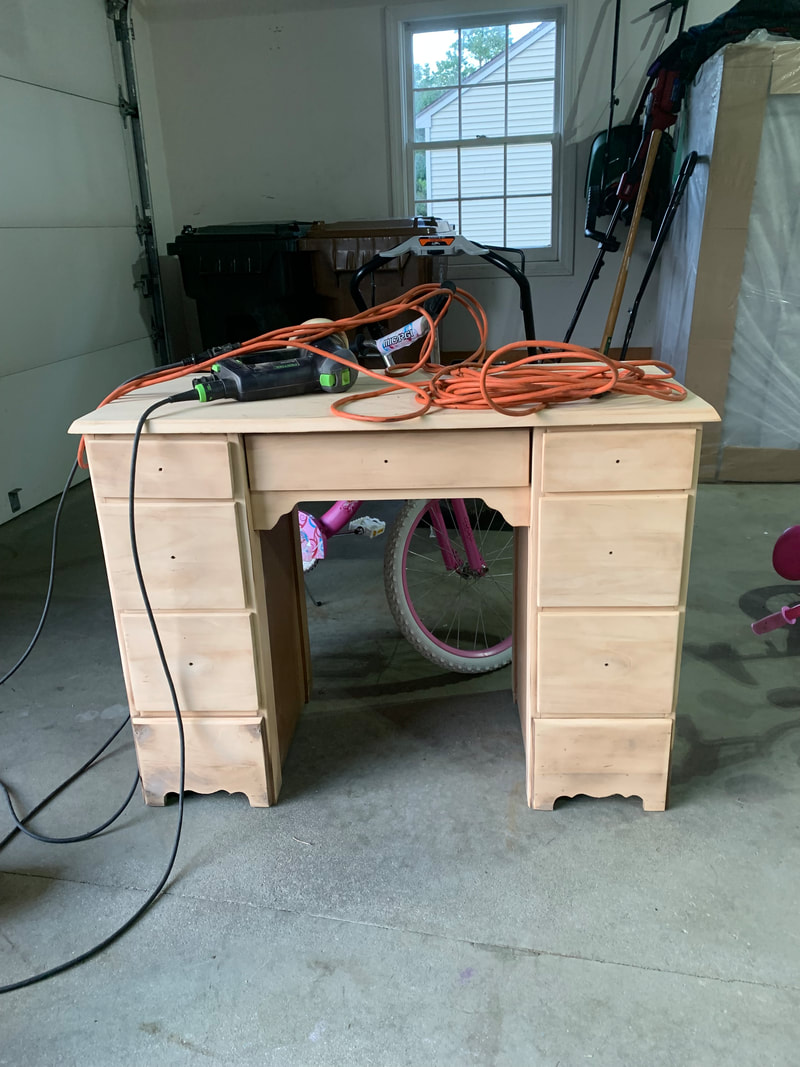 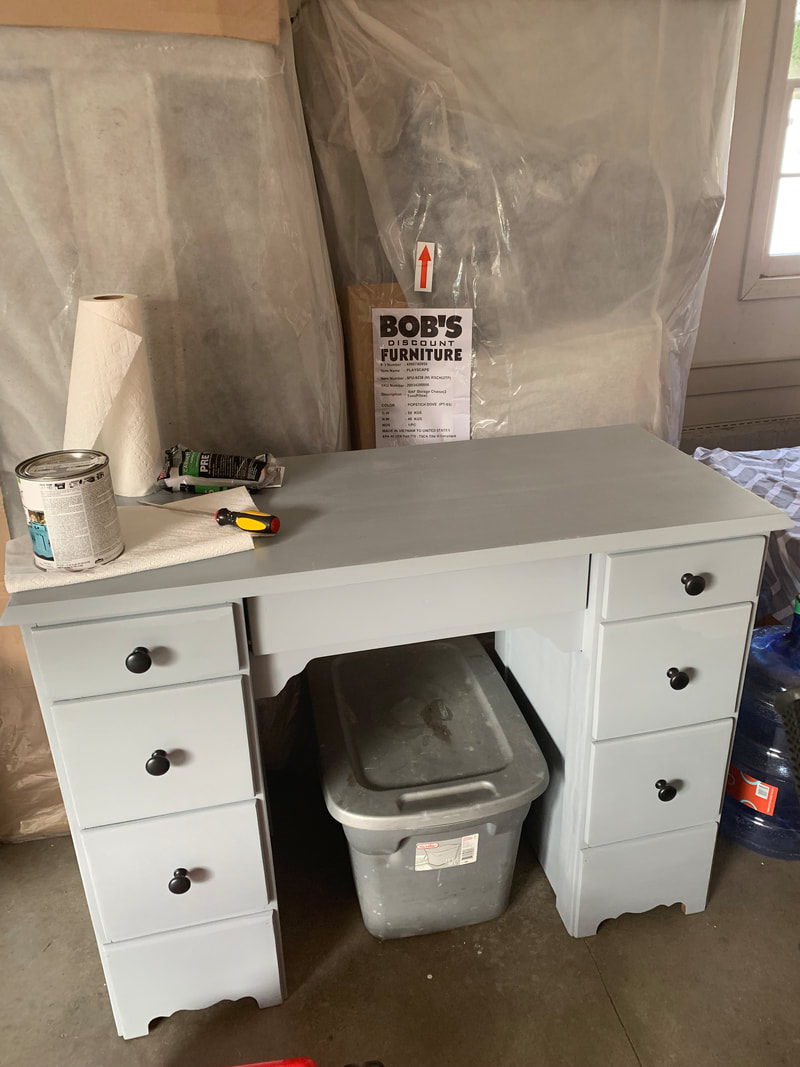 It's August 17th and we're hoping to have all of the electrical and plumbing done by Labor Day. The kitchen sink is in and we need to finish installing/staining closet doors and baseboard trim inside. We'll finish the stairs also then start moving on to the outside. It's our hopes to get the siding on and the screened in porch framed up by the end of September. We're projecting to finish before the snow flies and looking forward to some fall days out in the woods and on the water with a nice chili waiting for us back at camp! Here's a cool picture of the outside of the camp from the winter. Stay tuned! 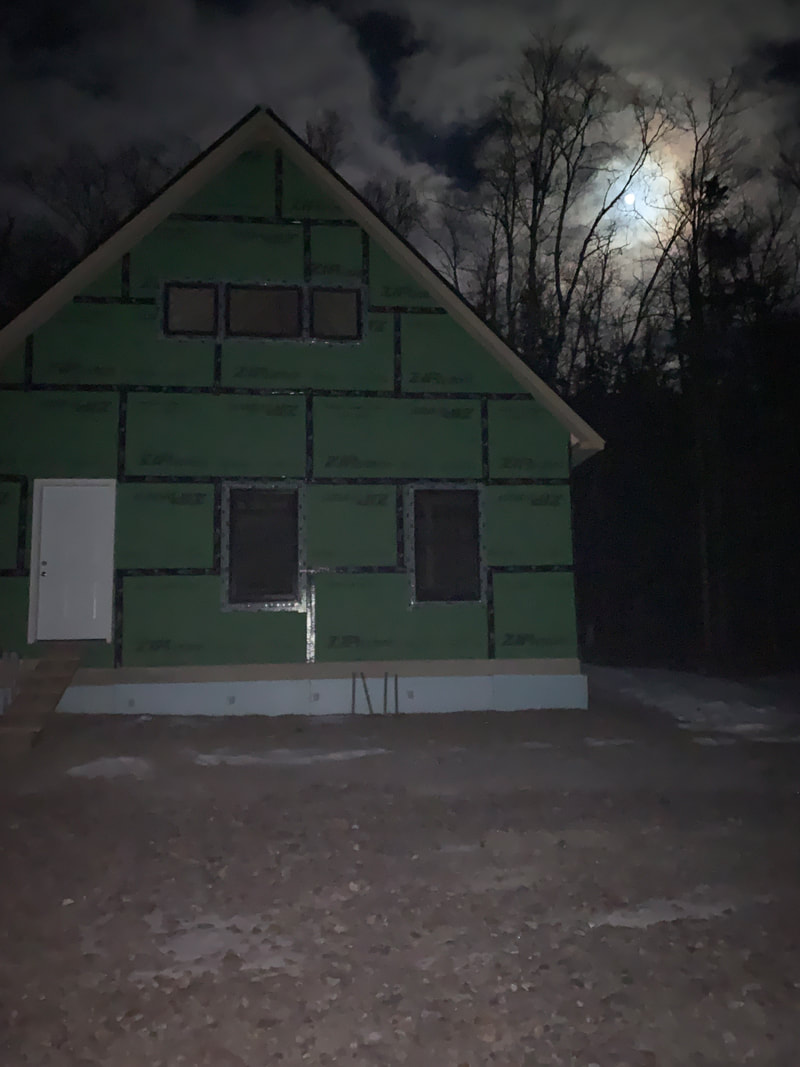 It’s crazy that I haven’t posted since late September. Life has been busy! It’s late January now and we are cranking along inside. The hopeful completion date is Memorial Day, but we’ll see. Remember, we’re just weekend warriors and not every weekend works. We have heat and most insulation in now, so it’s no problem staying in there at night. There was a window where we were insulating with no heat and it was only 15 degrees, so that was chilly. We did NOT sleep there on those nights fortunately. The roof was a bear, but John was a beast nailing in the 22 foot rafters (62 of them) as I sent them up to him from the side staging. My buddy Lane came to help with the roof and helped us get all the plywood up the ladders and nailed on. His shoulders were hurting for several days. We got the Grace (ice and water shield on) just before the first snow. We had some windows in October where it was nice weather and we got the metal roofing on. After that, it was time to finish the walls up and install the windows. As you can see, the cathedral ceiling is very high about (26 feet from the first floor), so staging work and getting off that fear of heights had to go away quick! Once the sheathing was on, and we put up the soffits and trim, it was time to put a door on and move inside. That happened in mid November, and then we had to do some interior framing of the bedroom and bathroom. I spent most of early-mid December putting up 2 inch foam board under the floors in the crawl space. That really sucked, but I’m glad it’s done and will be great for not attracting bugs/rodents. December and January have been insulation months. Electricity was completed, so we have lights and power inside (no more extension cords through the window). Heat was put in just before Xmas with a Rinnai Propane Direct Vent heater. We put it at 75 degrees and ran it for several hours with just wall insulation (nothing on the ceiling) and it stayed 60 degrees consistently with air temps outside in the teens. Now that we’ve put up most of the ceiling insulation, we’re seeing that the propane heater will have NO problem heating up the entire camp. The ceiling insulation and foam board going over it should be done just before February. February will be drywall month. March will be about putting up the tongue and groove pine ceiling, and painting walls. Plumbing will happen sometime in March. Hopefully April we'll be doing a lot of finish work, with deck and floors finished in May. That’s the goal! Learning a lot and I’ve added some captions to pictures to detail things that I’ve learned along the way. Stay tuned for more updates! Working with two guys means that things take time. We've been making great use of our time, but we've had a couple of hiccups which haven't wasted any money, but they've wasted some time. My biggest regret and thing that I missed was framing out a 30" door instead of 36". It's easier to fit bigger stuff through a bigger door, but we're moving in things through our 36" windows before we put the windows in. Other than that, we had some rafter issues, but all has gone well. Since my last post, we've made some great progress, and sleeping has been great with dry nights, no bugs and cool temps! The sheathing is on most of the camp at this point. We left out the top part because we'll use more sheets to tie into the gable ends on each side. 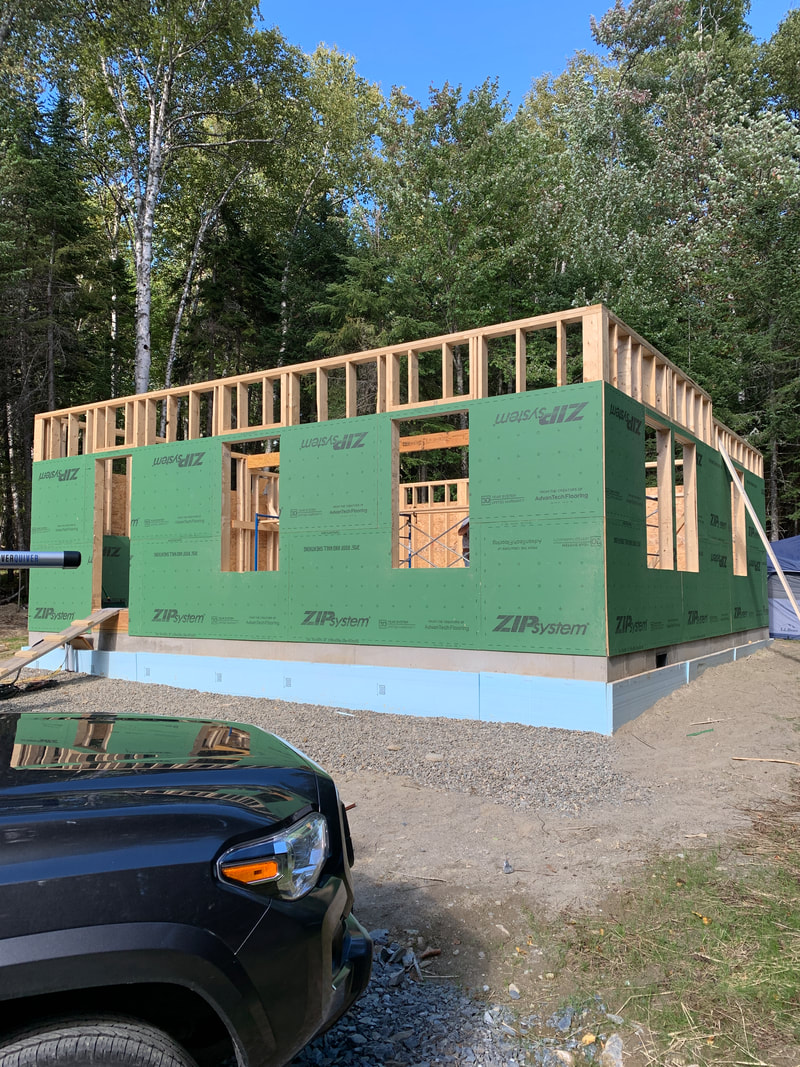 We framed up the second floor next by tying the floor joists into the LVL in the middle, which was doubled up. We'll have two support walls under this. In the pics below, you can see the joist hangers, then the stairwell in the middle framed up, then some floor sheathing put on and finally the second floor was finished. This goes pretty quick when you have mapped out all of your joists ahead of time. I've quickly learned that a straight line with an X next to it means that's where you put the joist! 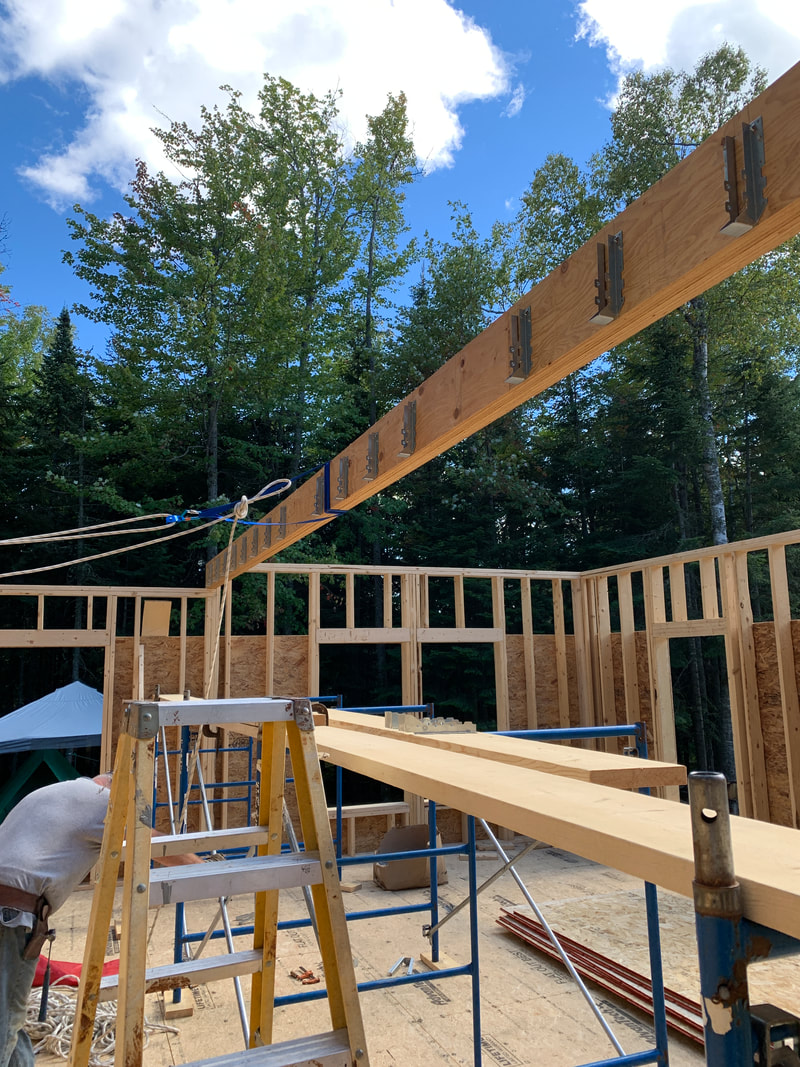 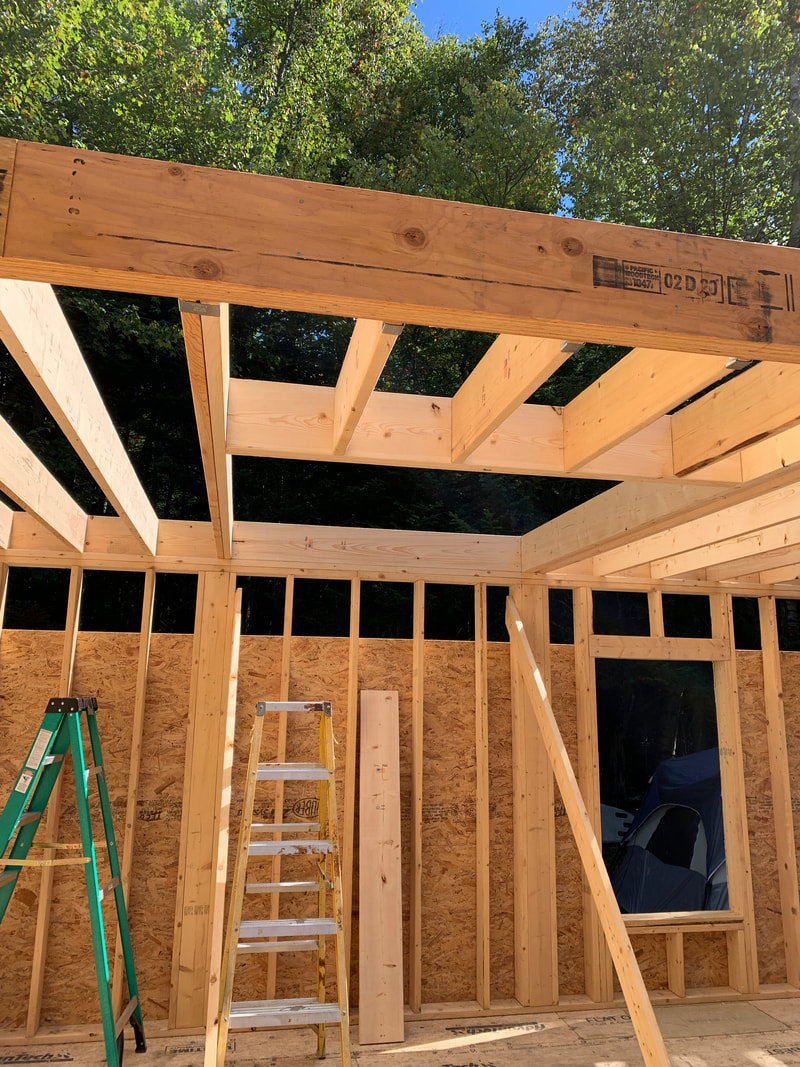 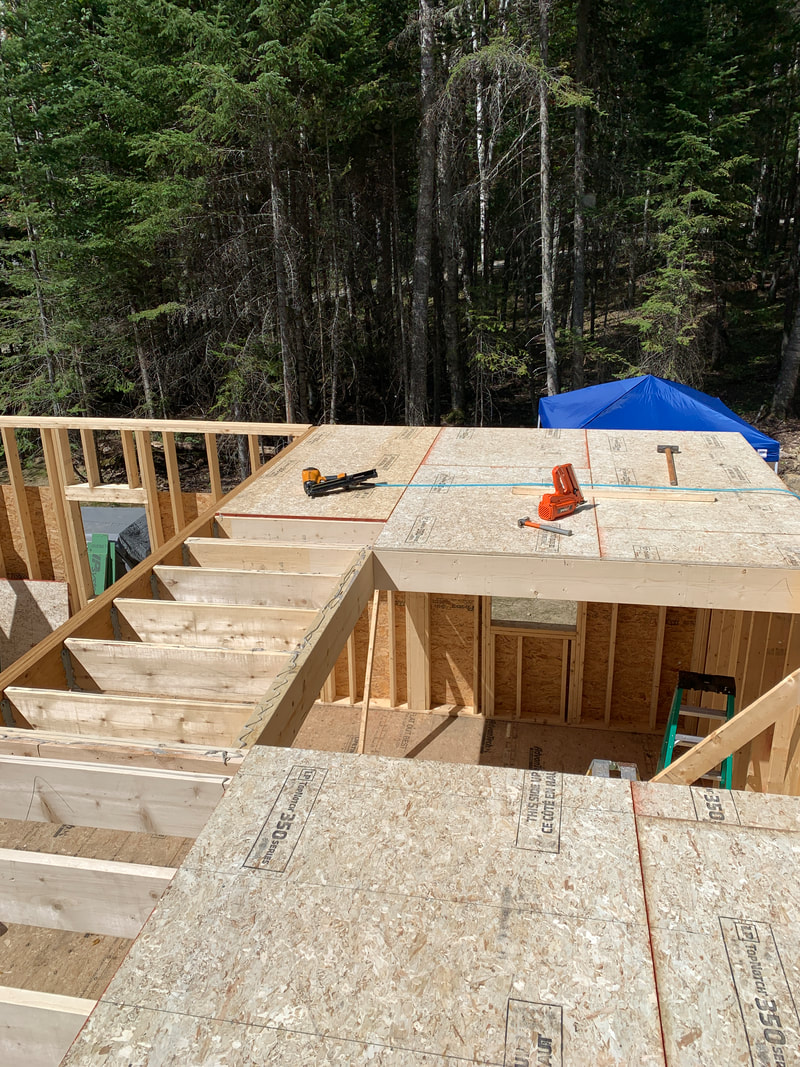 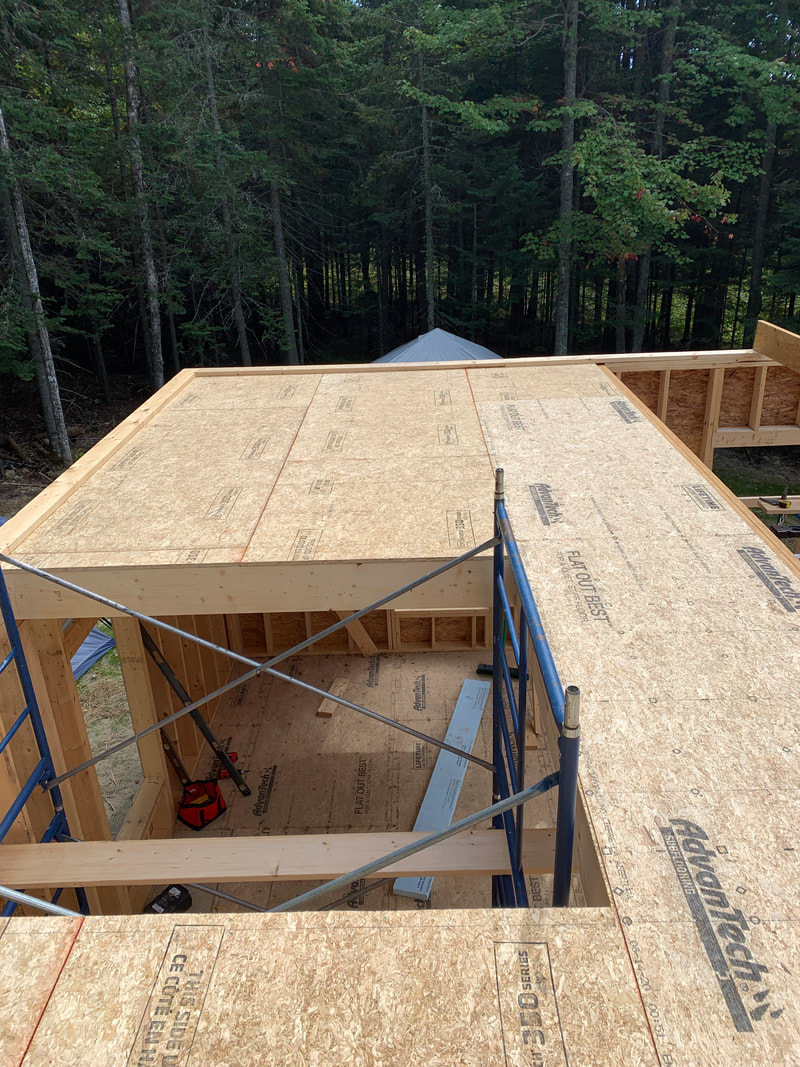 Our floor sheathing was hanging over just a little bit so a T-square was a great tool to use to make a straight line for a circular saw cut. The second picture is the top plate that you put on to match the top plate on the front half of the camp. 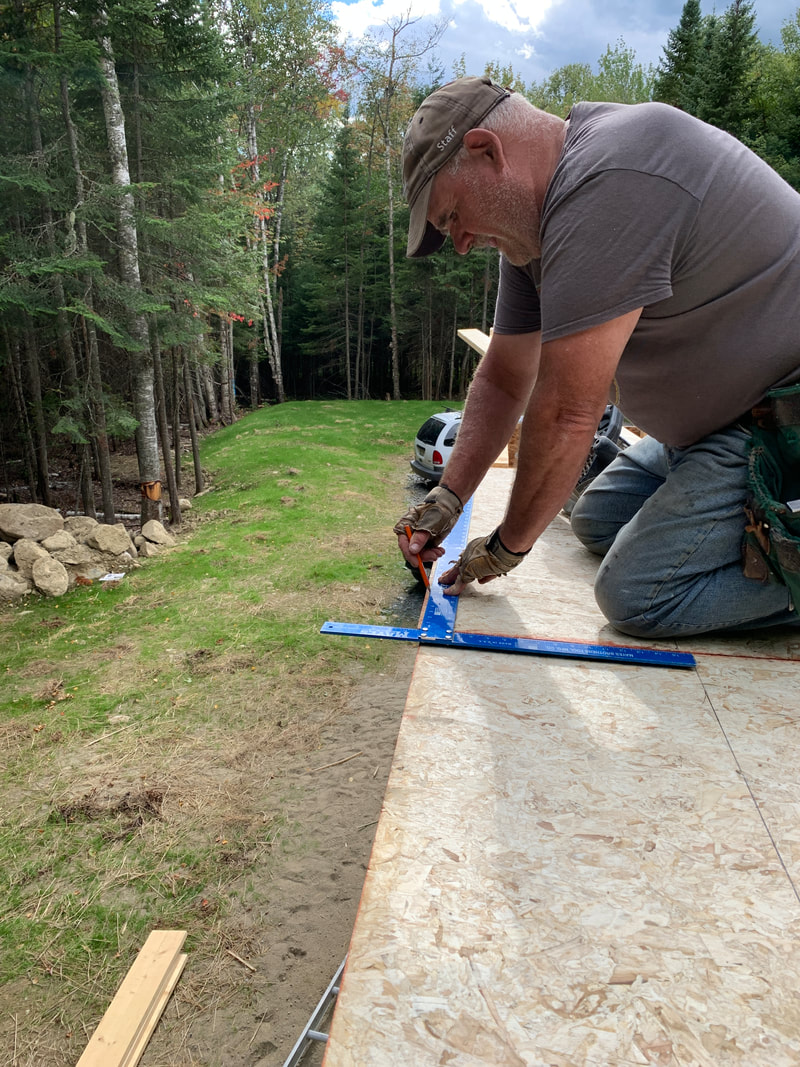 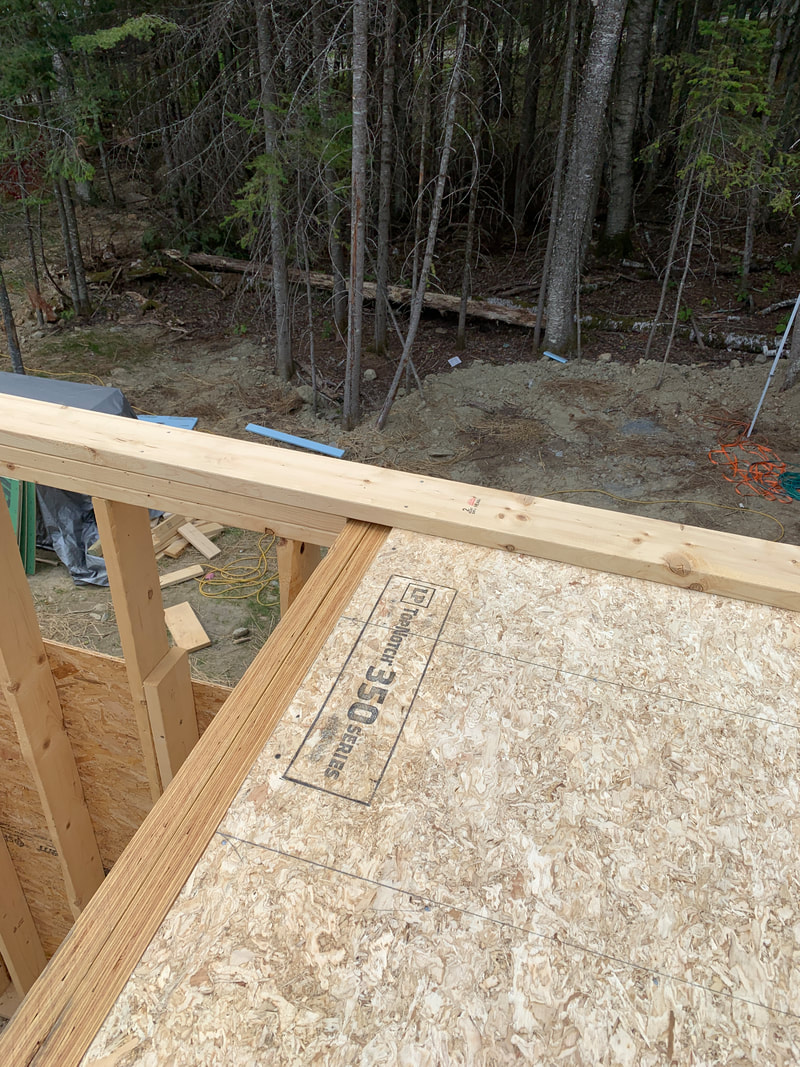 Next we built part of a support wall, which is also the front wall of the bedroom. This made the second floor bounce a lot less! On the opposite side not pictured is a 30" bump out for the pantry, which is also a support wall. The doubled up LVL is 28 feet long and didn't sag at all even before all of this support! That stuff is so strong! 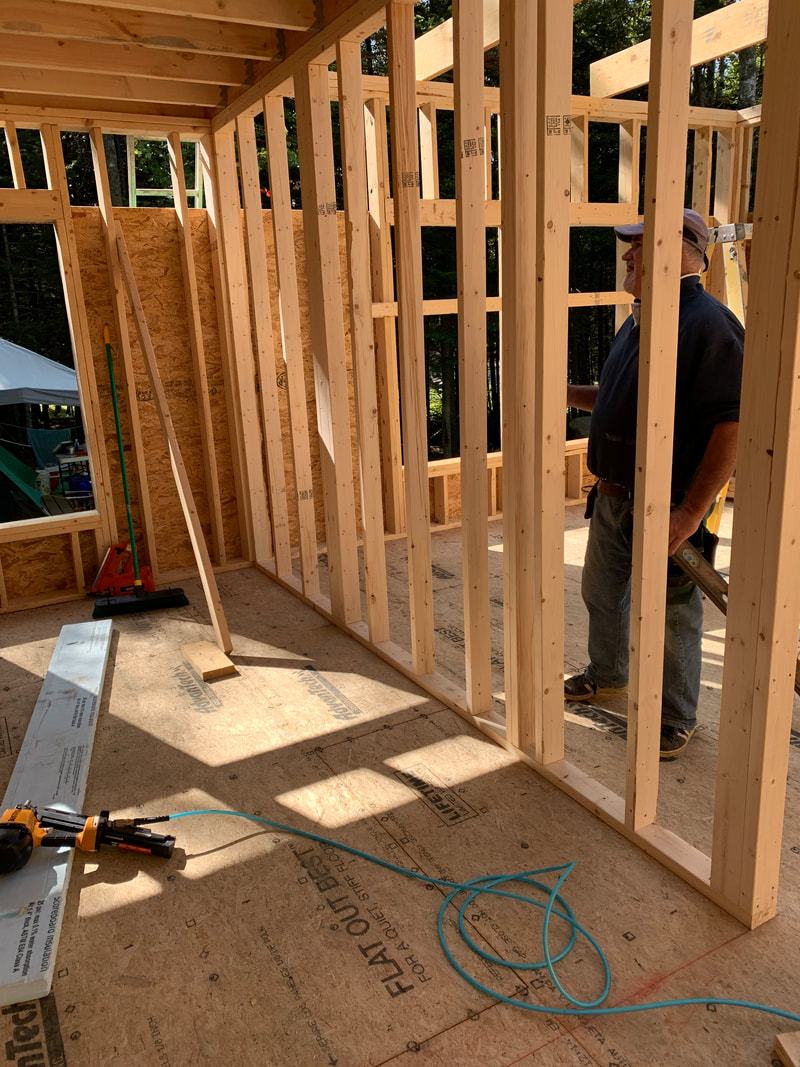 Before we got started on the roof, we had some small things to take care of. My dad came up for a day and we put him to work! He taped up the seams in the sheathing. Then him and I cut what seemed like 100 sheets of 2" foam board as insulation for underneath the floor. That stuff is nasty to rip on the table saw... it's sticky and particles end up in your eyes, ears and mouth. Our masks came in handy for this step! 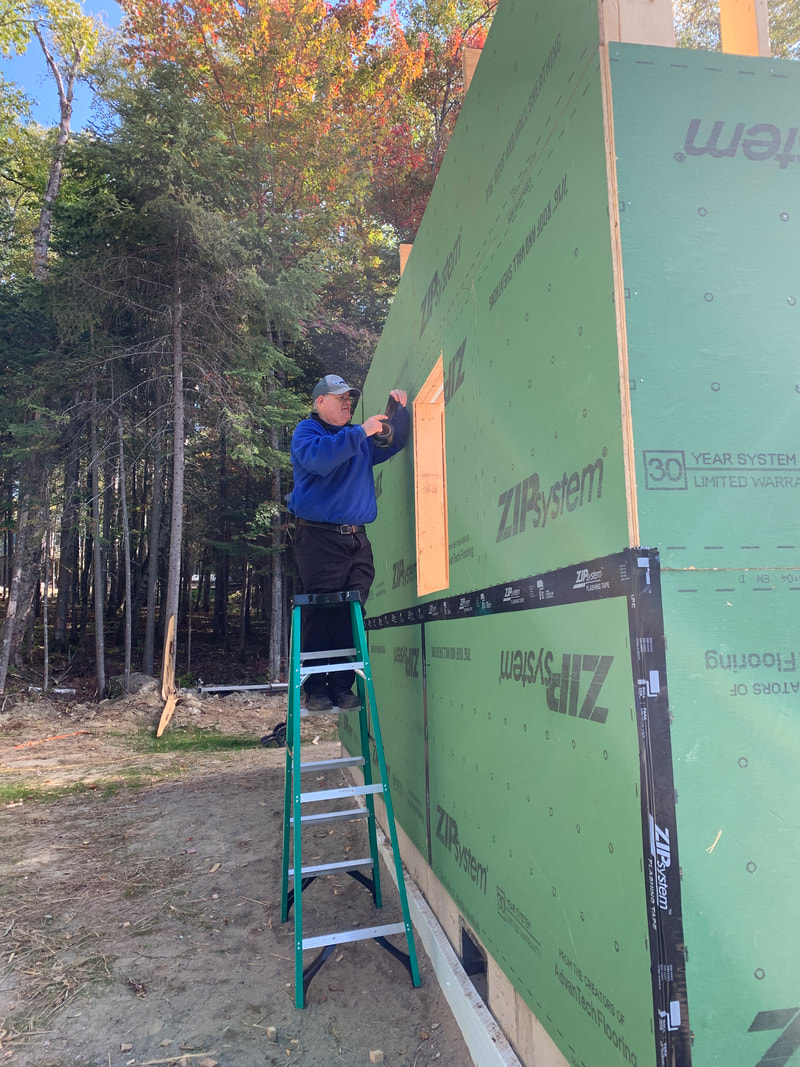 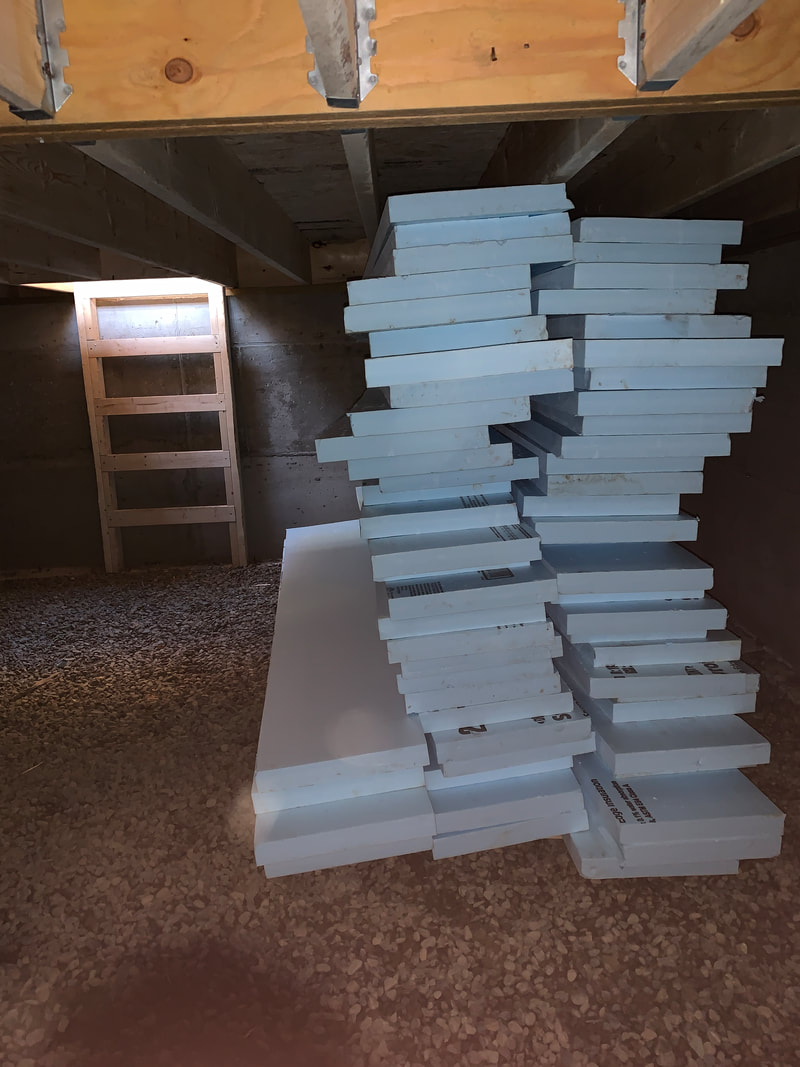 Now on to the roof..... we had to get the ridge beam up first. We had to build posts on each end with 2x6's and as you can see we're starting to use a lot of staging. We also put a post in the middle attached to the LVL. This is a tricky process because we needed to know the exact length of the rafters. We had some issues with the rafters that were sent, they were too short. So after some back and forth, we got the right sized rafters sent and then we were able to get the ridge beam up. 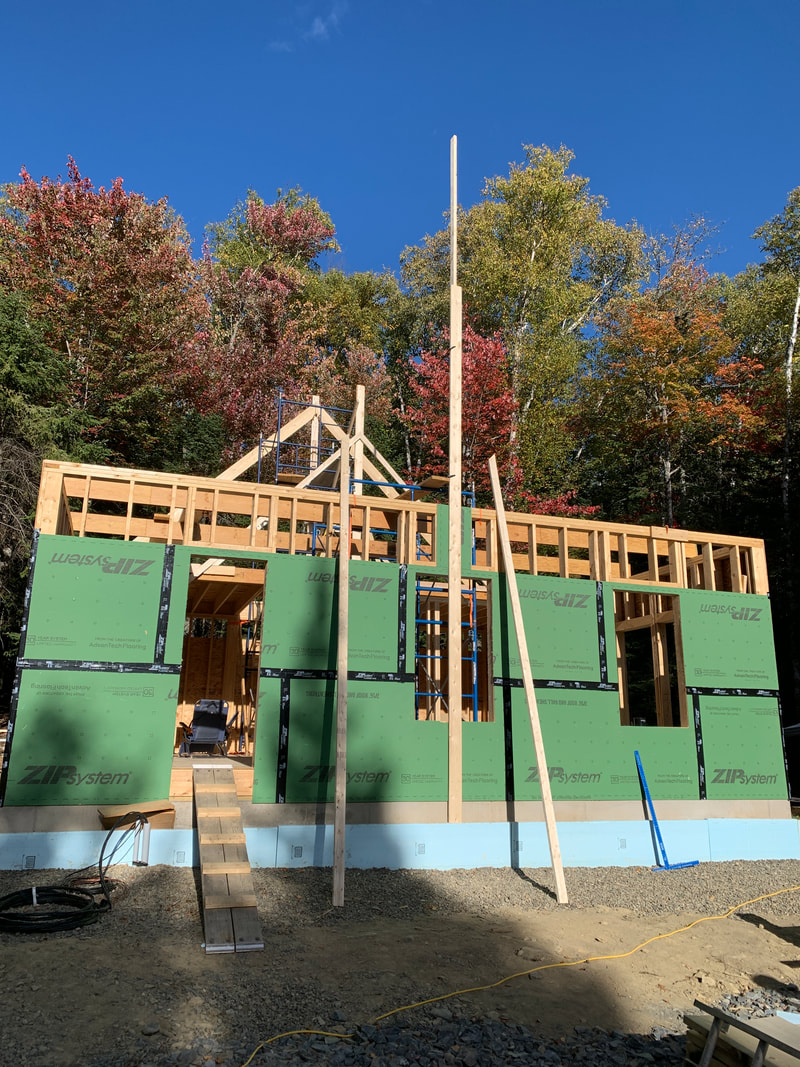 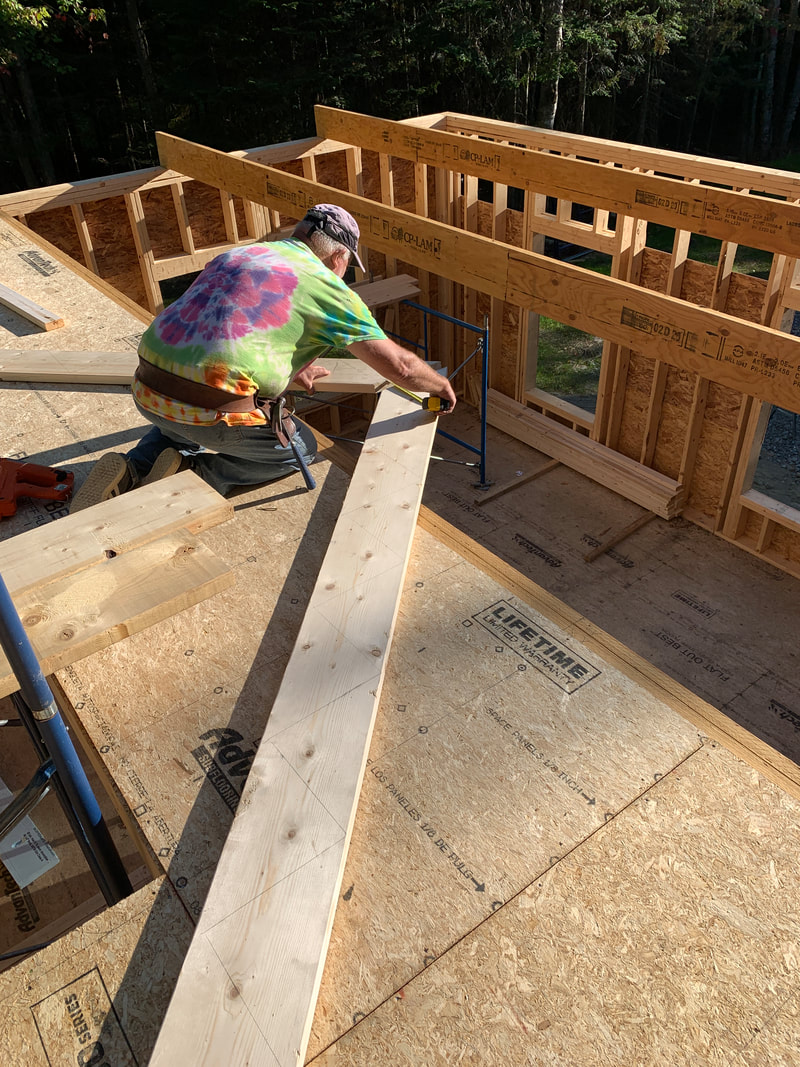 We measured and measured. Finally we determined the boards were too short! 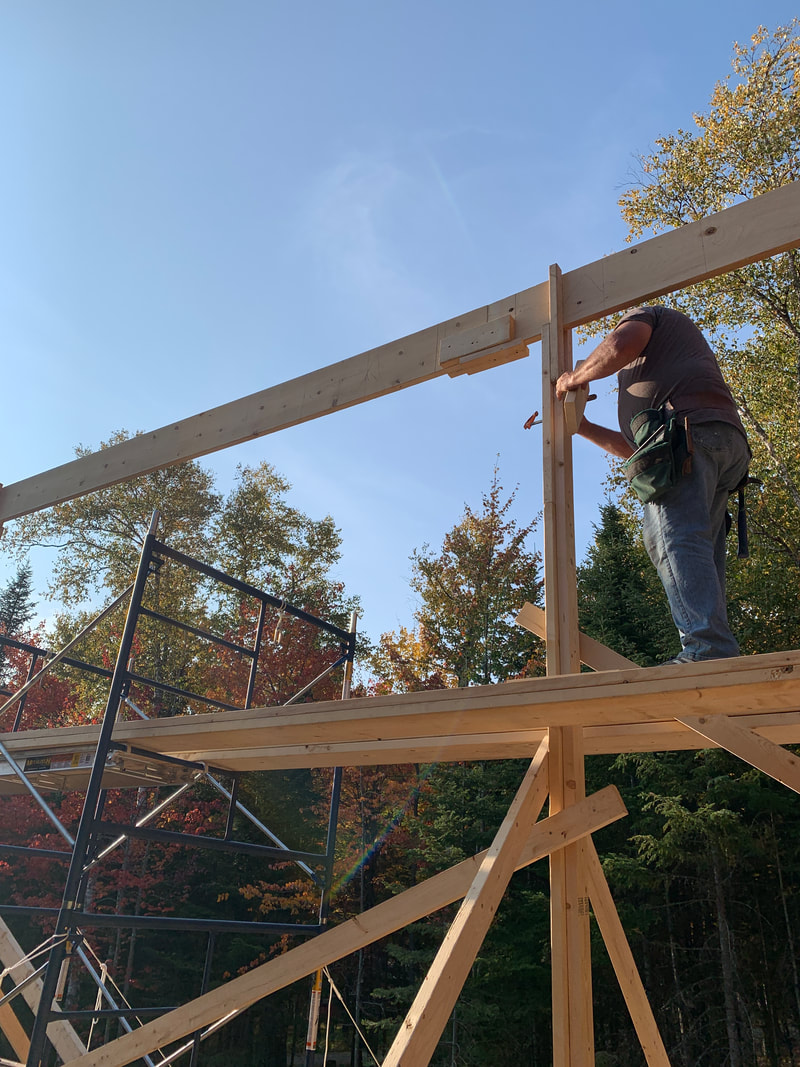 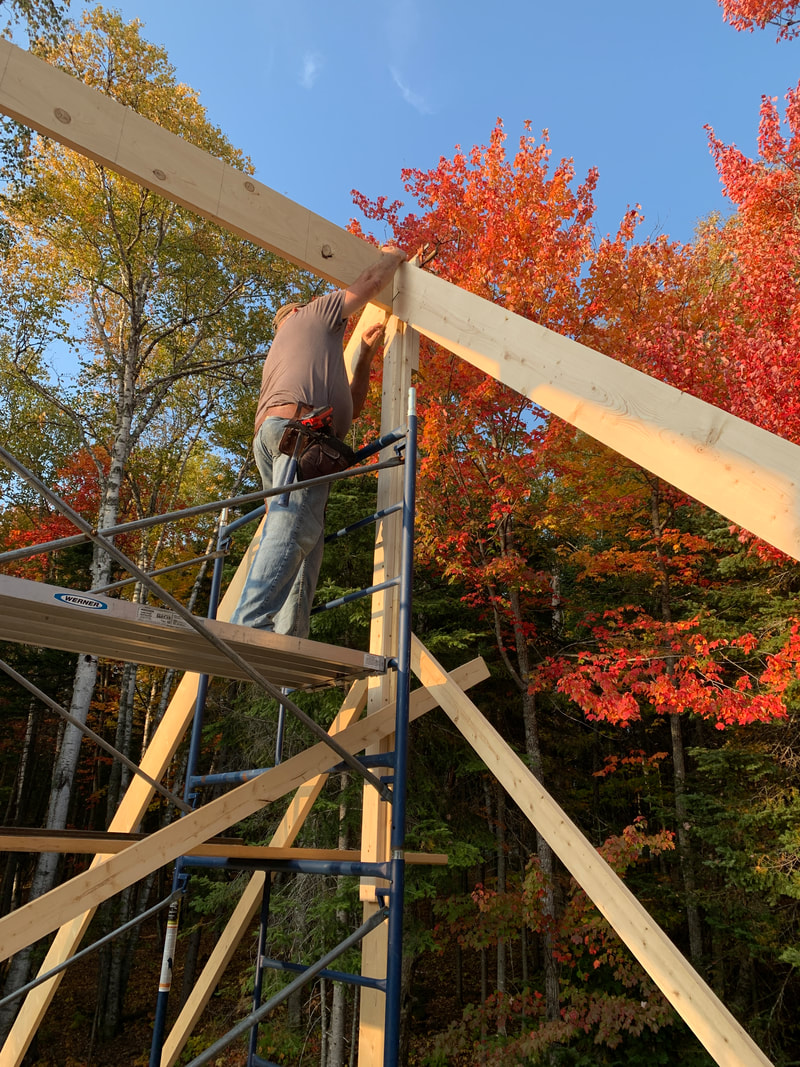 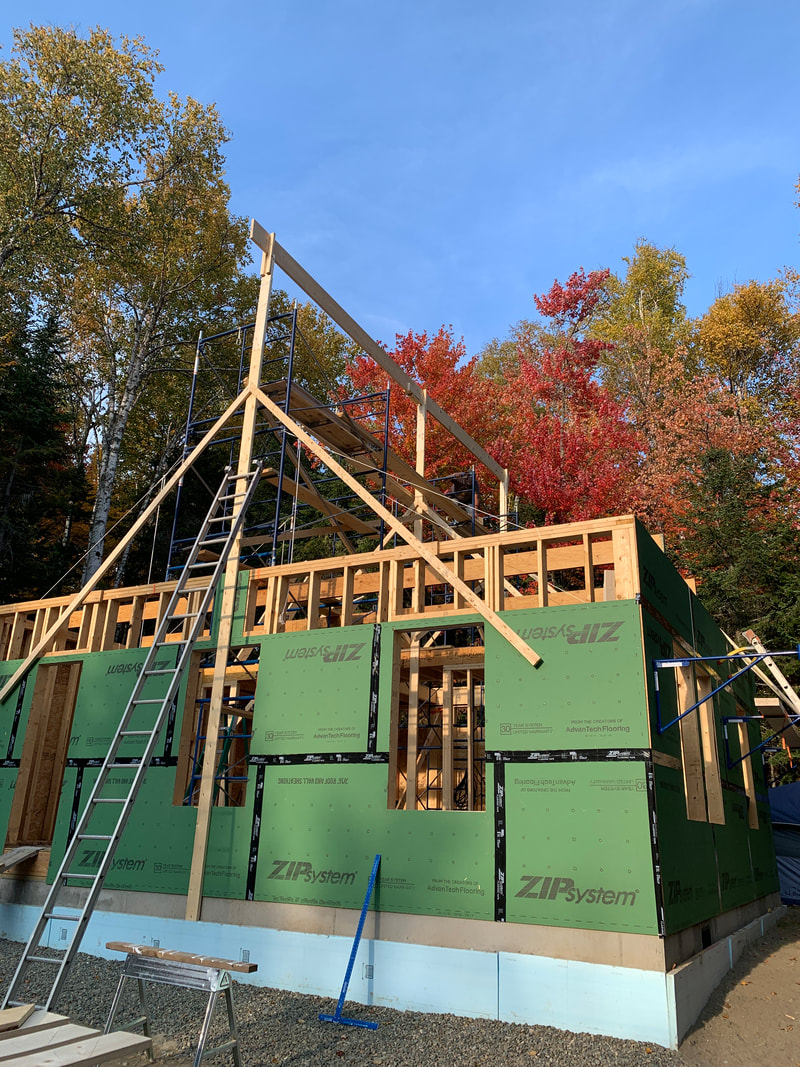 The ridge beam and rafter measuring took time to get right, but it was important that we get it exactly to where we needed it to. In the pic below, I spent the first night in the "bedroom" 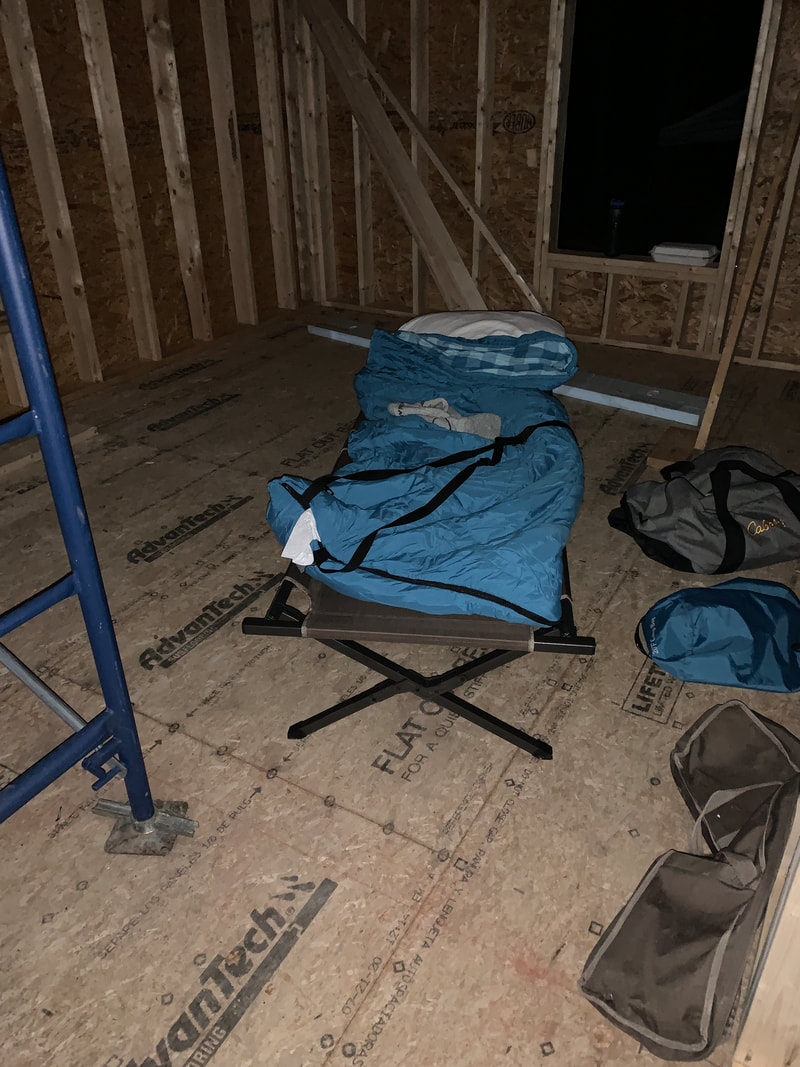 Before we started the rafter install, it was important that we get our staging right. We bought these wall mount brackets which came in huge for passing up rafters to the ridge. 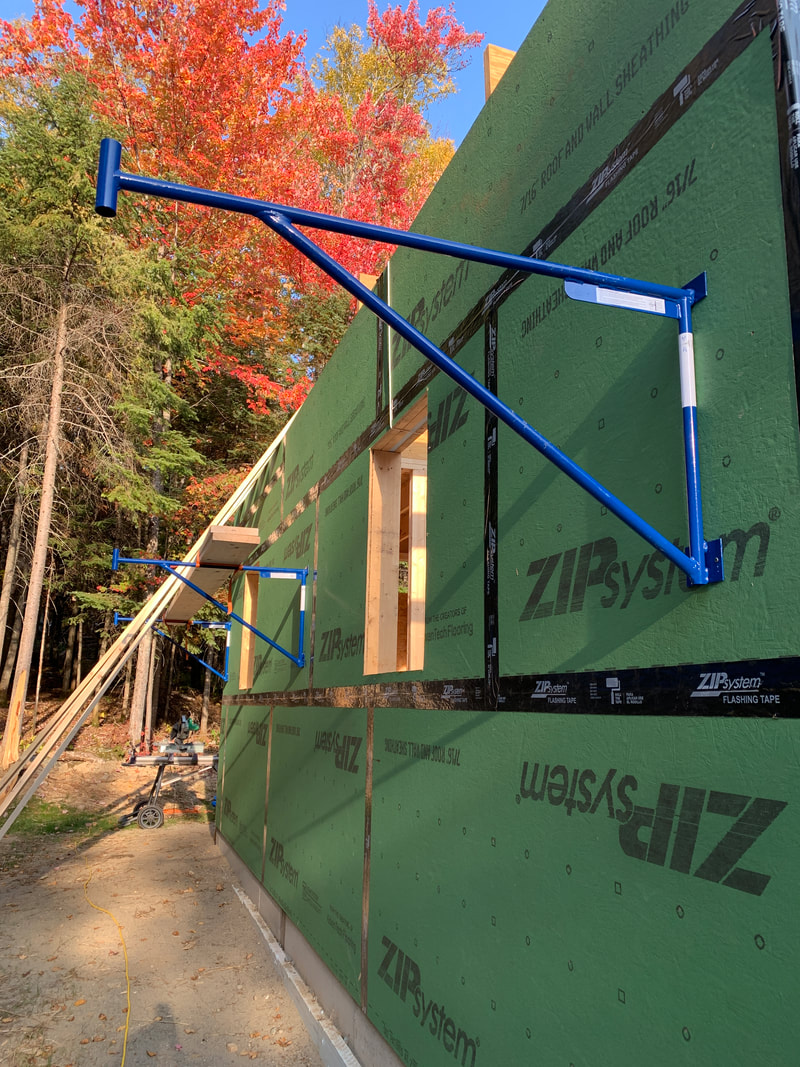 The first step was to cut 40 rafters. This isn't bad because once you get one made correctly than you use it a prototype for the rest of them. I watched John do this, but wasn't exactly sure how he got the measurements. Putting the rafters up on the back half of the camp was pretty easy because I could stand on the floor and hoist them up to John, who nailed them into the ridge beam. 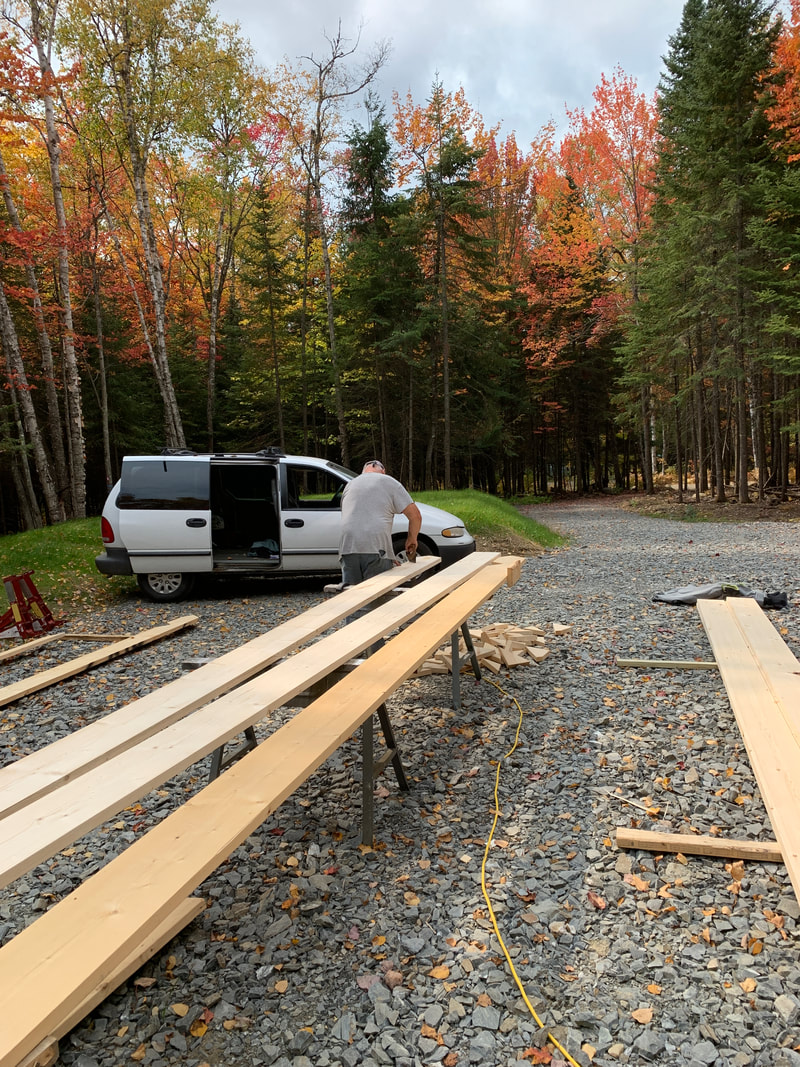 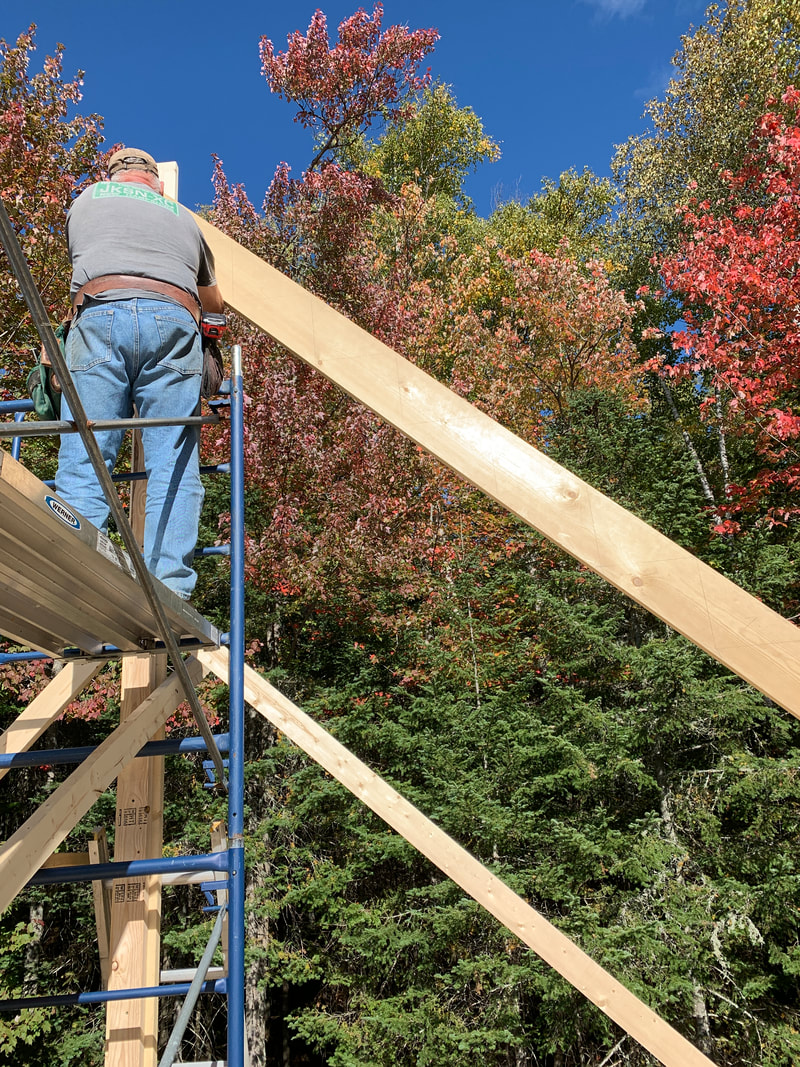 Once we got the back half of rafters on, we had to figure out a way for me to hoist the rafters up from the staging on the side of the camp all the way to the ridge. These were just over 21 feet long each, so it's not easy lifting them from the top of the outer wall to the ridge. Notice John built a nice railing for his staging at the top for added security. 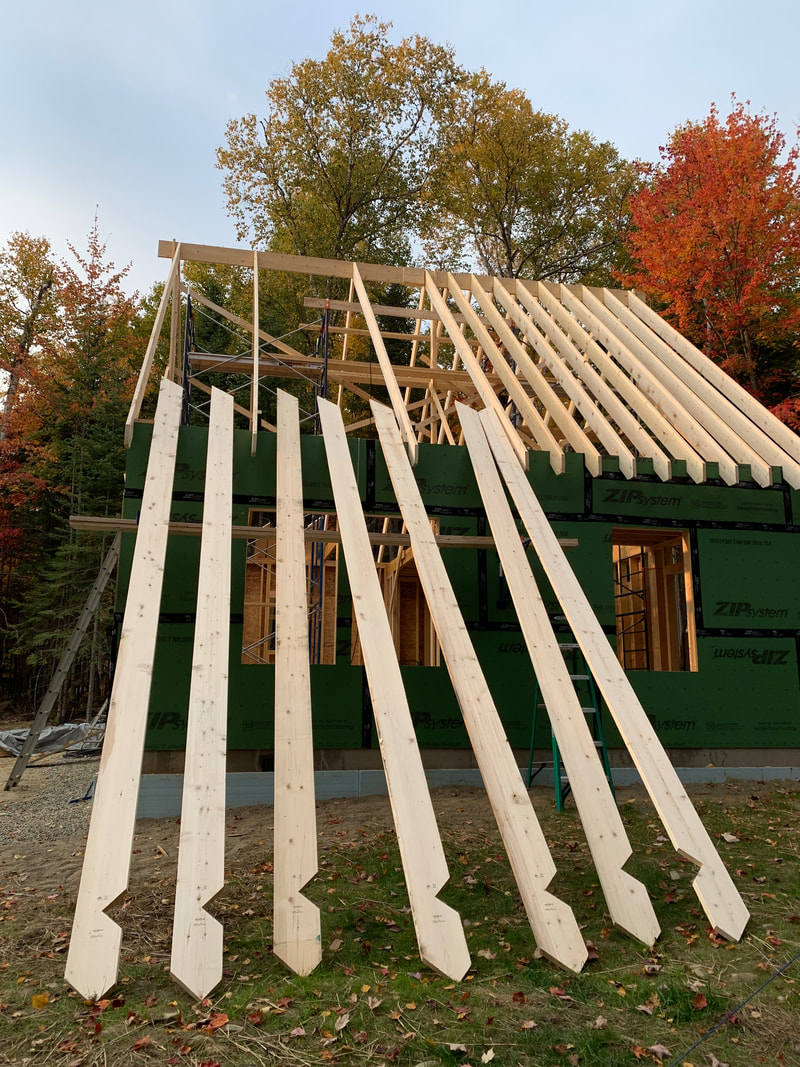 John came up with this great idea to put a clamp on the board and tie a slip knot around it with a rope. I fed the rafter up the side of the wall from the side staging and he pulled it with a rope. He nailed in the rafter, or used screws when the other side was nailed in because they're easier to angle and can come out, then he put the clamp back on the rope and threw it back to me. This process took a long time, but we got the job done! 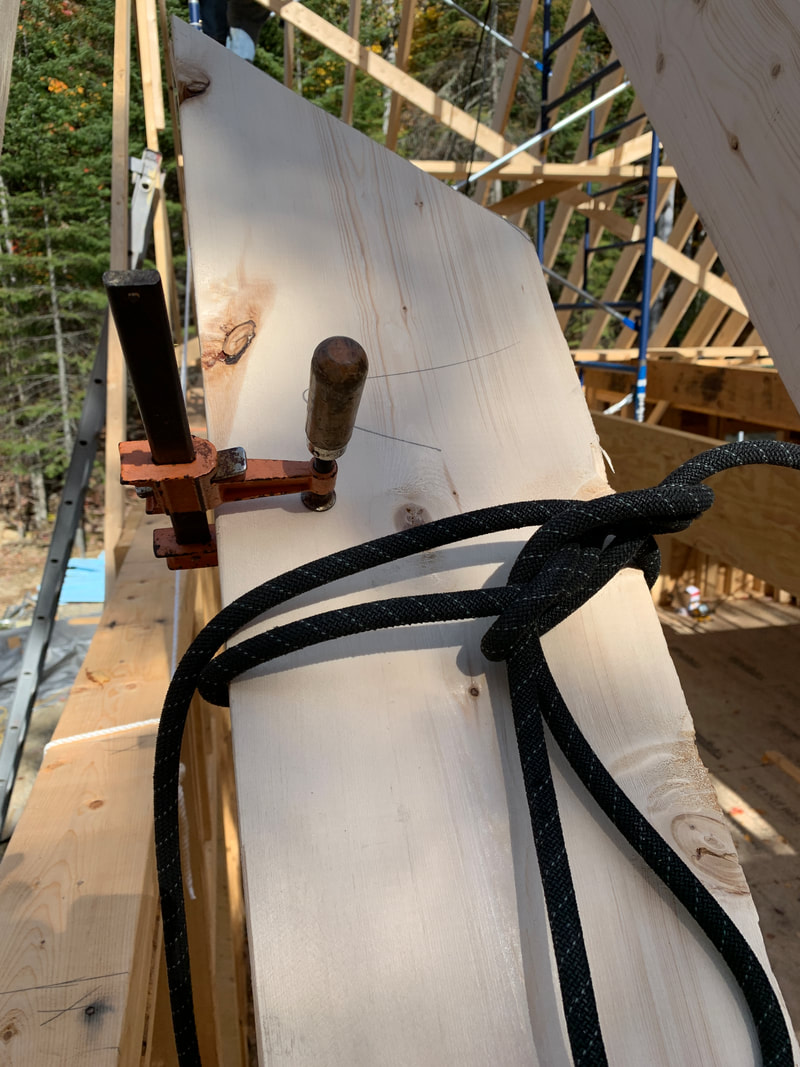 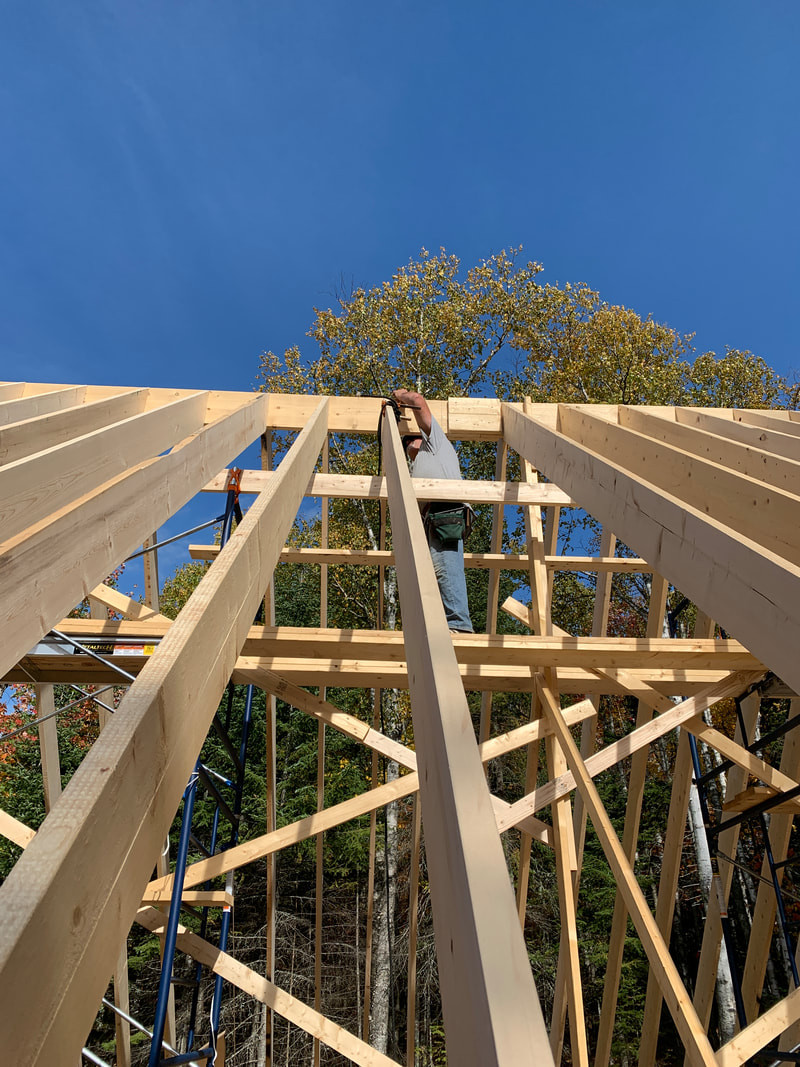 We measured out the rafters to include that two of them would be right next to each our LVL beams running across the first half of the camp. This just helps tighten them up a little bit and bring everything together. We through bolted and then shaved off the part of the LVL sticking out to match the angle of the rafter. 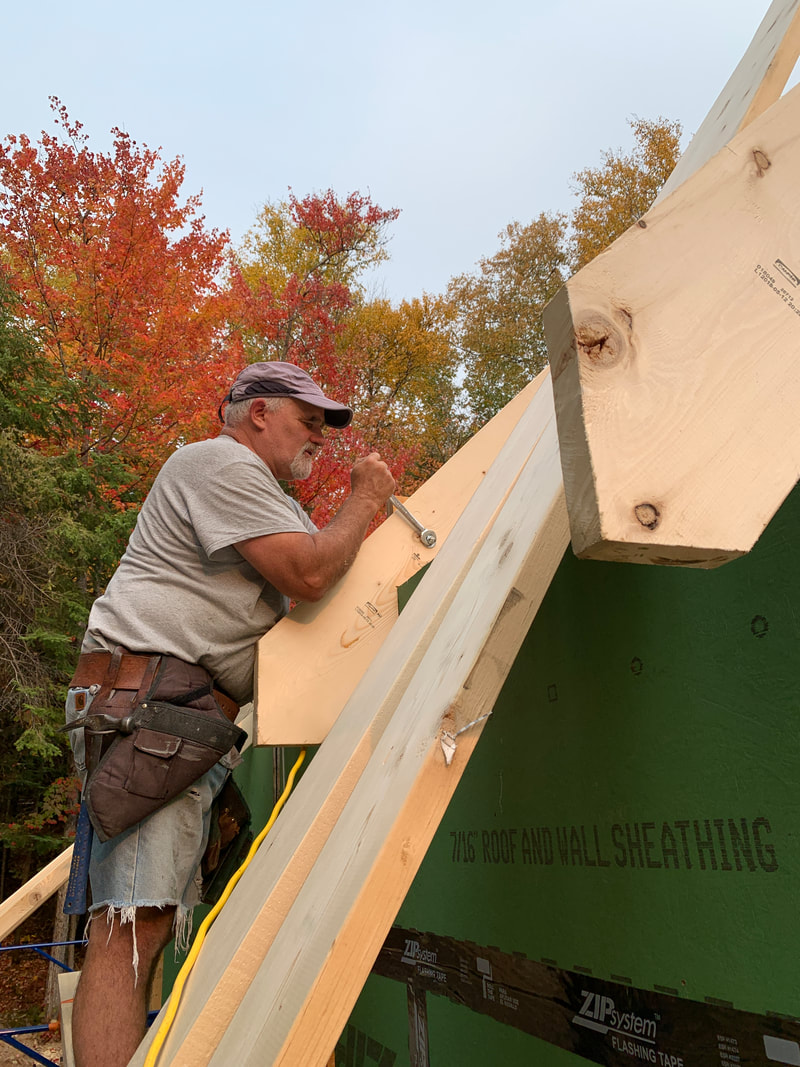 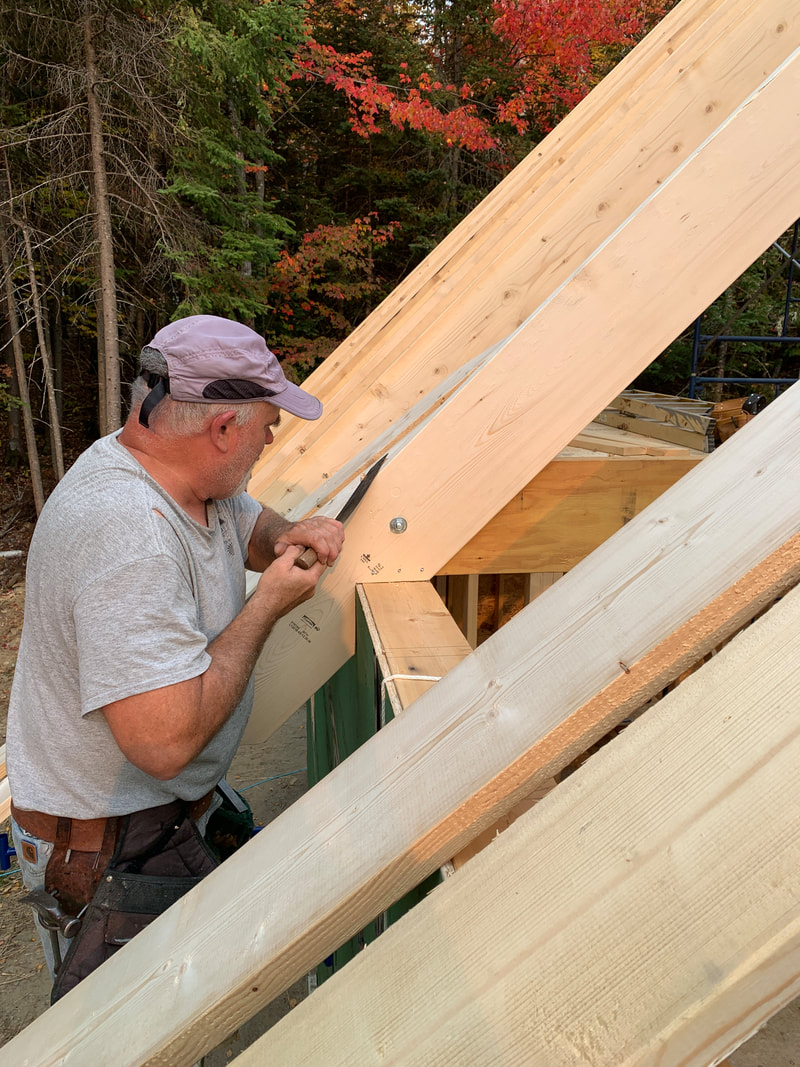 All in all, it took us about 2 ½ days to cut the rafters, put the ridge beam up, and nail in all 40 rafters. Not too shabby for a two guy crew with one guy not knowing what he's doing!! Next it's on to the plywood and underlayment. I get to learn all about the world of pulleys and rope safety in a few days :) 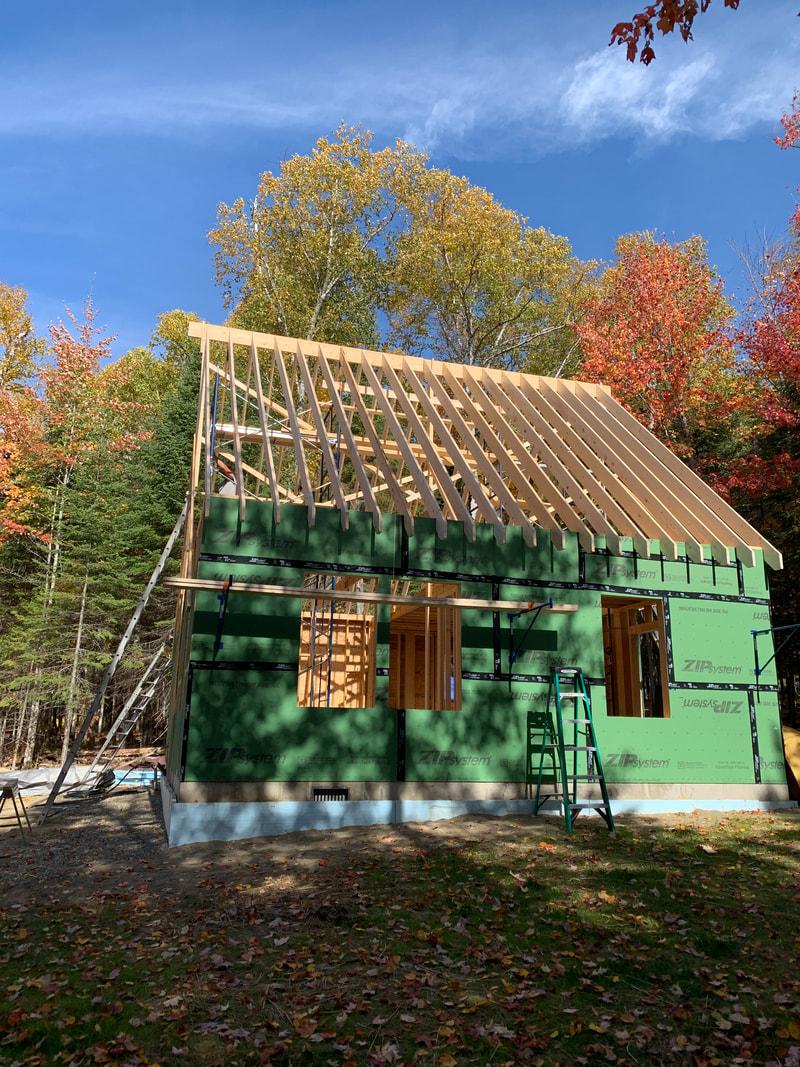 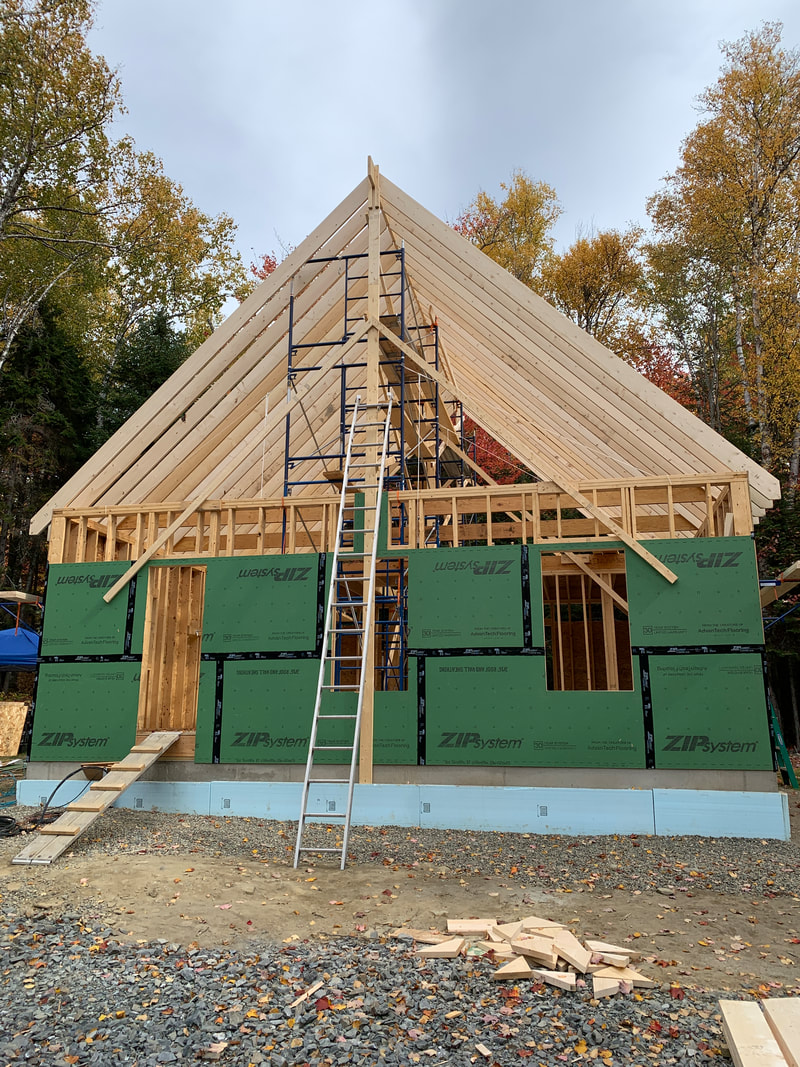 So, I've learned that working in the rain really sucks. When all of your equipment and materials are getting poured on and you're soaking wet, it's just not a fun game. We came back on Friday and put up ¾ of the last two walls. It took about 7 hours for us to get the last two walls drawn out, marked off, cut, nailed and framed up. Not bad for two guys, and one who has virtually no experience with building (me)! Saturday was a washout day, so we decided to do something really important and go drive around looking for ponds and good dirt roads that we haven't had time to discover in the Rangeley area. We found a bunch of cool new places, but sorry guys, I can't share any info! Sunday we put up the last section of wall and then started putting on some sheathing. The Zip system sheathing is so easy to work with, and it's so cool that each board has markings for all of your studs (assuming you're putting everything 16 inches on center). Another cool tip is measure 47 inches from the bottom of your sill plates and make a mark on each end of the wall, and one in the middle so that you can run a chalkline. This way, your sheathing will be one inch below the sill plate to cover them up. Another thing that we figured out with sheathing is making sure that your partitions are insulated before putting up your sheathing! We use two strips of 2 inch foam board that I ripped on the table size at 5.5" in width. I had to leave for the day on Sunday afternoon , so instead of finishing the sheathing we decided to put up the two LVL beams that are in line with the two posts in the crawl space as well as the first floor framing for the bathroom and bedroom. These each span 28 feet and are pretty heavy. We had to get it up on staging then get it into place and nail it together, as well as bolt to the front first floor wall. I made a timelapse video for this process and I'll try to post it, but it's nothing too impressive. See below for some pictures and explanations from our work this past weekend. The next steps are to finish the sheathing, put on the joists and rimboards in the back of the camp for the second floor, and put a final top plate of 2x6 around the whole border. We'll then put up two more LVLs in the kitchen/living room for extra support. In this photo, you can see that the back walls were built with 8' studs and the front were built with 8'10" studs. This is to accommodate for the rimboards, LVL and floor joists for the second floor. 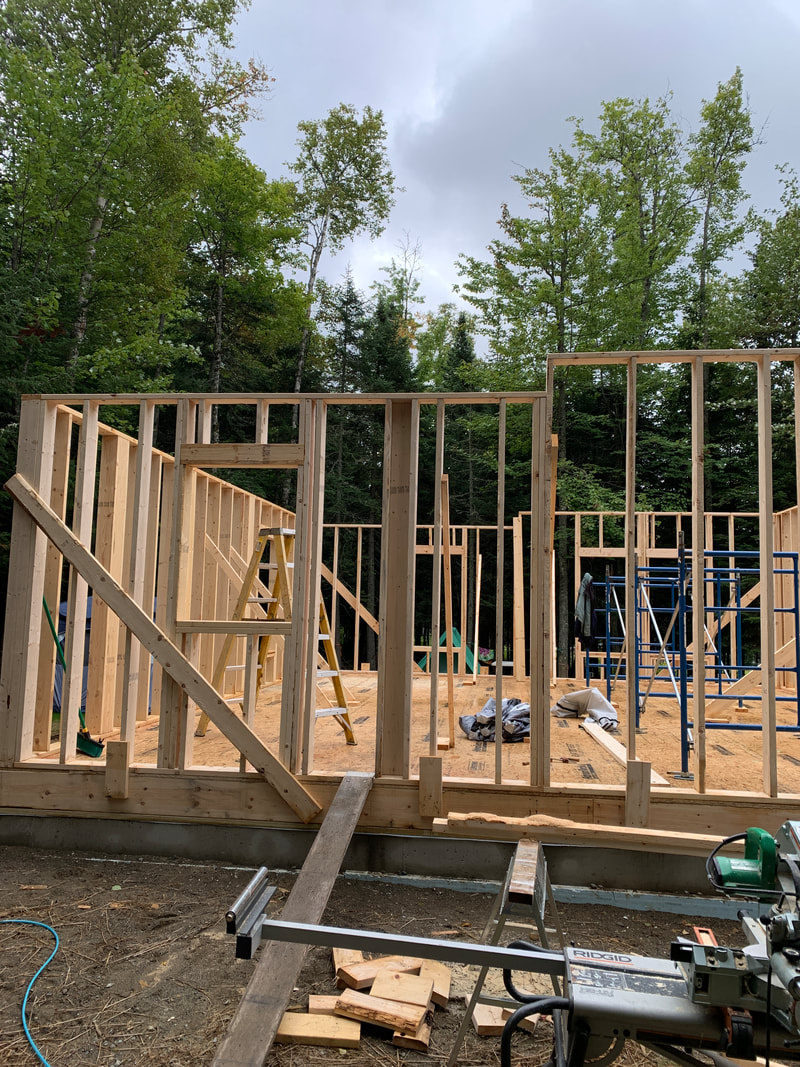 Here's another shot of the uneven wall heights for now 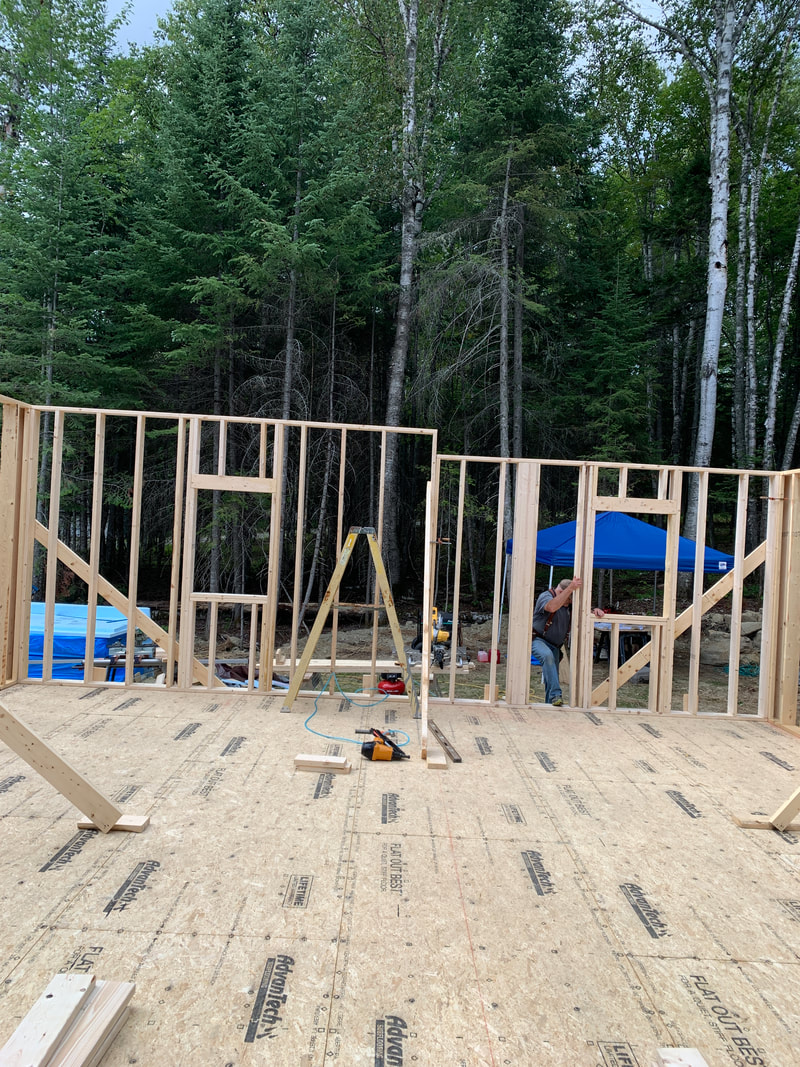 I had explained above how the sheathing is put on. I was curious about how you cut around windows and doors. John just made a simple measurement from the inside and cut it with a circular saw. I let him do this work due to his many years of experience and I didn't want to screw it up :0)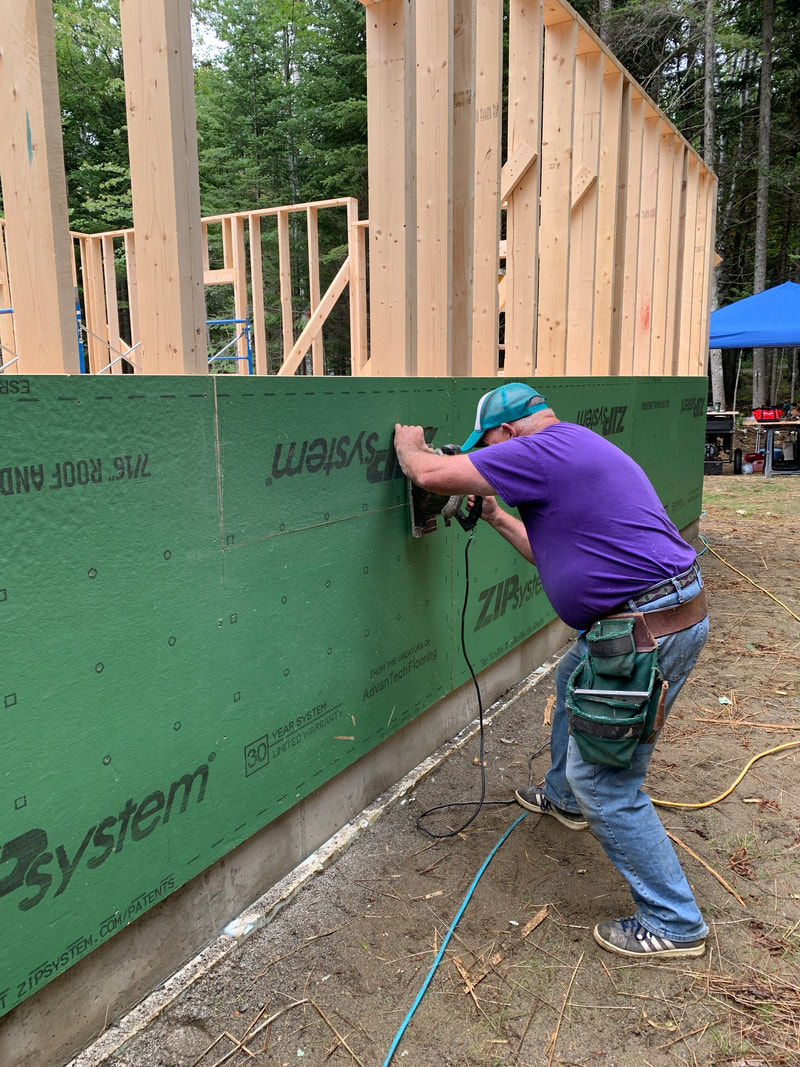 Here's a shot of the front of the camp with the doors and windows cut out and the sheathing started 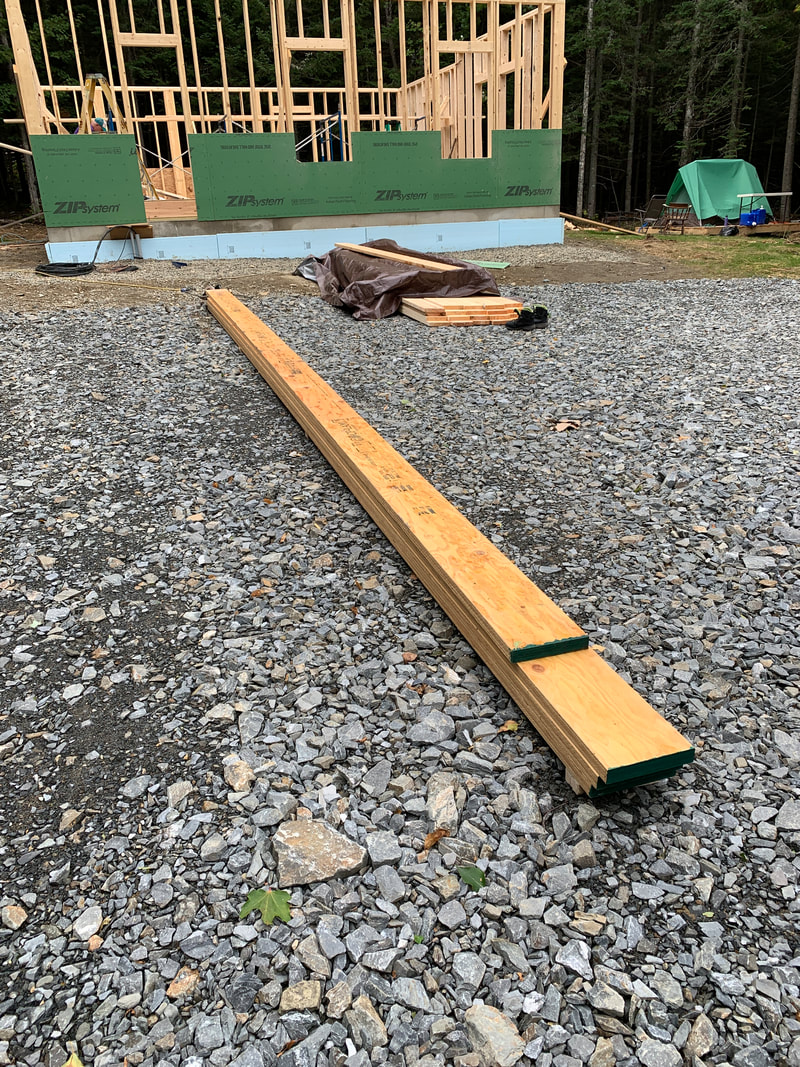 Here you'll see the two LVLs that we lifted up on to the staging. We had originally thought we'd need about 3 guys to lift these, but it wasn't that bad. This LVL will be on top of the first floor interior walls and used for the 2nd floor joists to hang on. We'll measure it out and put on the joists after we get the rimboards up on the back walls. I also never realized how much work it is to get staging put together and set up. On top of that, we needed to buy some extra long (16 ft) 2x10's which isn't super cheap. We're going to need another set of staging once we start getting to the rafters. These LVLs are bolted to the walls at the end also! 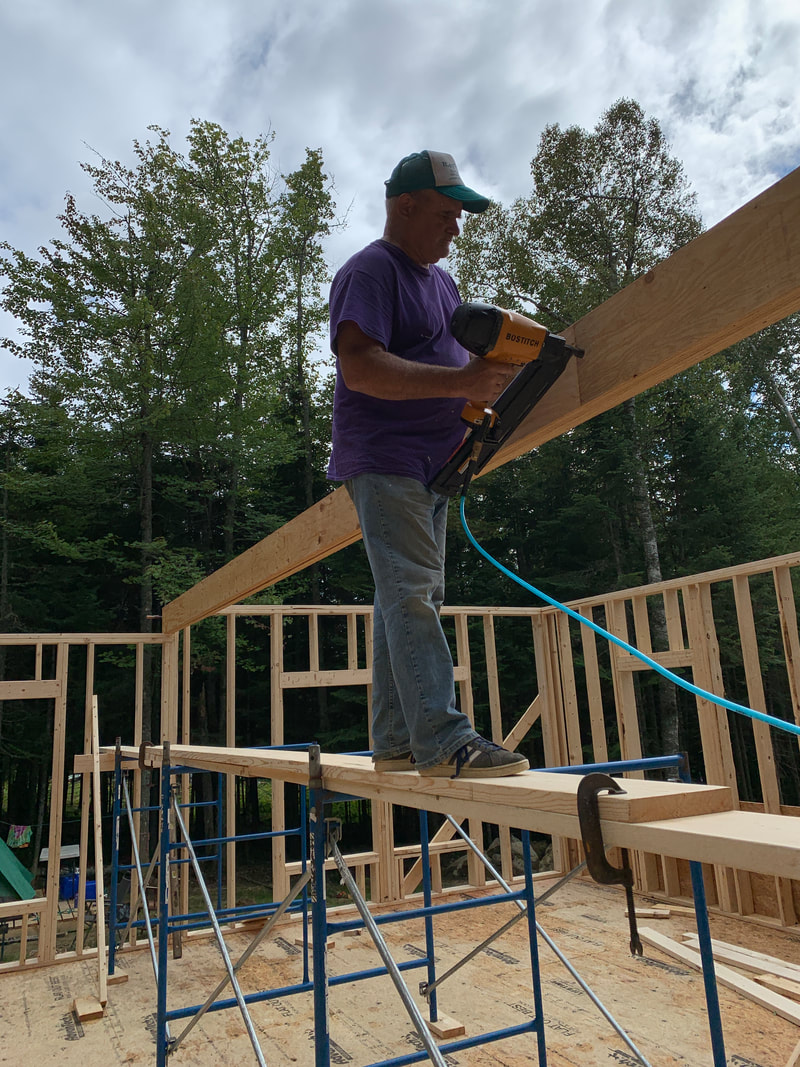 Here was the progress that we made on Sunday. John is working by himself this week finishing up the sheathing and starting to put up the second floor joists. I'm excited to get back up there and see the progress. It'll be great once the roof goes on because we can store tools inside, and I might just start sleeping in there. On a side note, my tent, which had a metal cot and an air compressor in it, flipped over from the 40+MPH wind gusts on Saturday. That was fun to clean up..... #troutcamp  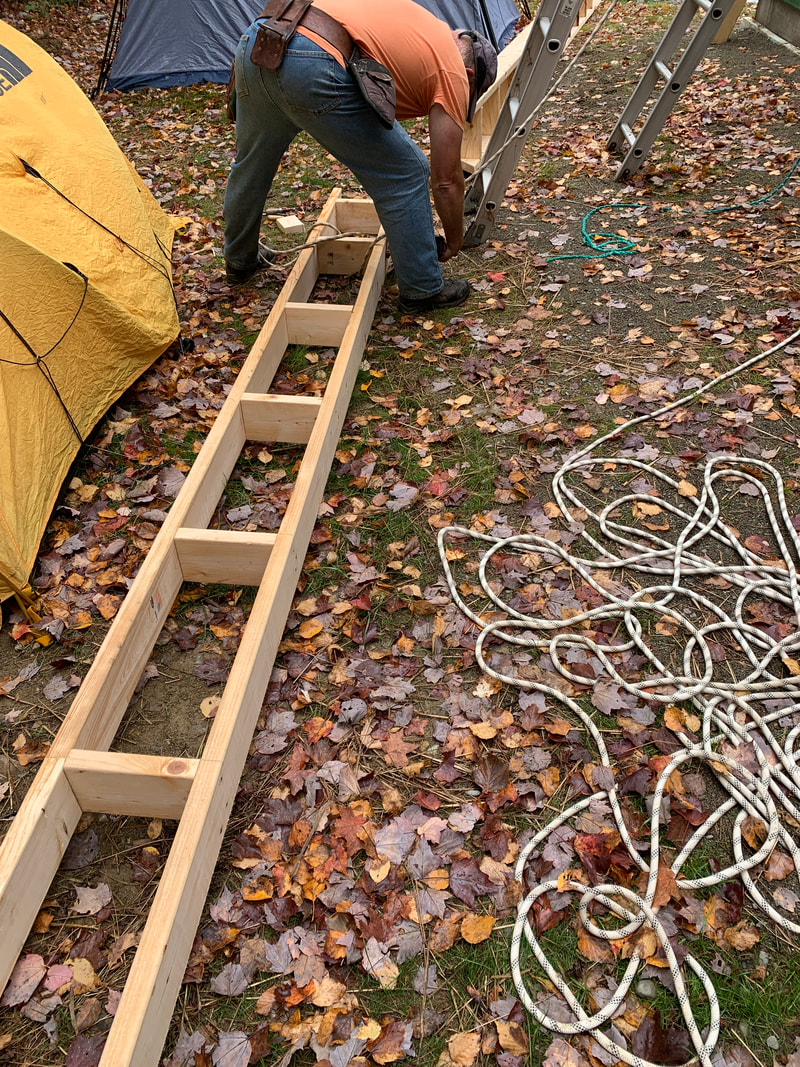 As you can see from the picture above, we're all ready to go. The foundation has been backfilled. The electrical, well and septic lines are set. Time to start building up! As a warning, I am NOT a builder. I had never even used a framing nailer before this project. My Uncle John is the foreman and the brains... he just tells me where to nail. I've learned a tremendous amount throughout the process and am excited to see what else I learn. All I know is that I can see how strong people get who hammer nails for a living. Long days, rewarding work! We decided it was best to put in a turnaround, so one last load of big crushed rock for the driveway was needed! 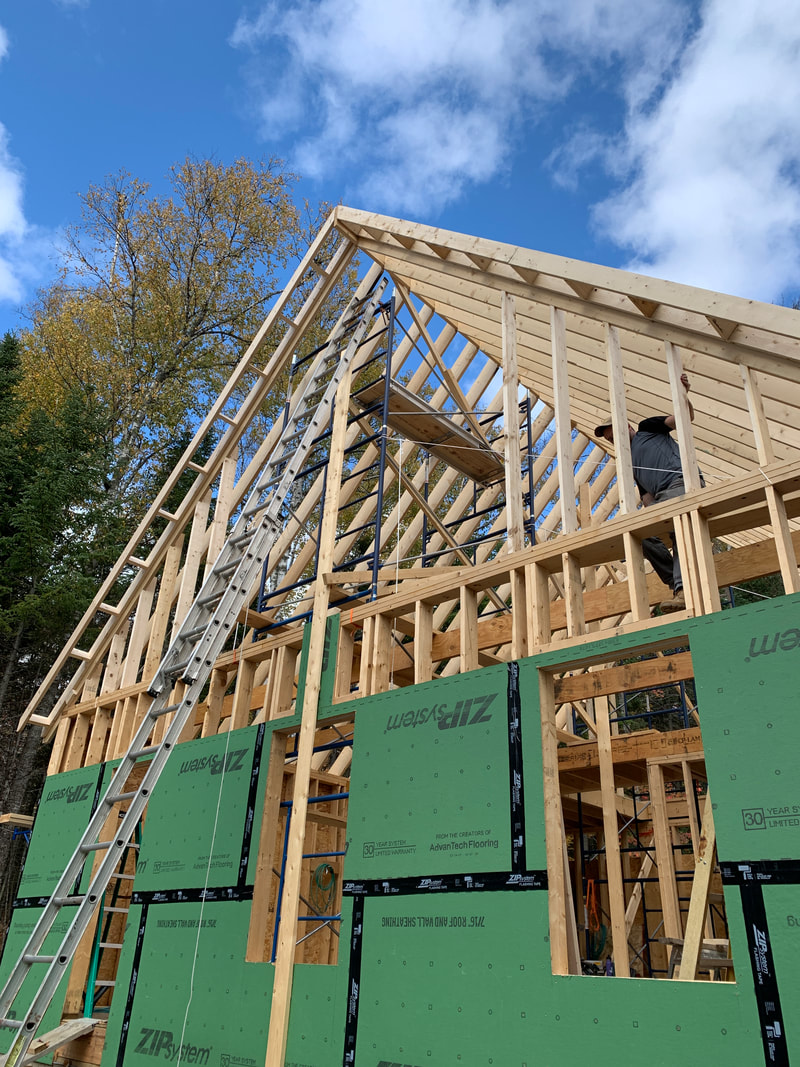 The first step before laying any wood is putting sill seal around the outside. The pressure treated sill plates sit on top of this.  We measured out the holes and used a 1/2" bit to bore them out. It was pretty easy going down. Once you put them on, you screw the nut on the bolts. Easy as that. Here's John with the first board laid! 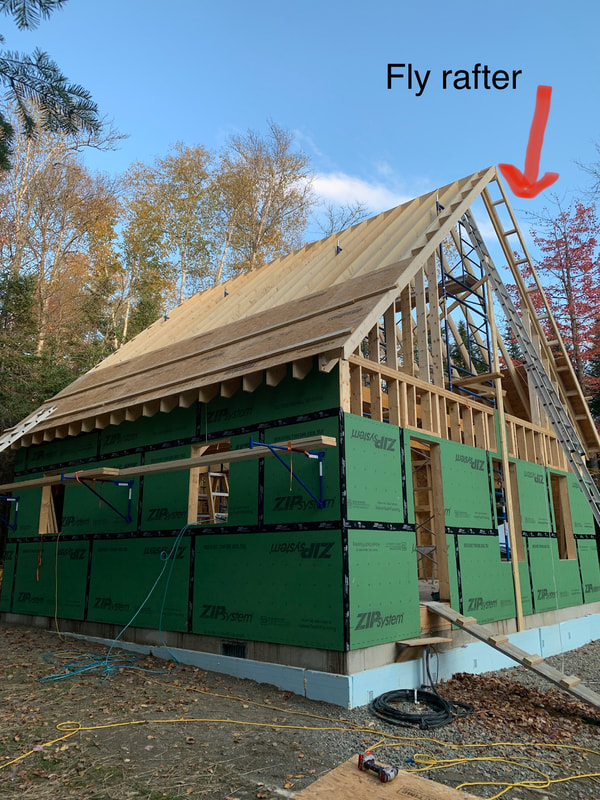 Sill plates all laid and it was only 9 am. Unfortunately, there was some mixups at the lumber place so our joists and joist hangers came in, but no LVL floor beam and no rimboards (the next step) so we had to wait until our next trip up! 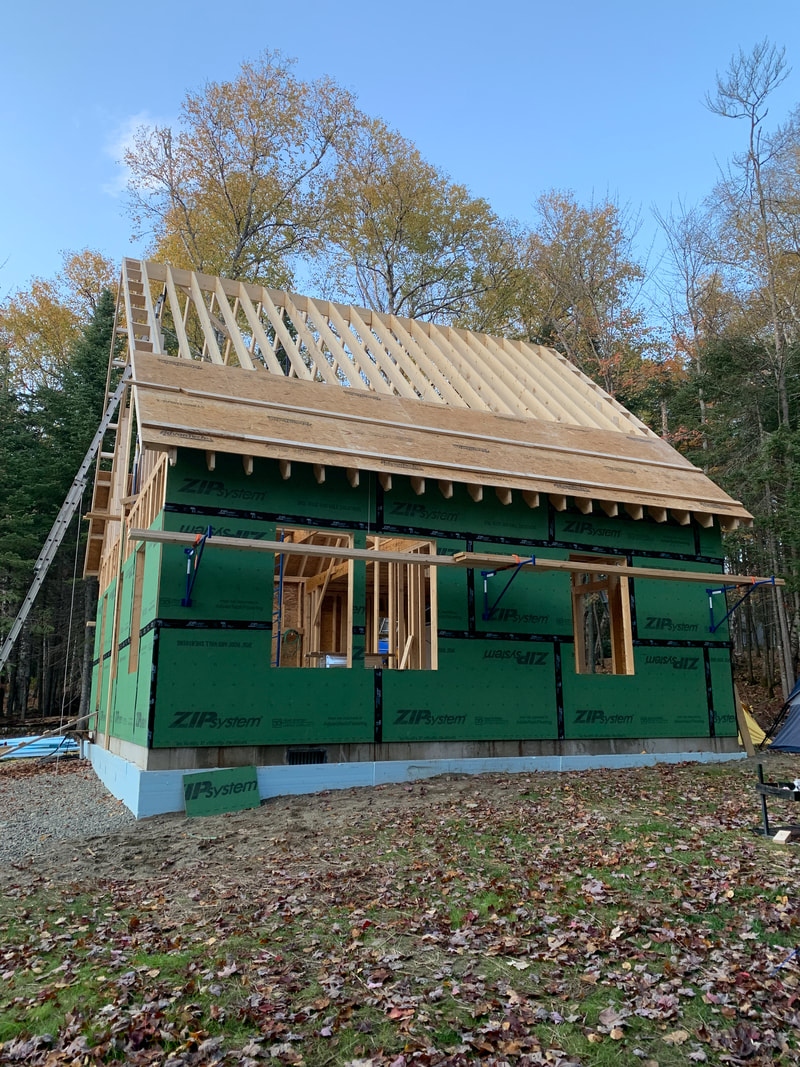 The next step is measuring out the 2x10 rim joists (or rim boards) and toe nailing them into the sill plate. I thought it was a little weird toe nailing a critical piece.. I thought we'd use L brackets or something, but John assured me that we'd be shoring this all up later as the LVL carrying beam and floor joists were laid. 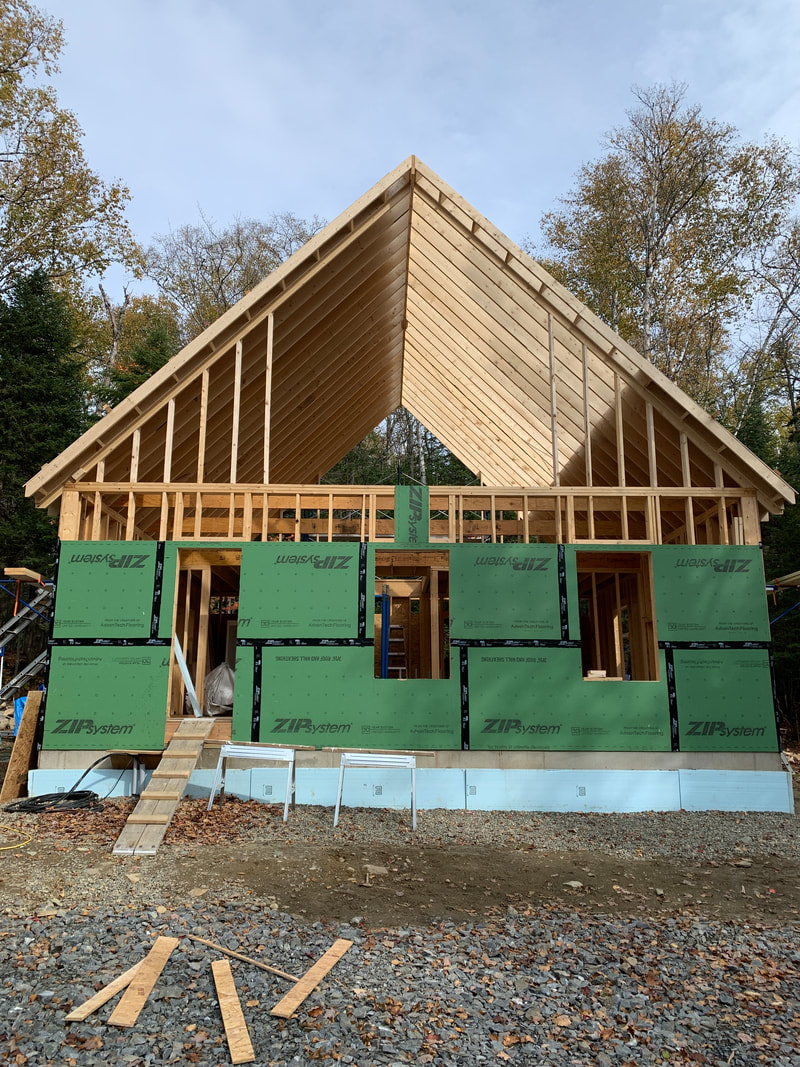 Next we laid the two 28' pieces of LVL. As you can see, there are two concrete footings for our posts. I was very surprised to find out that LVL is almost the equivalent to a steel beam in terms of strength and this puppy was dead level without any support posts below it! 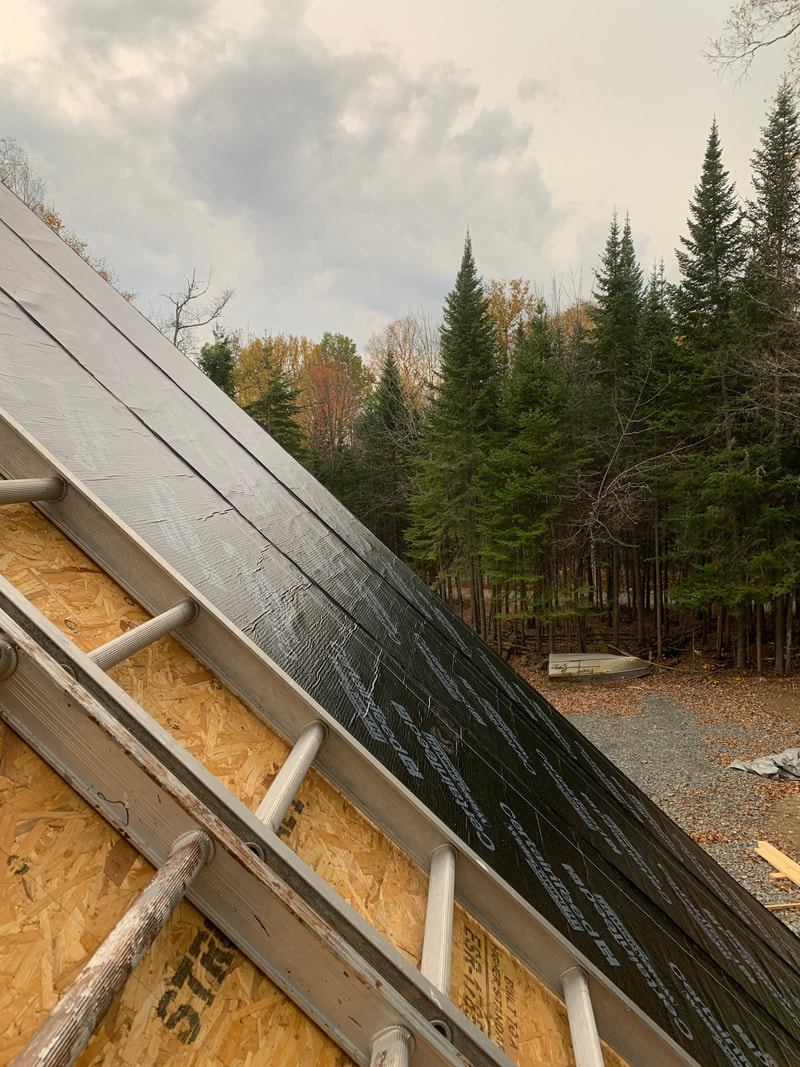 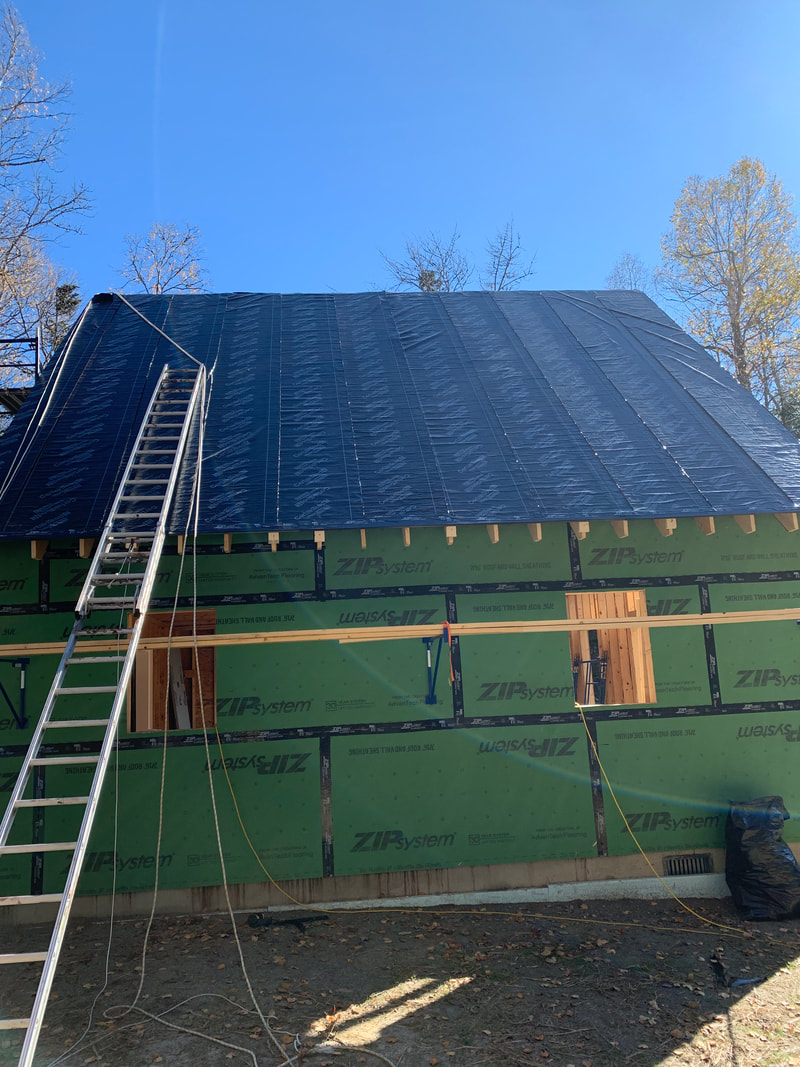 We decided against using steel lalley columns and went with PT 4x4 posts instead. Later, we used L brackets and concrete screws to really strengthen the posts. The LVL is not in the center of the camp because it marks where the back wall for the loft will be, which isn't dead center in the plans. If you look closely, you can see every joist hanger marking made by John. He was very methodical in marking out every spot and reading the plans carefully. I left this work to him, but I learned a lot in the process. He's constantly teaching me new things and I'm very grateful to learn! He does the measuring and I do the nailing!  Below you'll see the joist hangers and a couple of floor joists hung. A good tip for hanging joist hangers is to mark out exactly where you'll want the joist to sit and also mark out the top of where you want the joist hanger to sit. We cut a small piece of a 2x10 joist out and used it as a measuring piece. We clamped the joist hanger to the test piece of wood which made it a lot easier to hang the joist correctly. Trying to squeeze them together and screwing them in seemed impossible without doing this. I wish I had a picture of the clamped piece of wood... man did this go much faster with one guy holding the joist hanger and the other guy on the drill! 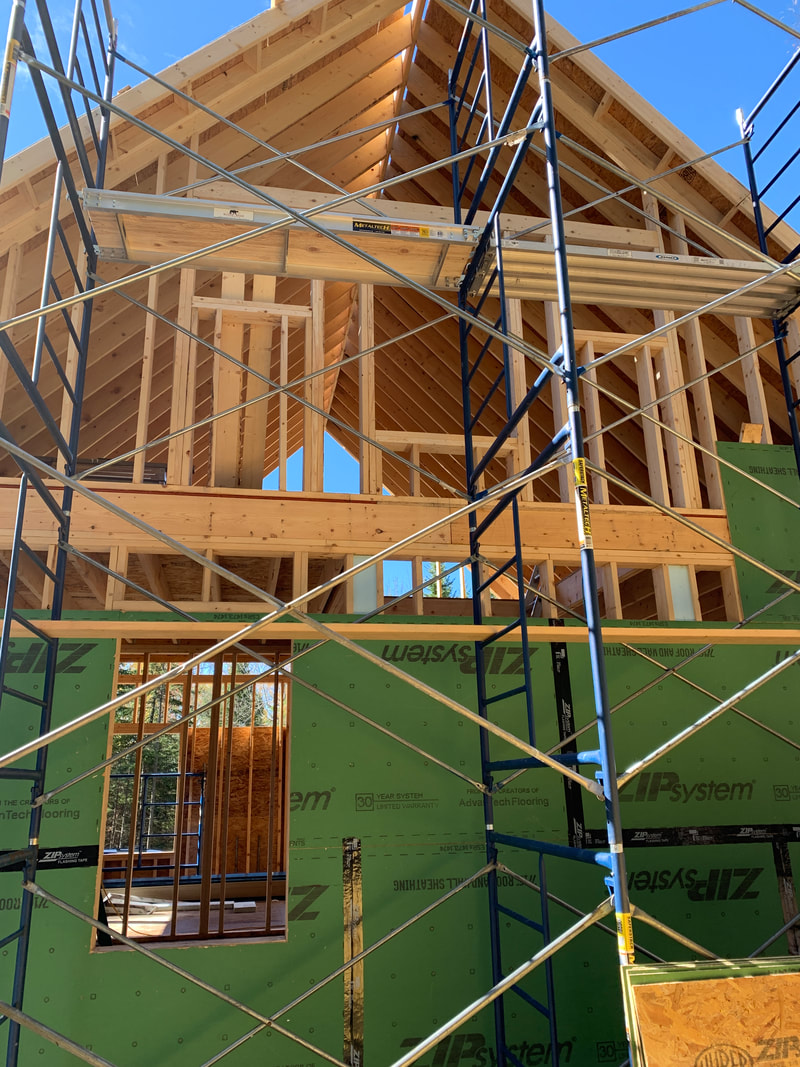 8 screws and 4 nails in each joist hanger times 50 joist hangers was a lot of hammering. I don't know if it was safe or not, but I used the nail gun to put in the nails on the left side. I couldn't get the same leverage on the right side, so I had to hand nail those in. Nailing into that LVL is tough stuff!  The joists are all hung and the door for the crawl space is framed out. We'll make a ladder using 2x4s for this access which will be in the bedroom. There will be a latch that is flush with the floor that will be under a rug, so you won't even know that it's there! 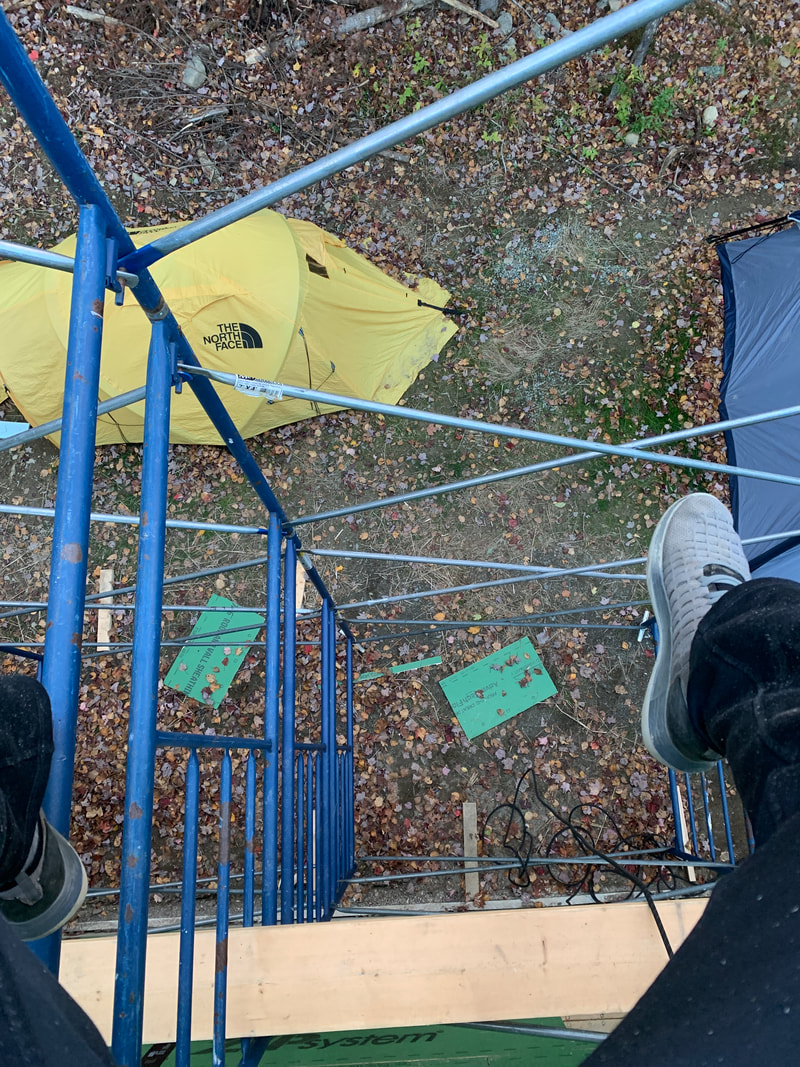  Down goes the advantech sub flooring. We had to use adhesive caulking for the floor then nail them all down. Very cool to see that each piece of subflooring had marks for the joists, making it much easier to know where you're nailing. This part FLEW with 3 guys. 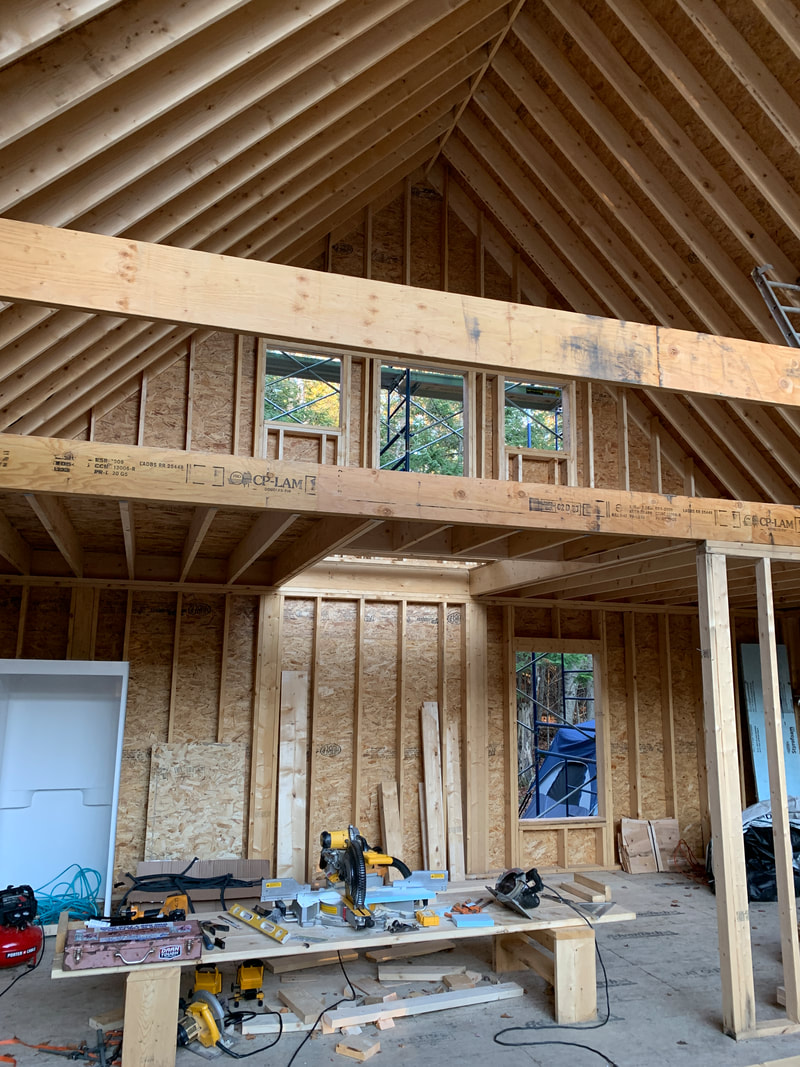 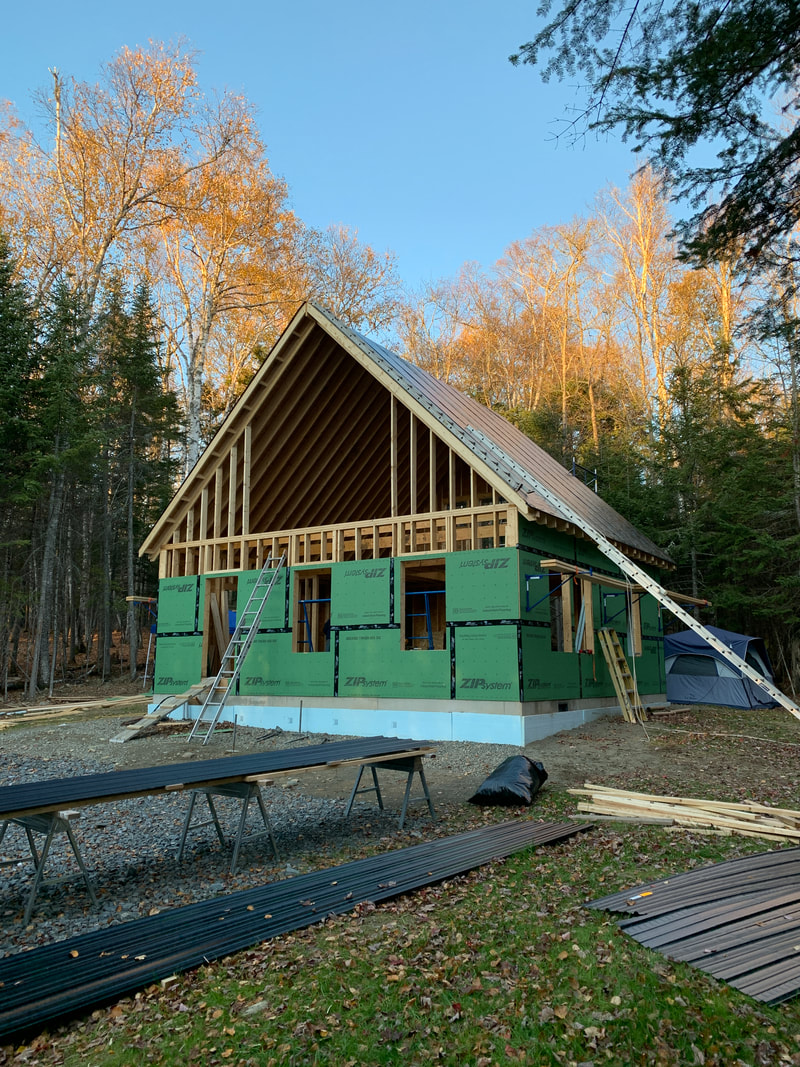 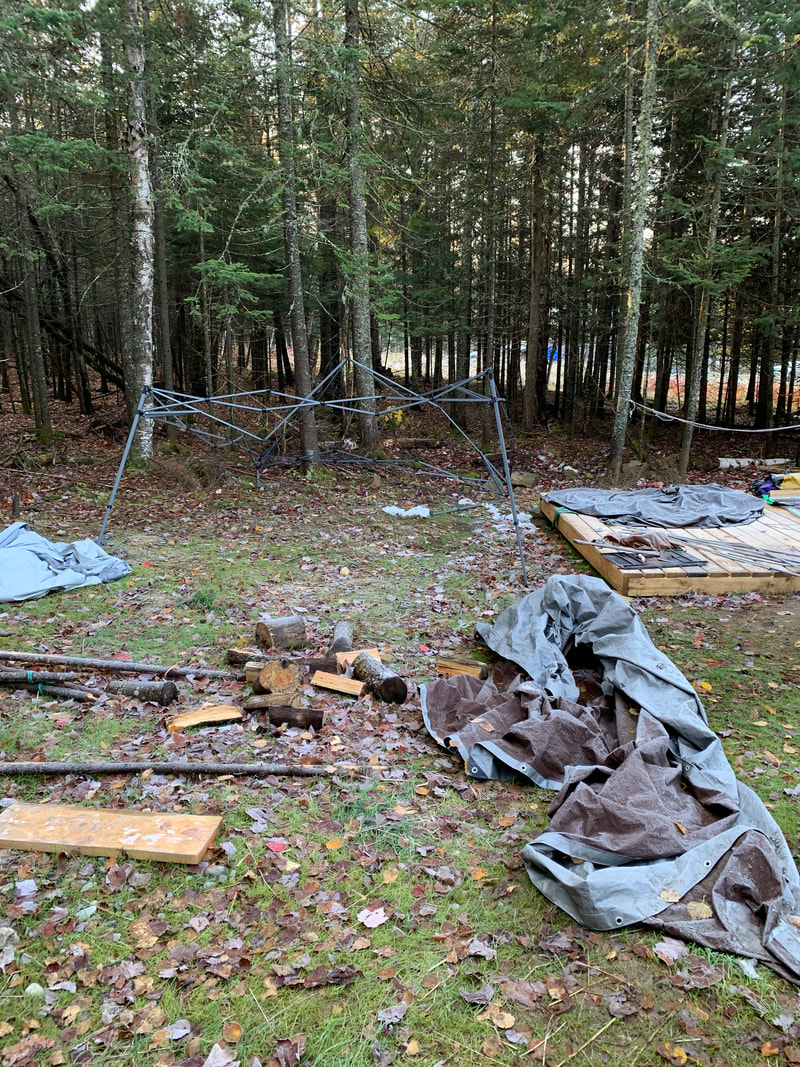 You start to get a feel for the place when the floor is laid. Below you'll see me emulating where I like to spend my time :0) 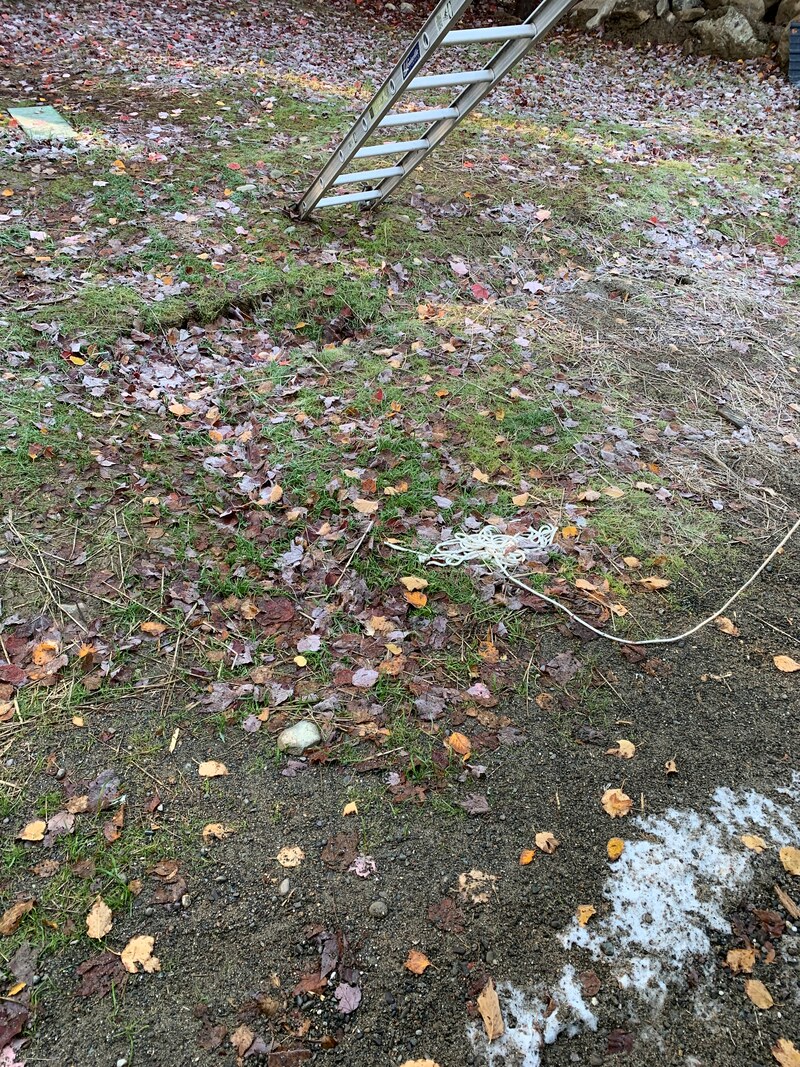 John's thoughts about all of the little things, like insulating this space that will be covered up by subflooring makes me appreciate the time that he takes to think things through! 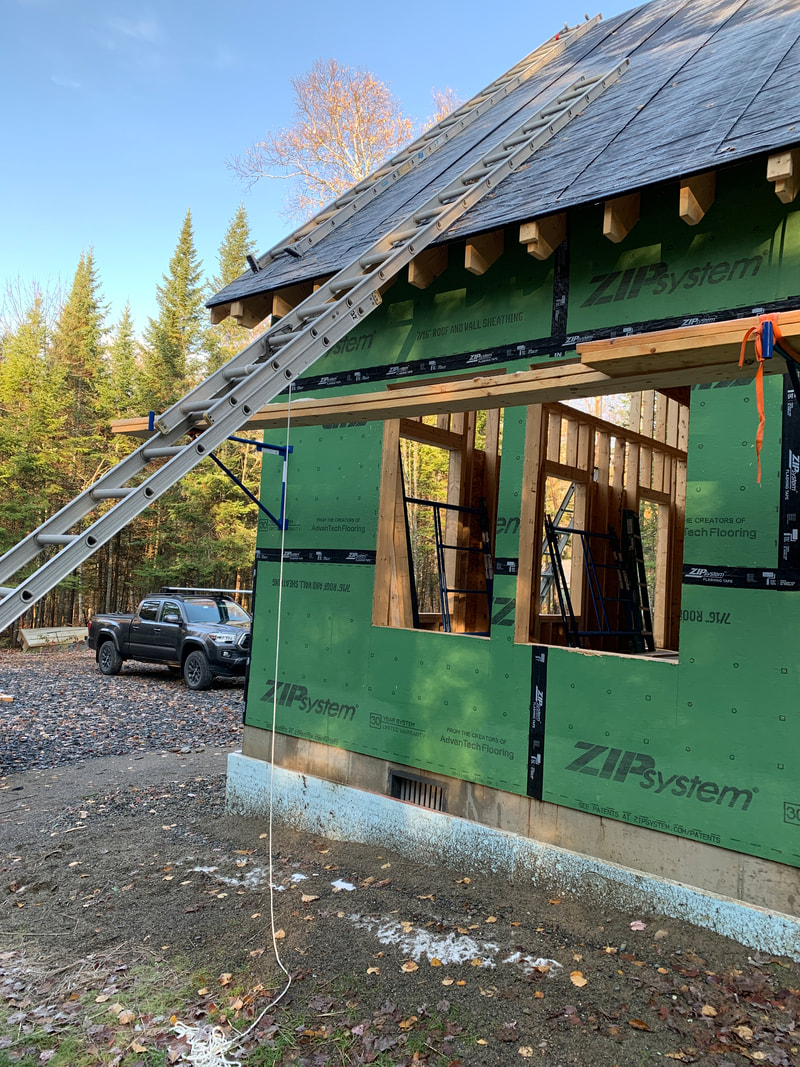 Below you'll see the door that I notched out, created and hung. Note to self, I'm a horrible chiseler. I notched out all of the spots for the rungs on a miter saw, but I noticed that flipping the piece around and going all the way to bottom of the notch made it much smoother when I had to chisel out the rest of the notch. Let's just say I'm glad these rung notches are hidden and nobody will ever see them! 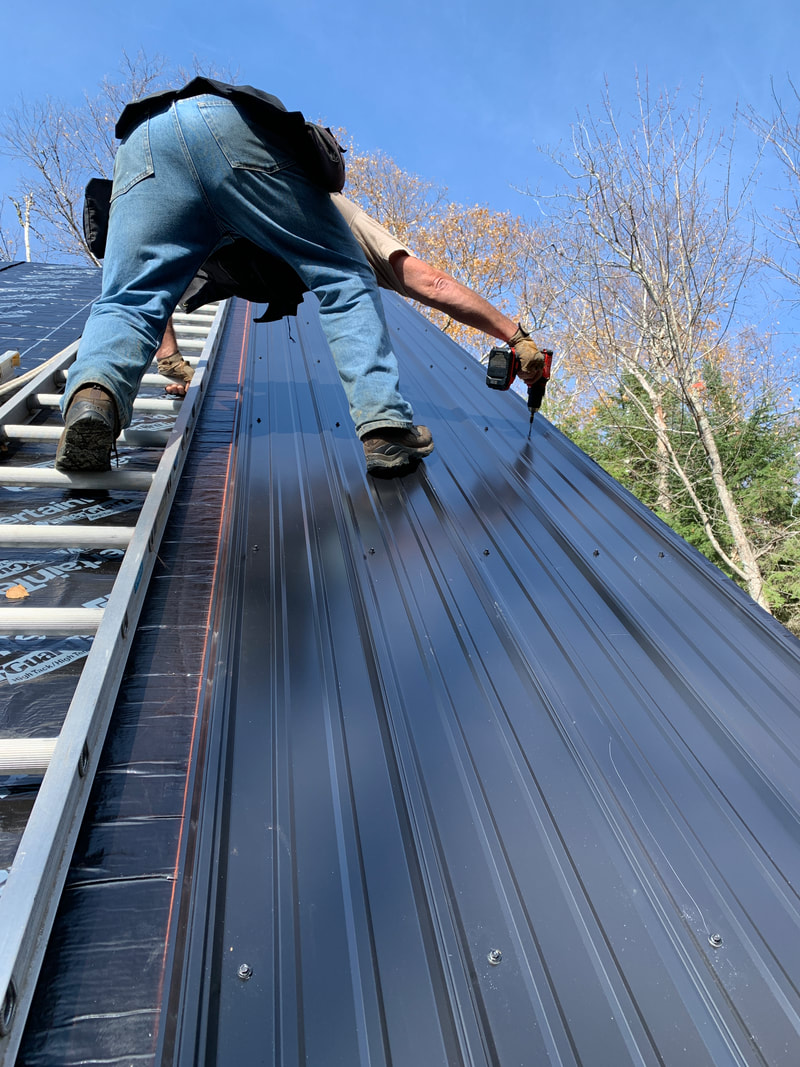 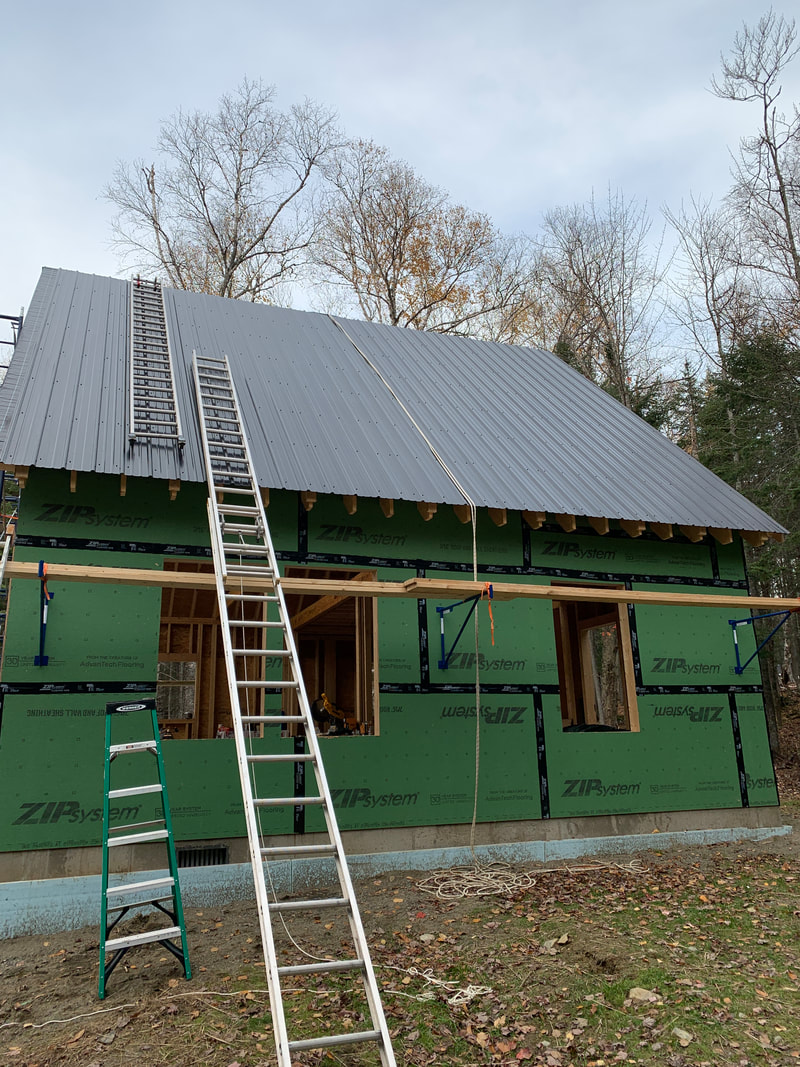 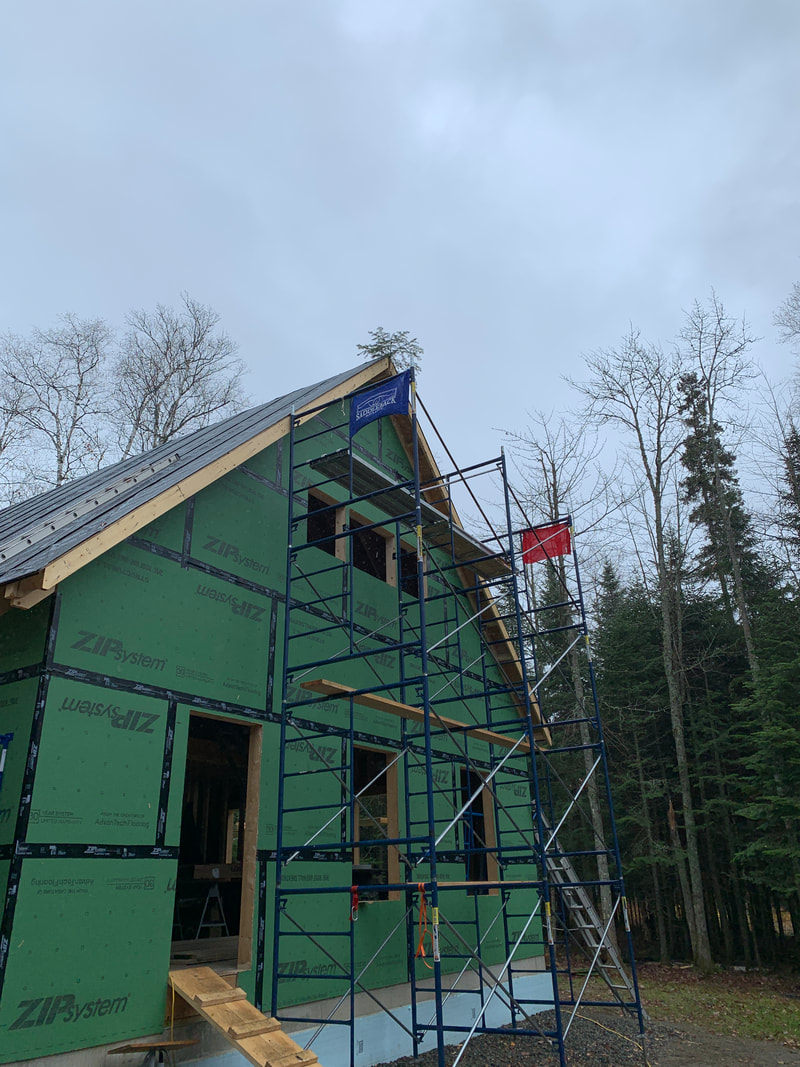 Time for the walls! John methodically marked out all of the wall studs, windows and doors on the sill plates, which made it much easier for nailing and constructing the walls. Below you'll see that we started with the corner then worked our way across. It was very easy once we got going. John gives me a lot of cutting to do while he's mapping things out. It's a good feeling to not just sit around and watch. I like being busy! While I'm nailing he's on to mapping out the next thing. 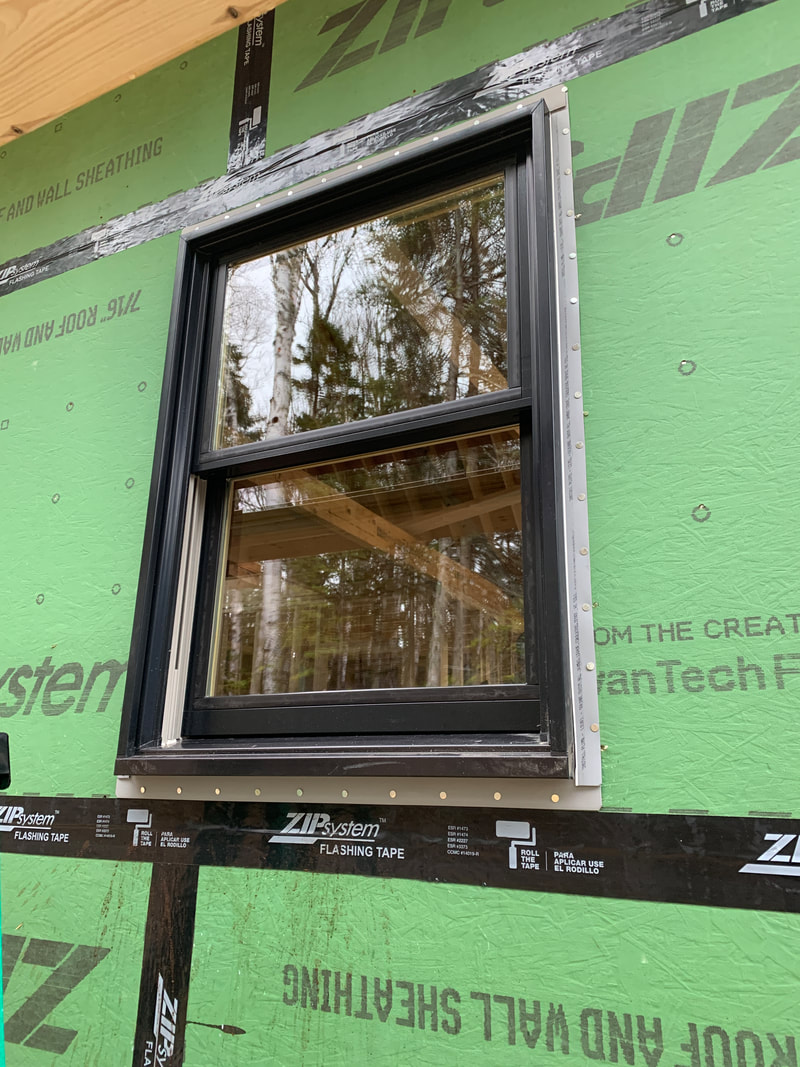 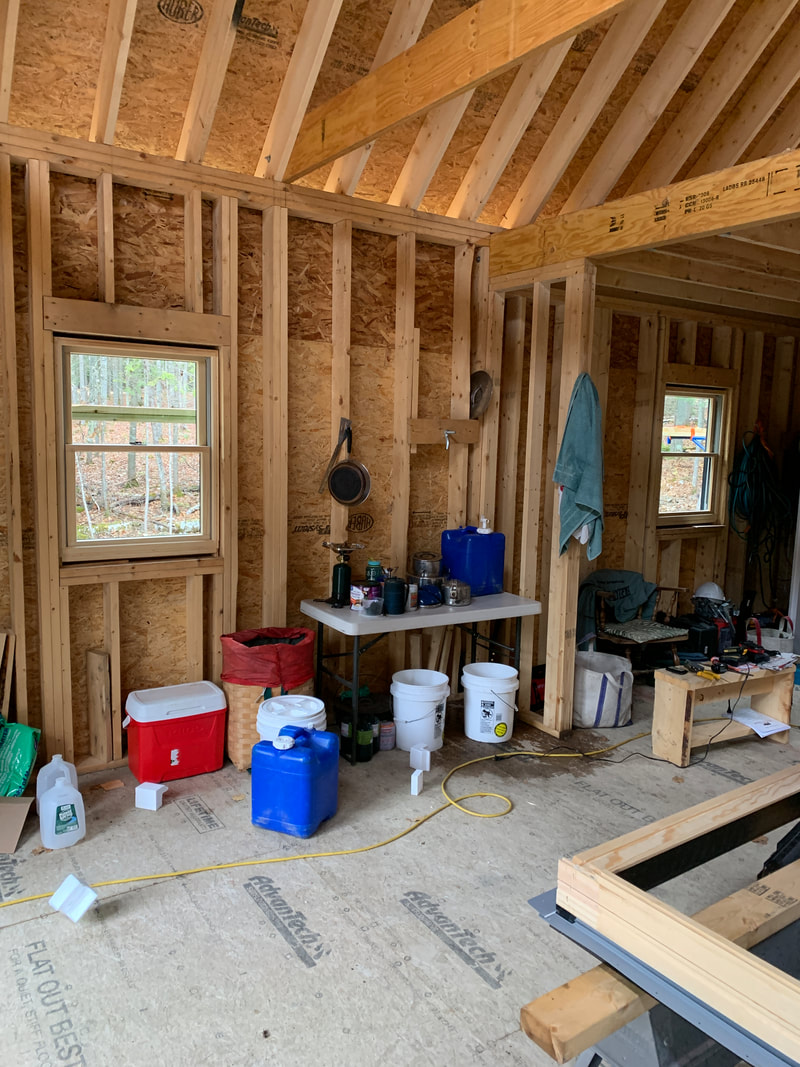 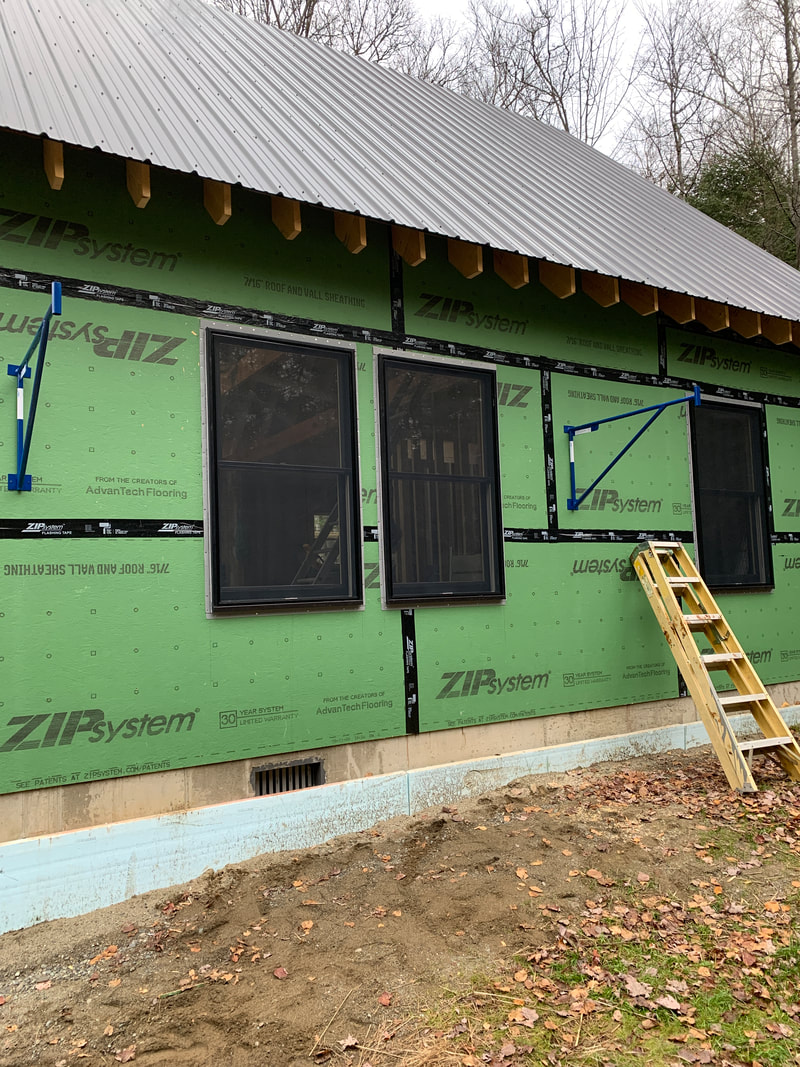 So I've never raised a wall before. It was in 2 pieces, so it wasn't too heavy, but we temporarily nailed in these pieces on the edge so that when we stood up the walls it wouldn't slide off the edge! 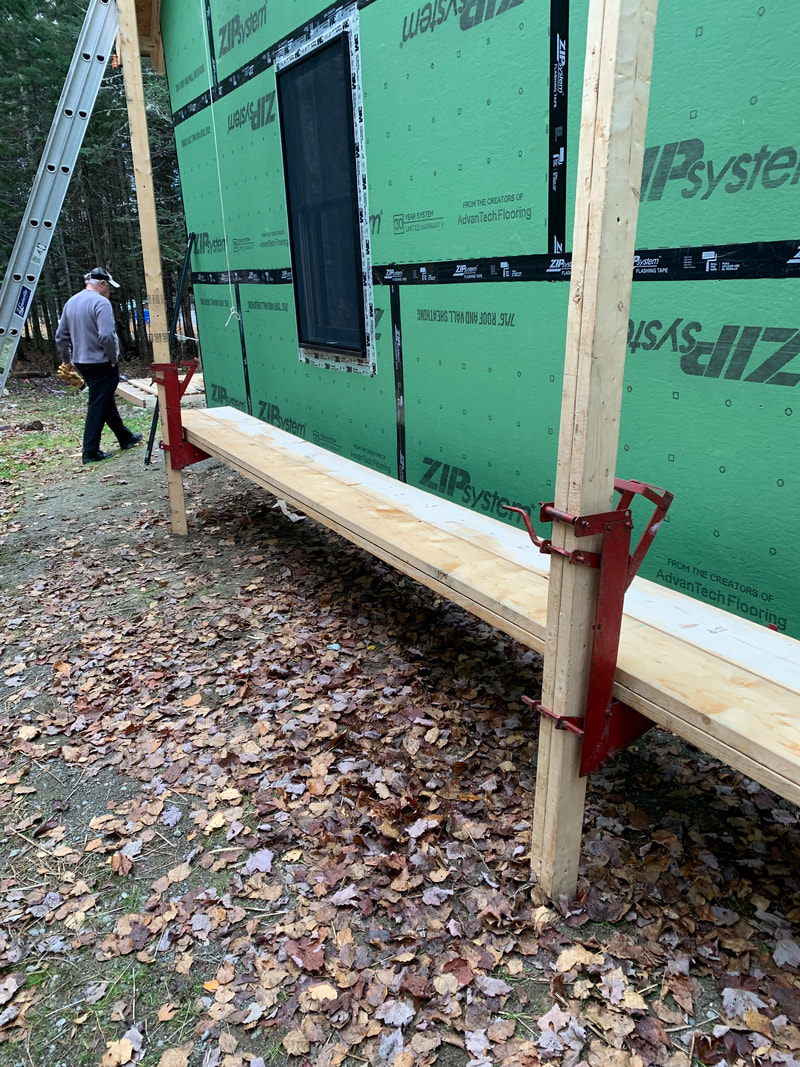 The front wall is up! All plumb and braced! 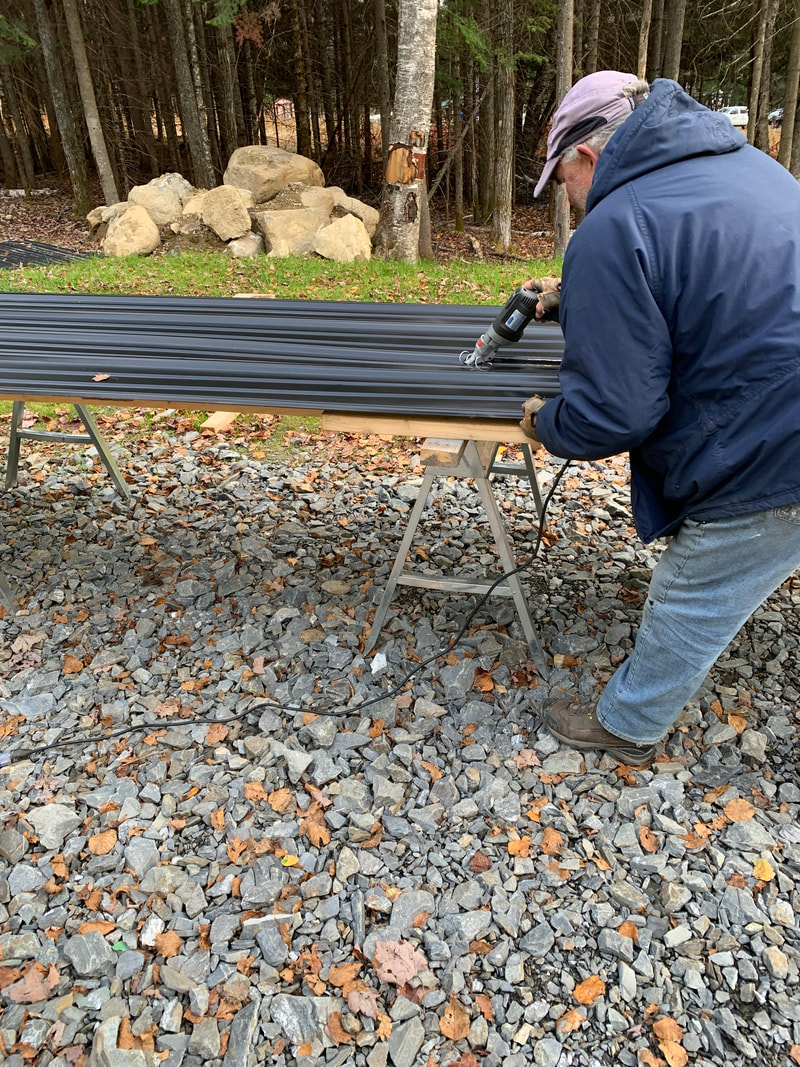 Below is a partition that we built for the back wall. If I remember correctly, this is basically a beefier stud that illustrates the ending of a wall that will be added in front of it. For instance, on the left of this will be the shower and to the right will be a closet that goes to the stairs, where another partition sits. It's important that we insulate the inside of the partition before putting on the sheathing! 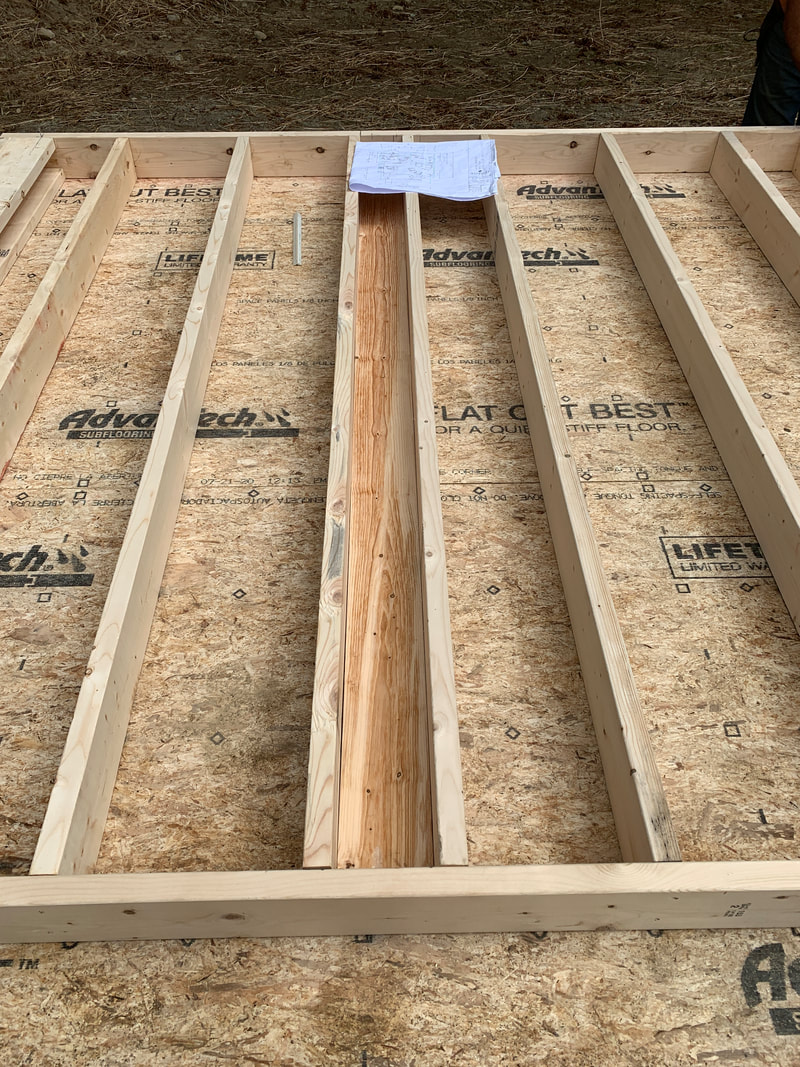 Front and back walls are up! Now on to the sides! 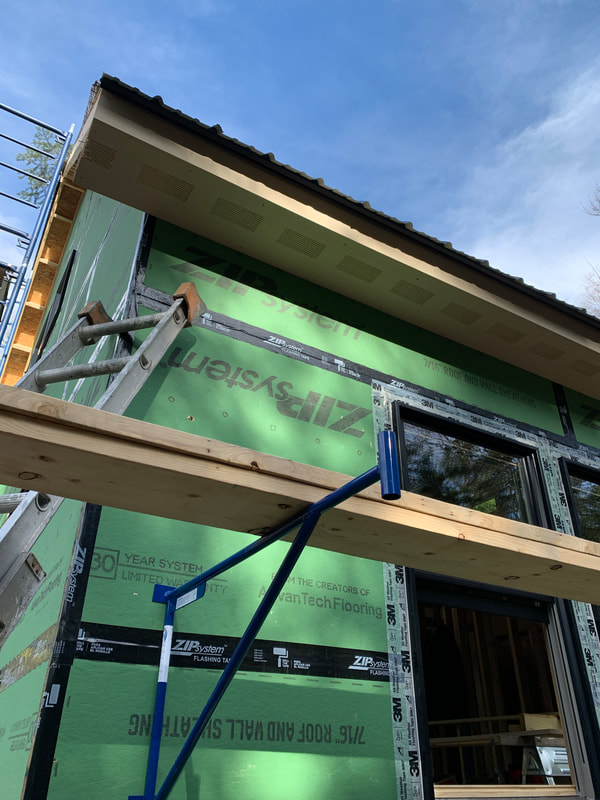 I had to leave after the front and back walls were up, but it was a ton of fun spending 3 days putting on the floor and those two walls. Camping out at night under the stars after drinking whiskey around the campfire was just what the doctor ordered during these crazy times. I'll remember this experience for the rest of my life, and I plan on making many memories in this cabin! John is finishing up the side walls and I'll head back in a couple of days to help him raise them. Then it's on to sheathing!
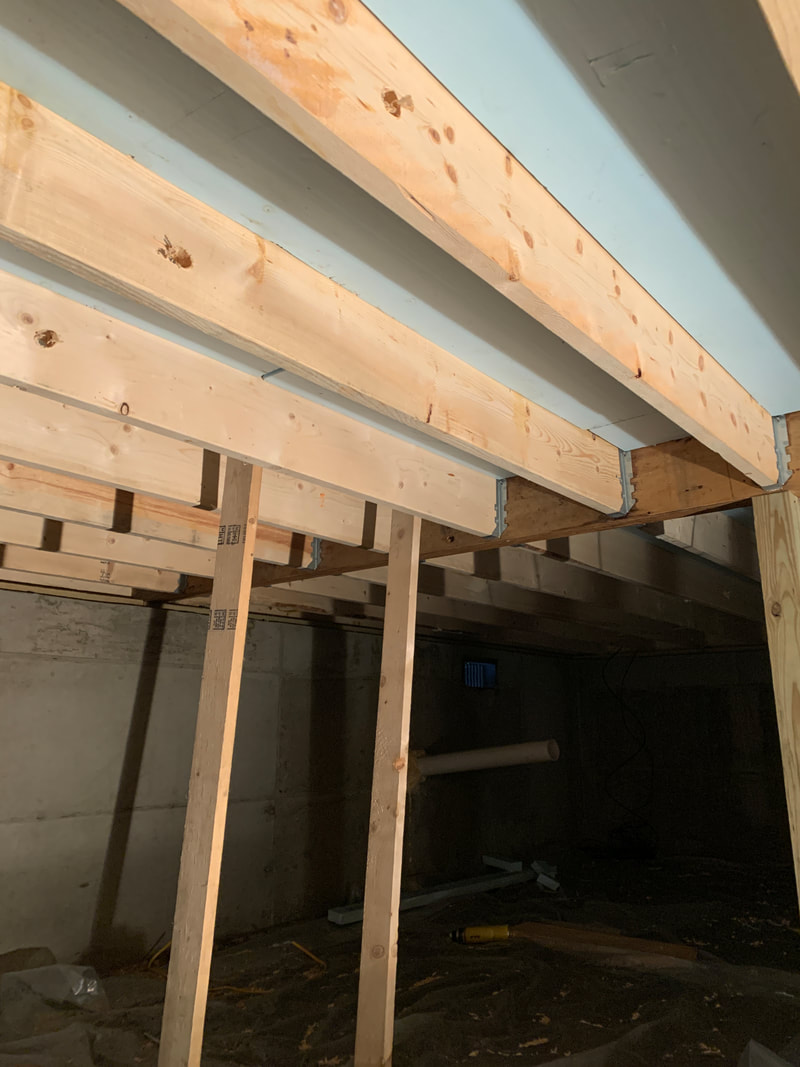
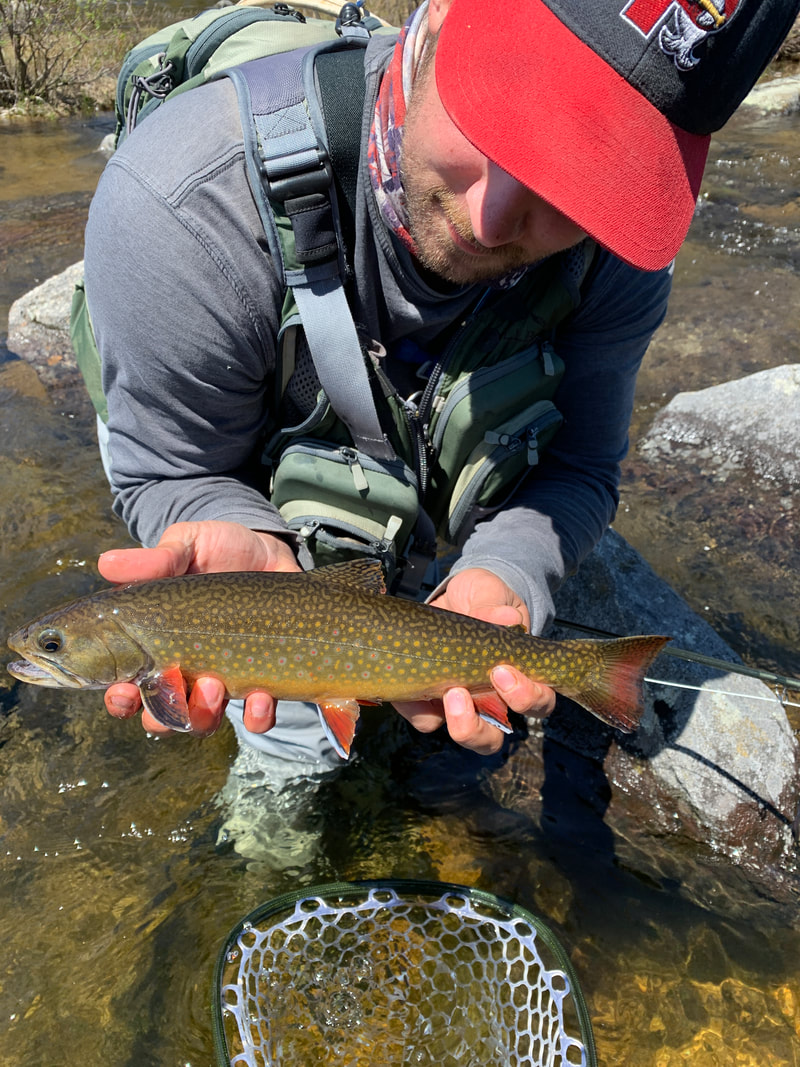
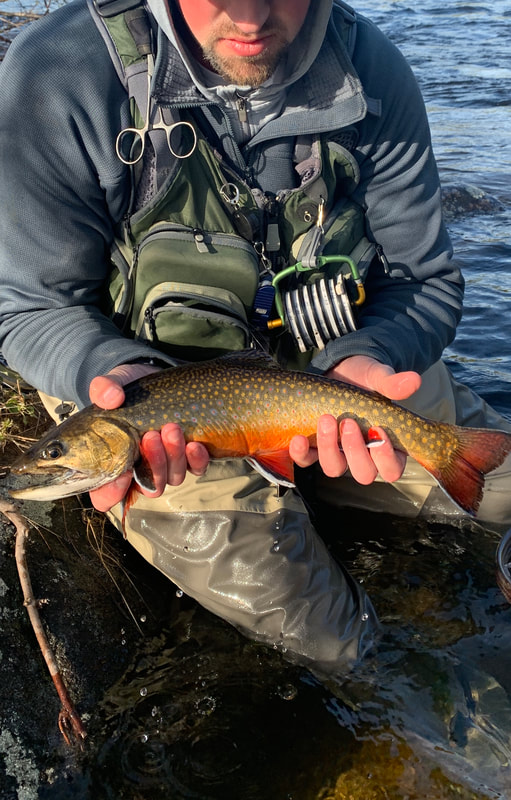
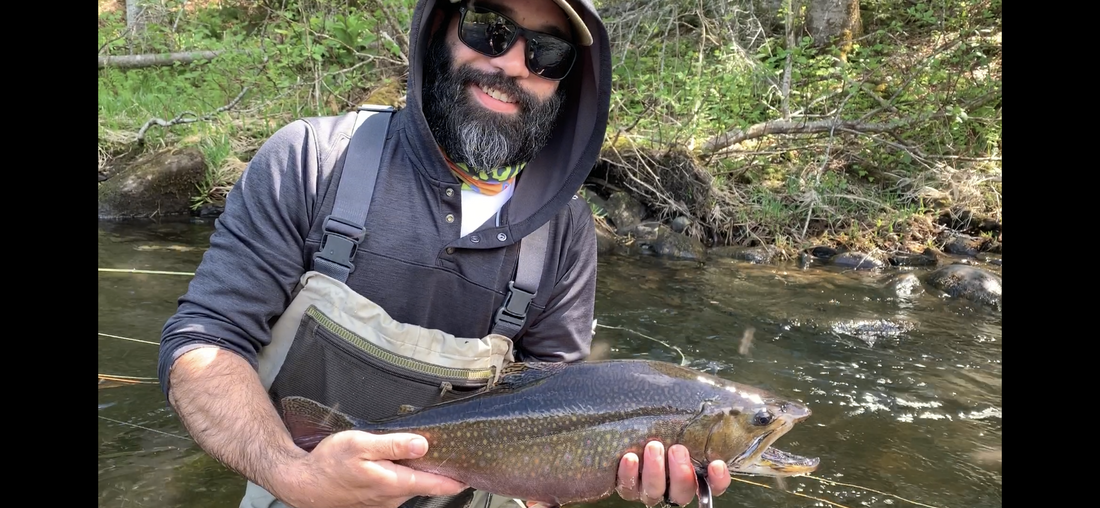
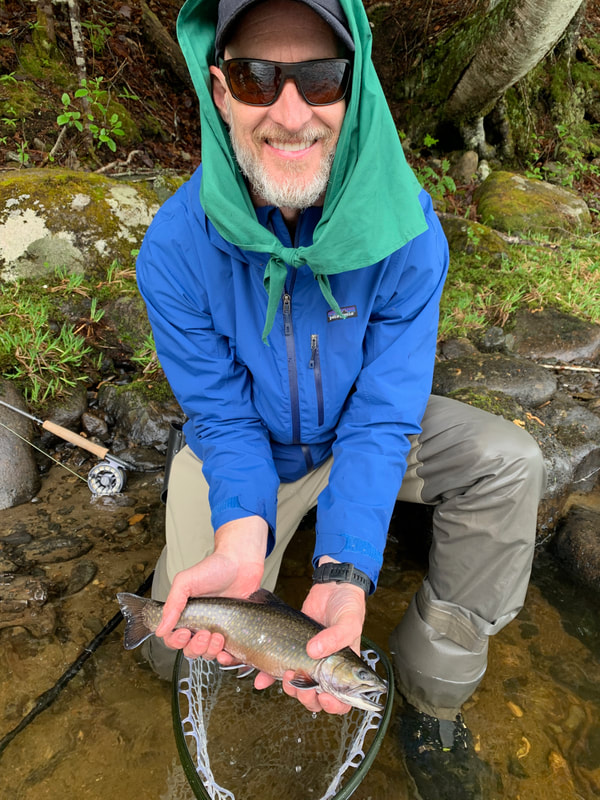
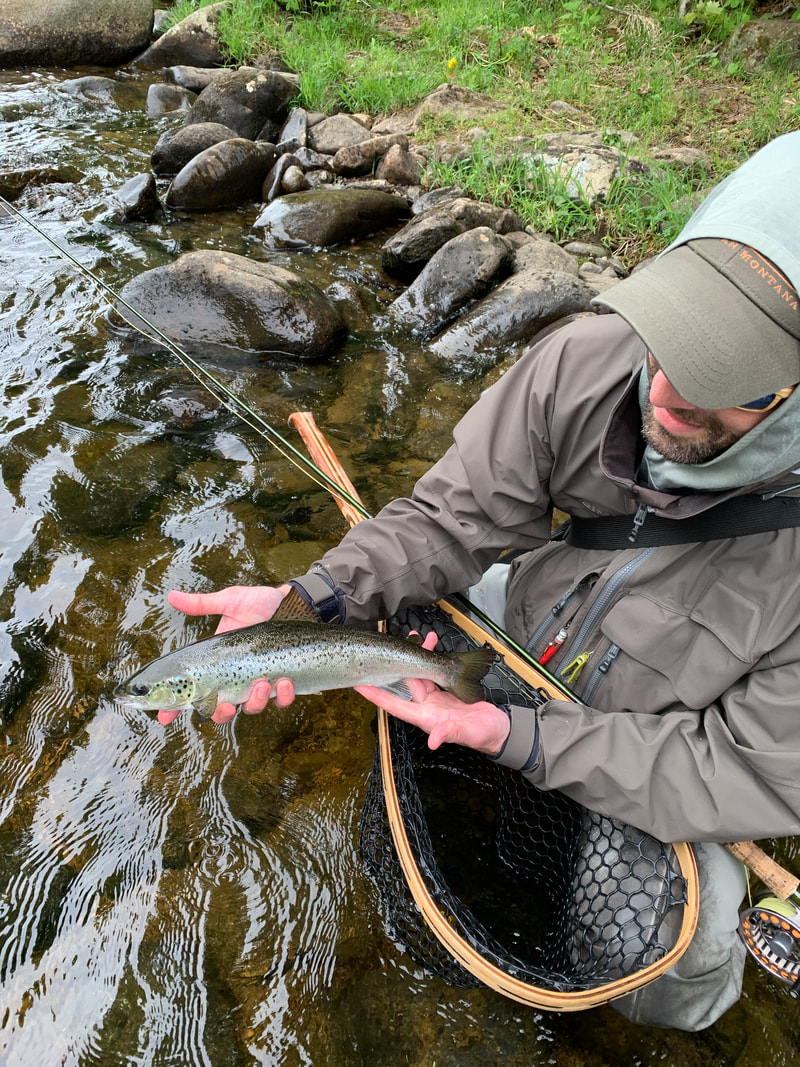
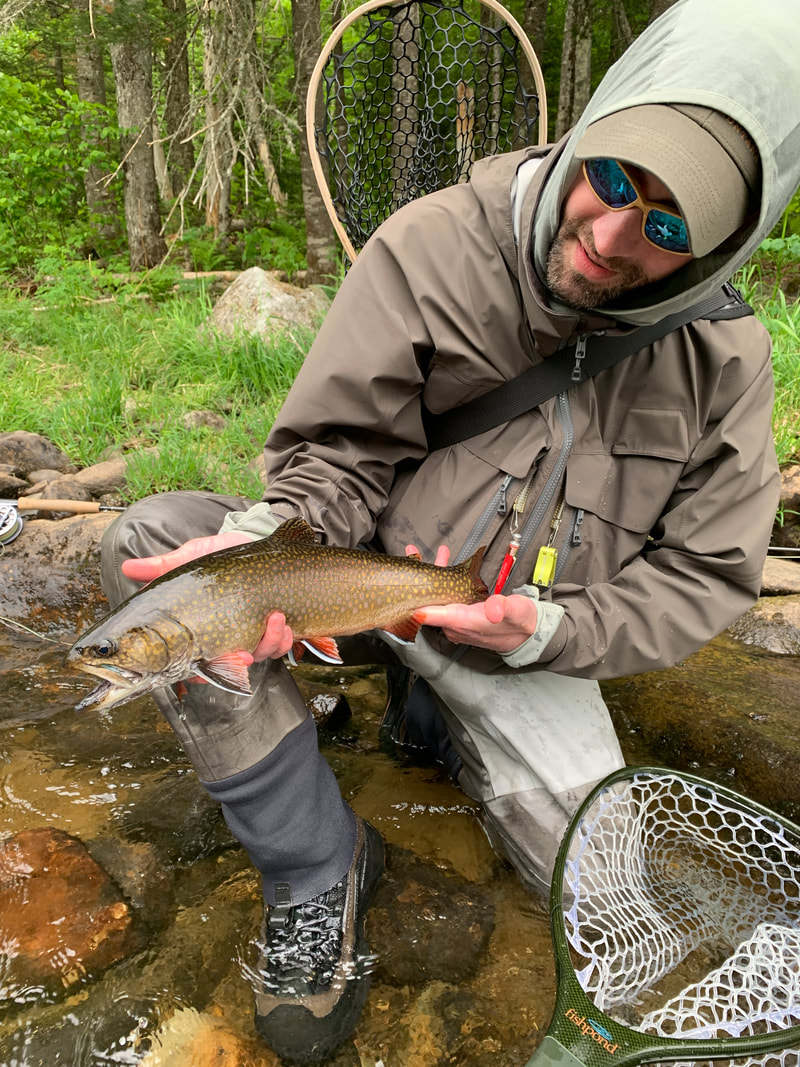
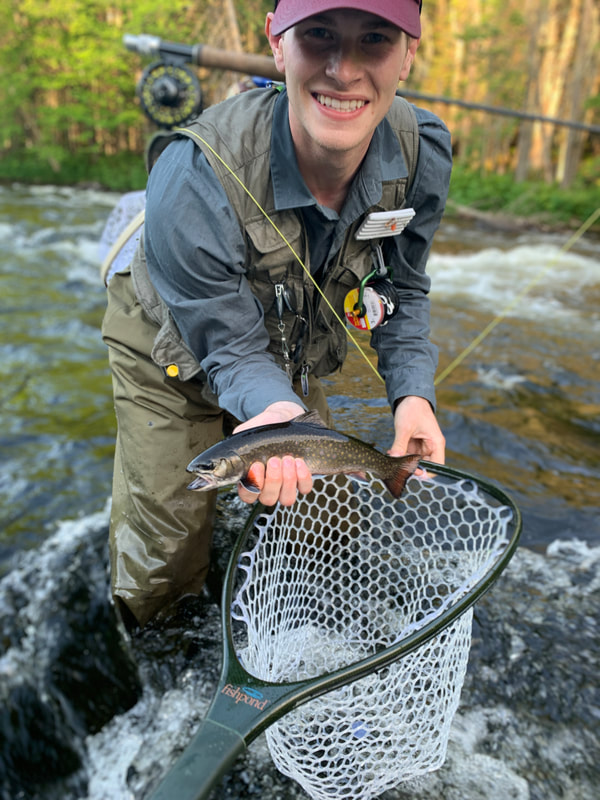
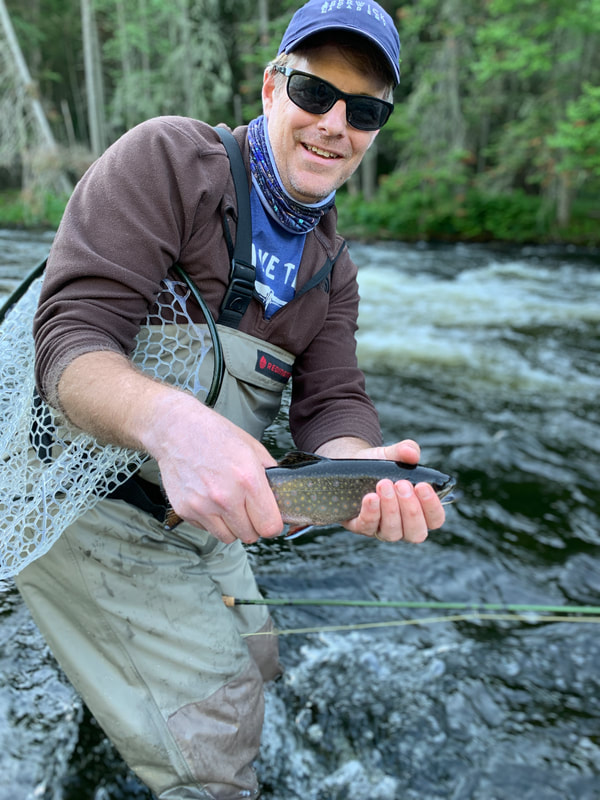
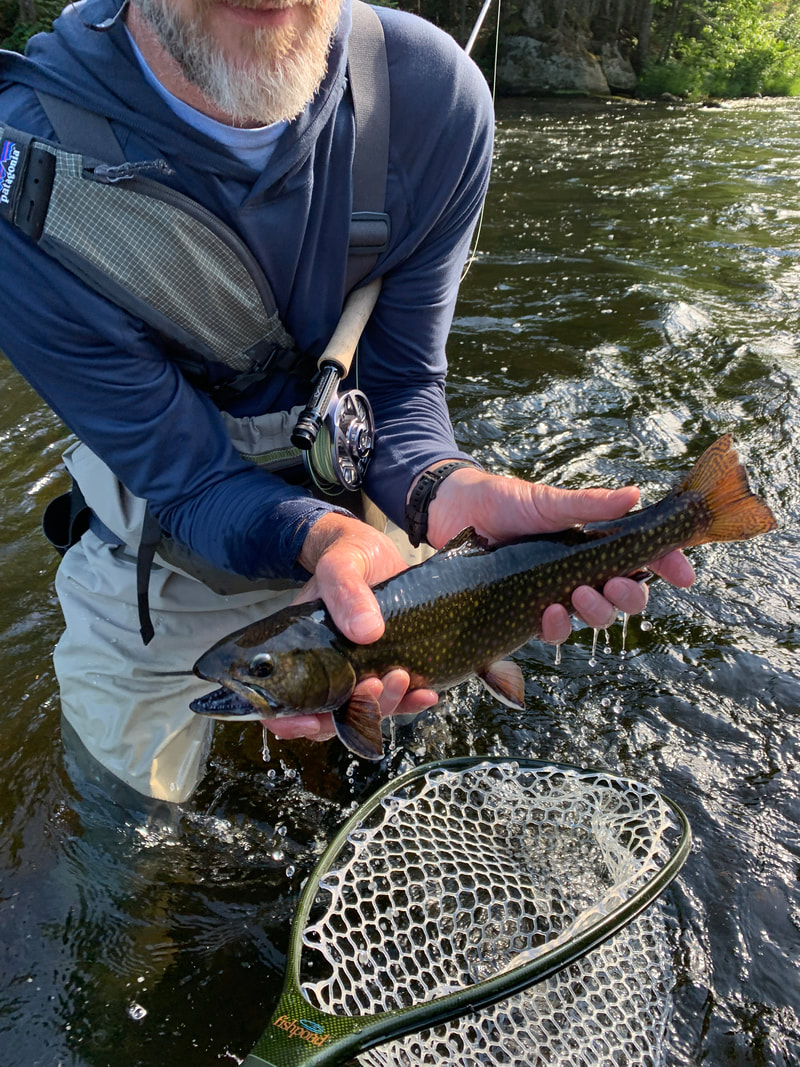
Unfortunately, the footings for the foundation were poured in late June and the frost wall did not go in until August 7. Sore subject, so we won't go there! However, as you can see below the foundation has been poured. You'll see holes in both sides for screens/windows to promote airflow underneath the camp. We'll have two posts underneath a carrying beam, which will inevitably hold up the loft. We decided not to spread tar on the outside of the foundation for waterproofing because it will just be crushed rock as a basement floor. There will be a "trap door" about 30" x 30" in the bedroom to gain access into the crawlspace if needed. All of the systems will be above the floor so there shouldn't be much need to get down there. Not pictured are just 2'x2' footings that were poured for the two valley columns that will hold up the carrying beam (two pieces of 28' LVL). As a reminder, the camp dimensions are 28' wide and 25'6" from front to back. There will be a 6'6" screened in porch on the front of the camp. The end dimensions are basically 28'x32'. 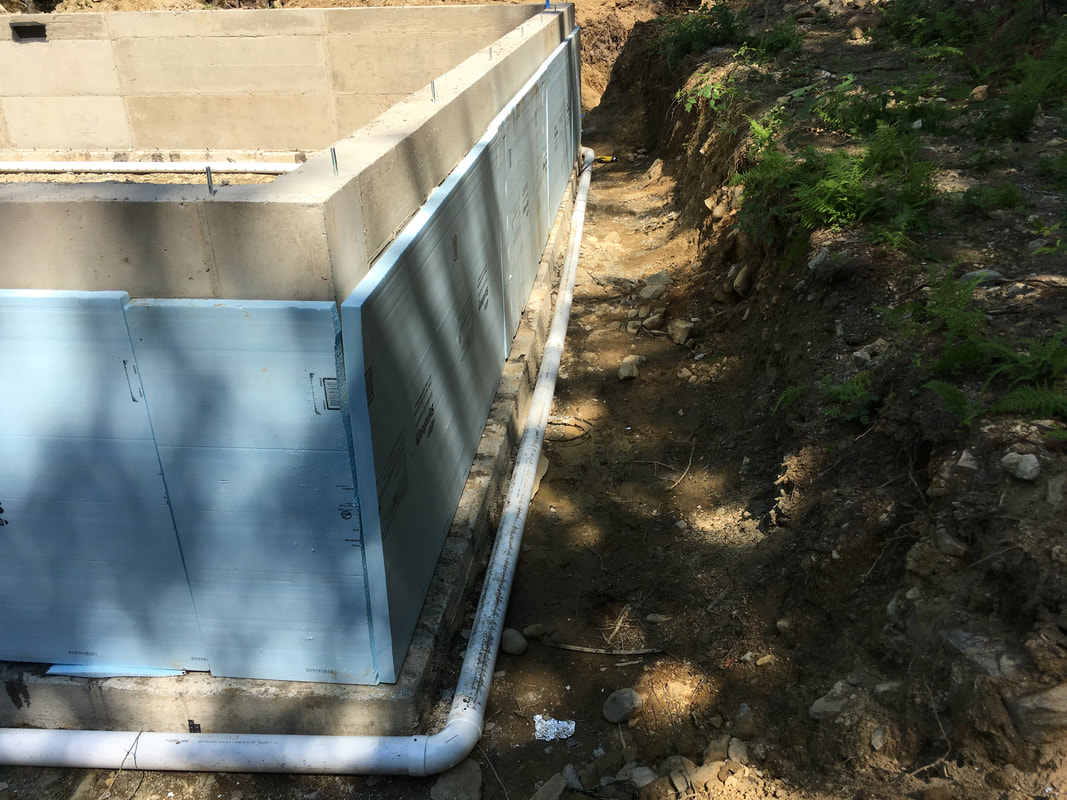 Here's a shot of the well line. We're putting in a curb stop, which is essentially an outdoor valve that you can turn on and off to drain water back down into the well so there's no water in your well line. I will likely utilize this option in the winter to drain out all of the water just in case power goes out. The plan is to keep the heat around 50 degrees through the propane monitor heater, but drain all of my sinks, put antifreeze in the toilet and drain the well line every time I leave. Until a generator is installed I'm going to play the game of drain the water because frozen pipes are a nightmare! 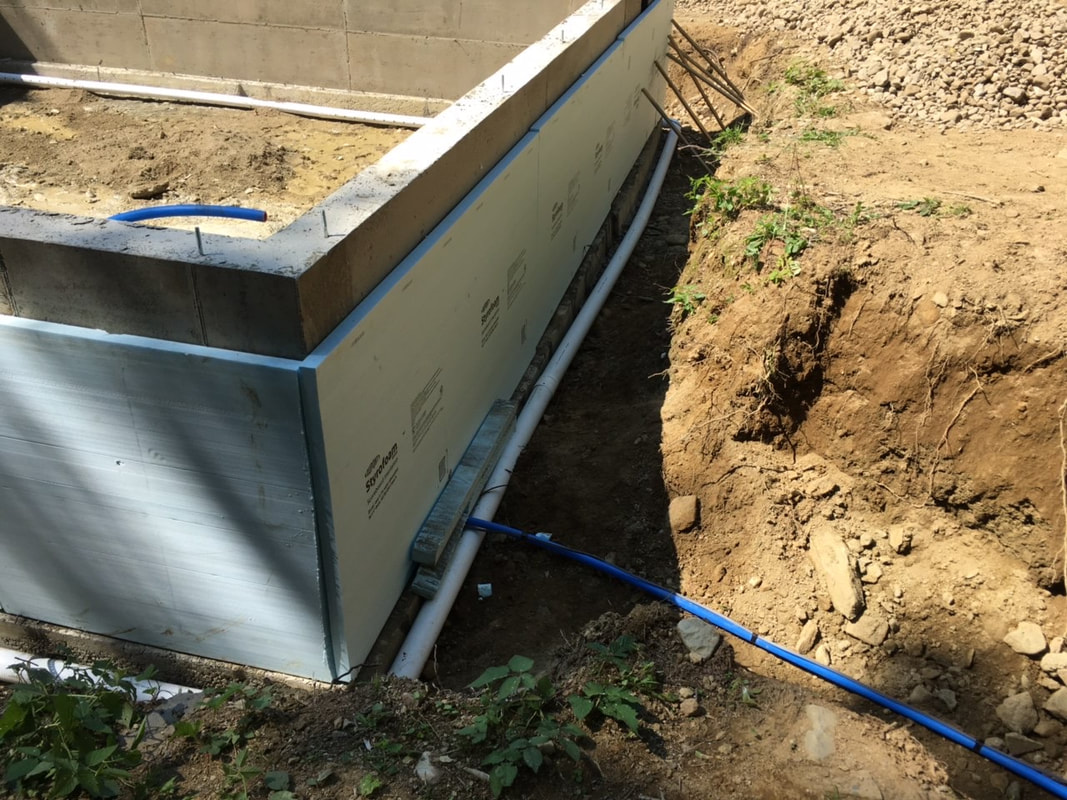 Here's a better shot of the foundation in with the septic system also installed. We used the 2" foam board on the outside to create extra insulation. Pretty soon this will all be backfilled with loam and seeded with grass. The electric line is dug, but it will take CMP about 2 weeks to come hook it up at the pole so we'll be working through the floor build and some of the wall framing with a generator. Next pictures should have some wood in them!! 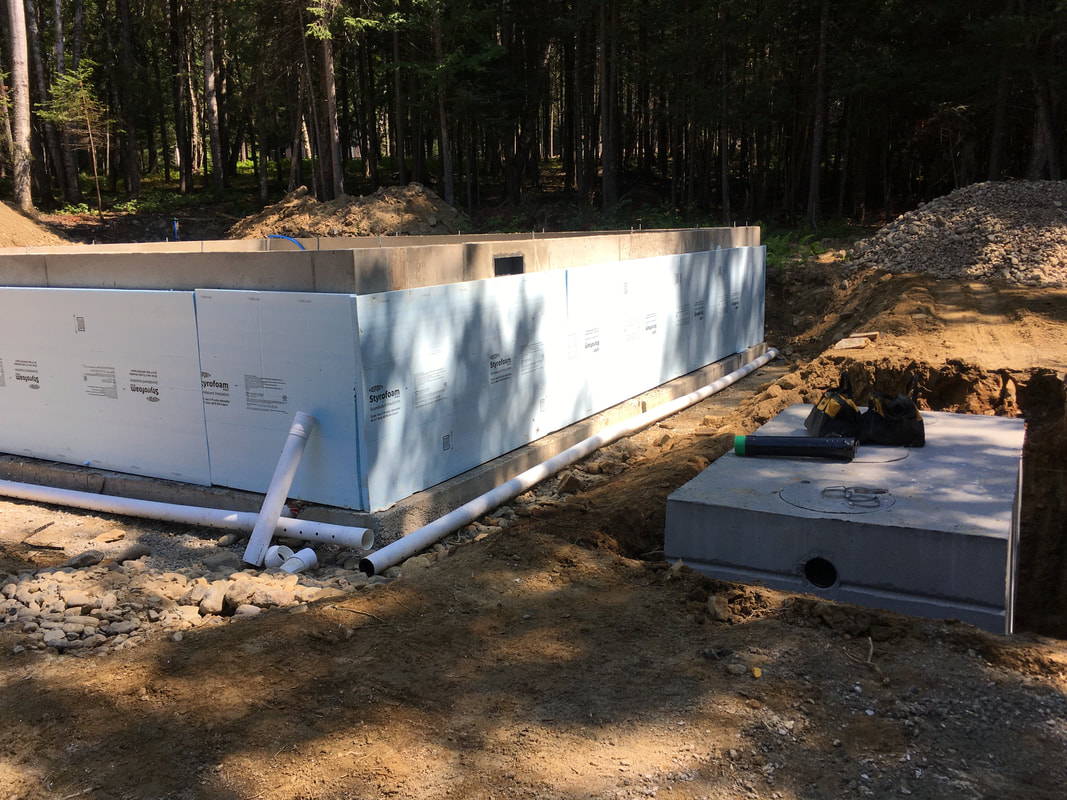 It's officially summer, and we have some progress. A LOT has changed since last fall and I'm very excited for the upcoming months to see what will transpire. The first big change is that we've decided to make the cabin a little bigger than we expected. After working with Rangeley Builders for a camp design, they were awesome to work with by the way, we decided to make some very cool changes. The camp will be 28' wide by 25.5' long with a 6.5' screened in porch, which will make it 28'x32' in total. The second big change has to deal with systems. Originally, we were going to have an incinerator toilet and a water holding tank. Well, after some discussions over the winter, we decided to have a well dug, and a septic system put in. As of now, the well is in (320 down w/ a rate of 2 gpm) and the leech field has been dug. Here are some shots of the leech field below.  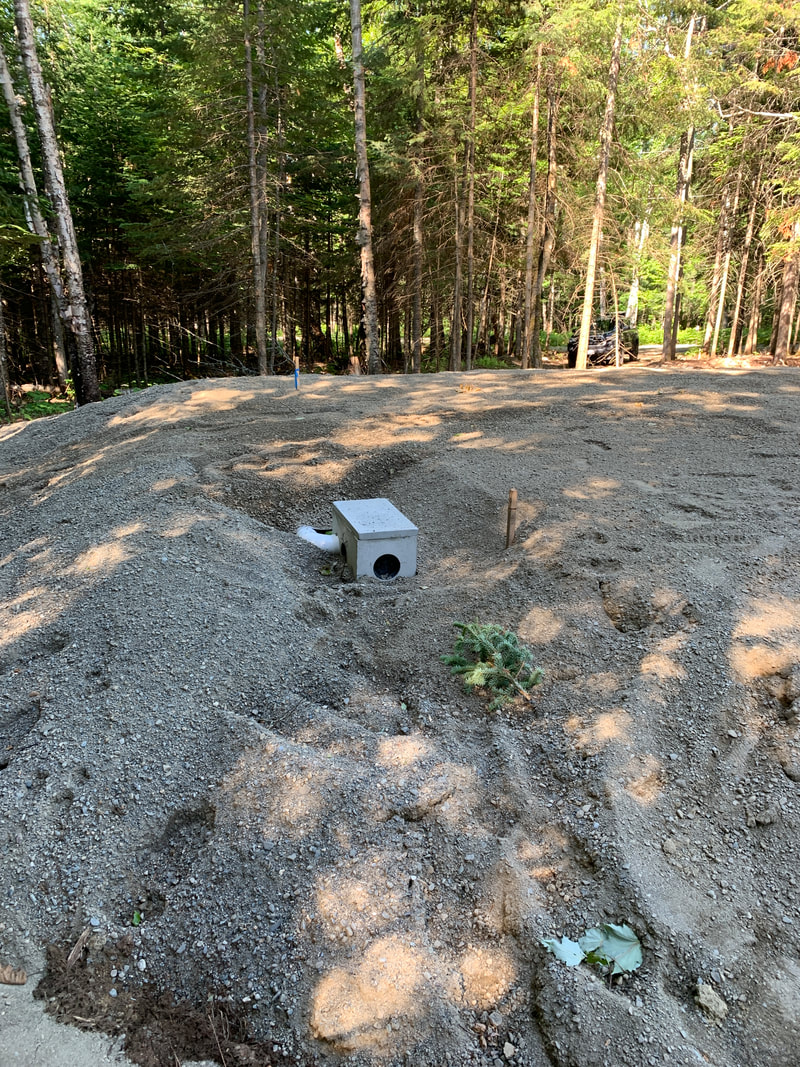 The third big change, and one that I was surprised at the cost analysis was putting in a frost wall instead of using technoposts. It was roughly the same amount to put in a frost wall as doing it on posts, and it will be much more sturdy over the years without having to adjust posts. There will be a gravel floor and a crawl space, but most of my systems will be above ground. There will be vents in the frost wall for ventilation, and insulation under the floor. There will be a "trap door" in the floor of the bedroom to get underneath the camp if necessary. For heating, we'll install a propane monitor heater that I can control from my phone if I want to keep heat going all winter. The bedroom and bathroom will have electric baseboard heaters to keep pipes warm in the winter months if I want to keep the heat on and water in the pipes. The plumber is going to install a curb stop valve on the outside of the camp for easy water shutoff. We're doing this in lieu of heat tape on the well pipe. I'm still not sure if I'll keep it running during the winter or not, depends on Saddleback opening back up I guess! Here are some photos of the foundation dig and the footers. The frost wall should be complete this week, and we'll coat it with tar and foam board after for added insulation and waterproofing. 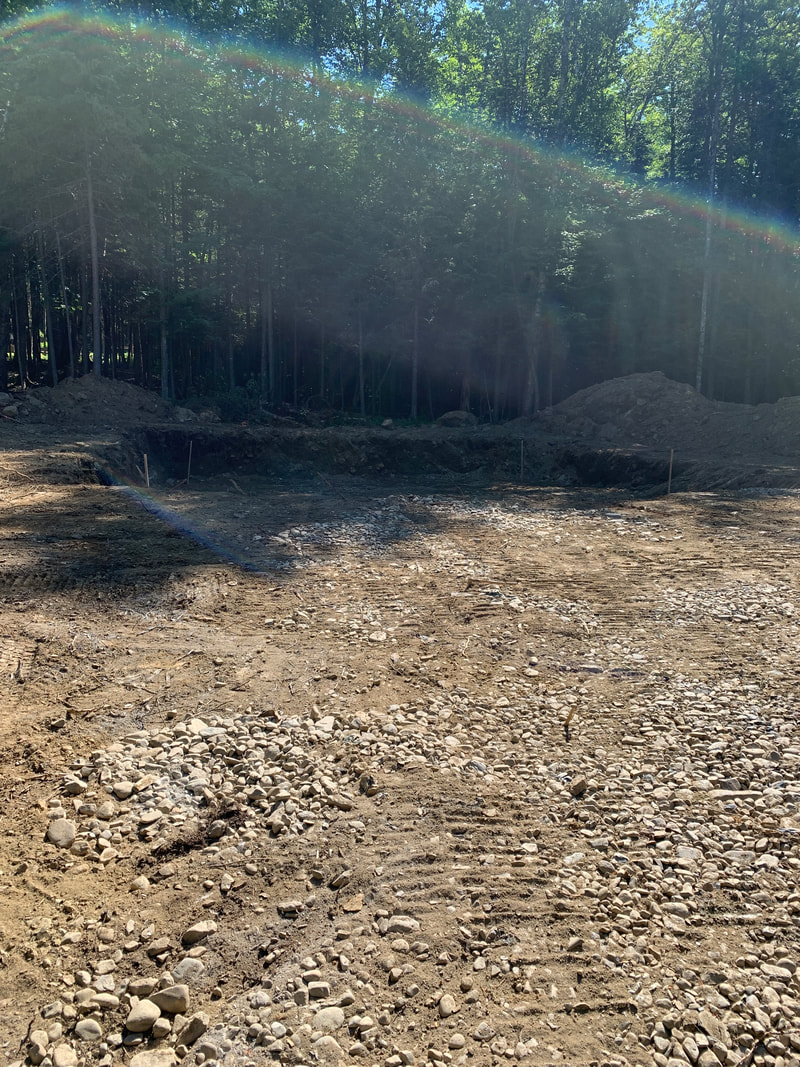 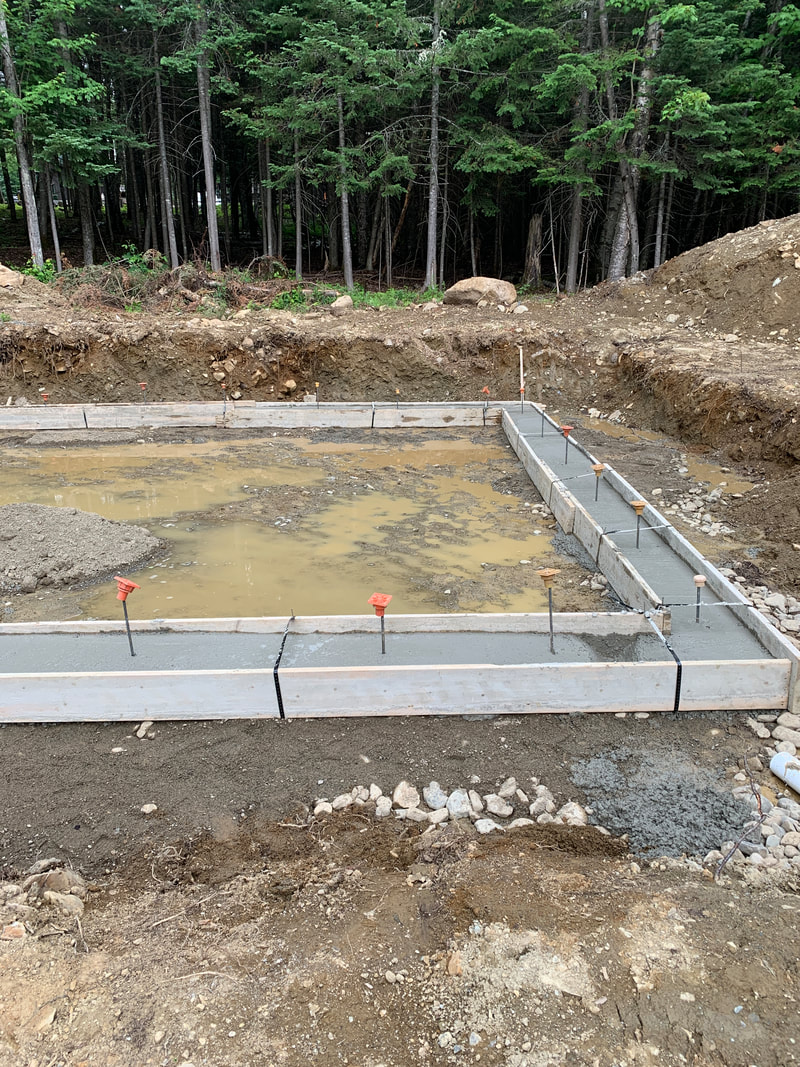 The kitchen will have an apartment sized fridge and a full range oven. No dishwasher, but we'll have a toaster and potentially a microwave. There will be a Rinnai On Demand hot water heating system hung on the wall in the bathroom. We'll have a toilet, sink and shower in there with a whole house water filtration system. I'll have the water tested and decide about using it for drinking water. I may install a reverse osmosis system, but again, we'll see about the water quality. There will be a loft with stairs that will have a queen bed and a twin bed. The downstairs bedroom will be a bunkbed with two full beds. A ceiling fan will be in the living room area, and the screened in porch will have lighting and a ceiling fan for warm summer nights. At 6 feet wide, I'm hoping the porch will be a nightly hangout spot for the adults and we'll have a table and adequate seating out there. It has been a very busy spring, and COVID is causing some issues. We're having temporary power put in this month so that we don't have to run generators for the build process. I'm building the camp with my friend, Marc, and some other helpful folks along the way. There are currently issues with pressure treated wood supply and prices, so I'm curious to see if that will affect us this summer. The plan is to have the camp framed up with roof, windows and doors on by Labor Day. I've had more guided trips this spring than ever, and I've been very busy. People have time to fish apparently, as many people have had their jobs interrupted. Below is a picture from the driveway, and a photo from some camping I did on the lot while I guided a 3 day stretch.  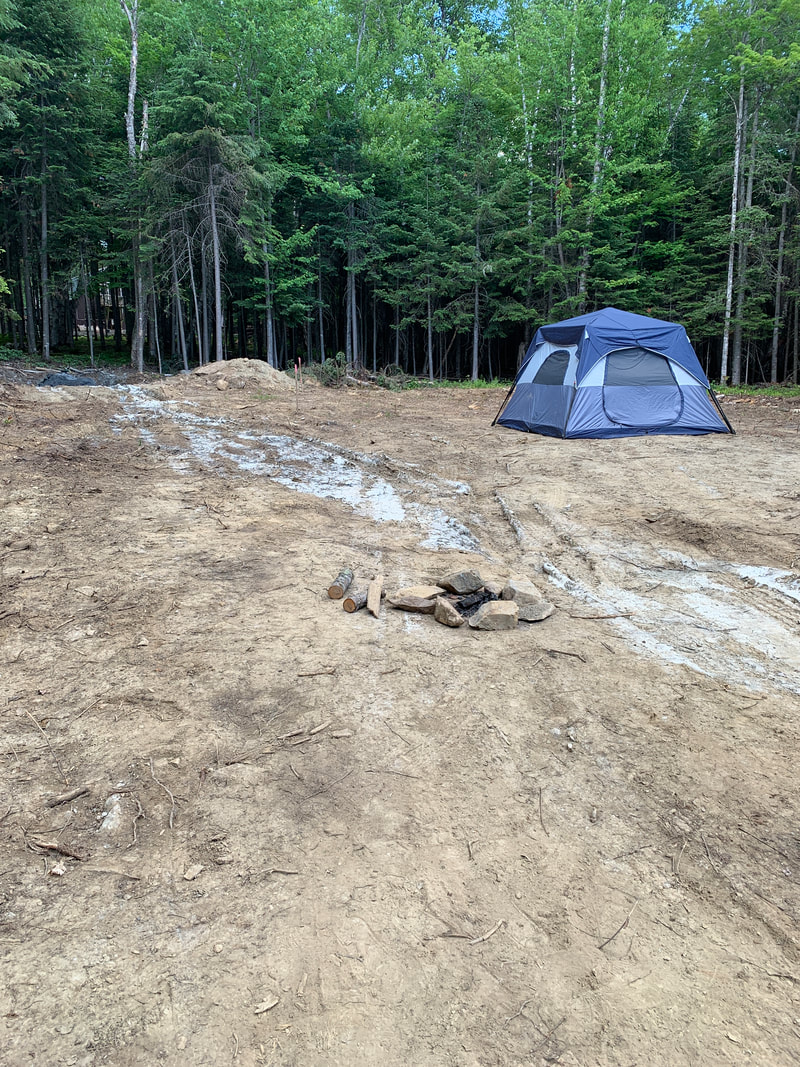 And for the fishermen and women, here a few photos of some awesome fish that clients have put in the net this spring. I also added in a 19" beautiful colored up brookie that I caught on a size 20 bwo nymph, and a great early season brookie caught by my friend, Greg. The fish have been very big this year. I wonder if it's due to the mild winter with early ice out, but honestly, I have no idea. One of my clients, Tony, caught a 23" brook trout on a nymph, and we landed it 80 yards down river from where it was hooked. It was the first fish of the season, and it's safe to say that it's all DOWNHILL from there. What a fish, and a fight that I'll never forget! I just feel blessed to know that brook trout and landlocked salmon are abundant and large in size right here in our great state of Maine. BEFORE 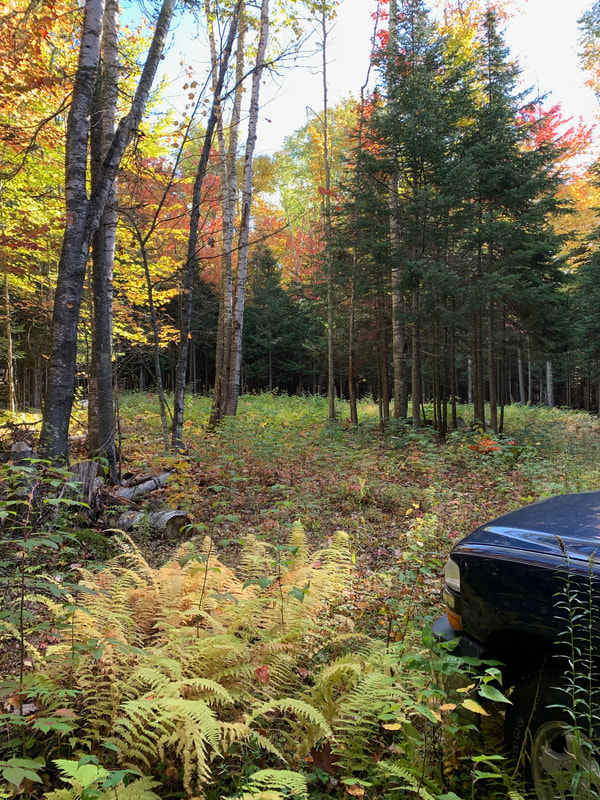 AFTER  I've had a very busy summer and fall, and we've had some hiccups in the permitting process. Our design plans were not sufficient, and we're working with Rangeley Builders to give us solid plans that should help us sail through the permit stage. They have been awesome to work with and I'm excited to see the final plans when they're finished in a few weeks. I'll be sure to post the plans on here when they're complete!
We've met some great local folks who will help us with all of the ground work (because I have no idea what I'm doing in that department) and we've decided to go with Techno Metal Posts for the foundation of the camp. After hearing many horror stories about using sonotubes, we've listened to our instincts and the words of experienced builders which have pointed us in the Techno Post direction. They have a plastic sleeve on the post that will most during a frosty period instead of the whole post moving. Folks in Canada use these all the time and don't experience any heaving. It's worth it to pay the little extra so that I'm not jacking up the camp in years to come to keep things level. When the posts are in (hopefully May), we'll begin the actual building process. I think about this camp almost every day and can't wait to start seeing some building progress!! Stay tuned! -Aaron  I bought land in the Winter of 2018 in Rangeley near a beautiful brook trout pond. My hope is to use this camp as both a family camp for years to come and a spot to host anglers who come fish the mighty Rangeley rivers with me for a couple of days. I bought the lot, which had been mostly cleared, and decided on a build site. I cut down several hardwood trees and now it's time for ground work.
A typical fishing trip for anglers would include coming up the evening before your first day on the water, and potentially popping the row boat into the pond to hit an evening hatch and dust off the casting shoulder. We'd fish all day the following day and clients would have the choice of bringing their own food to cook for dinner or hitting one of the great restaurants in Rangeley or Oquossoc. On the second full day, we'd fish all day and then head for home. I have many clients who spend $300+ on two nights lodging to fish for one full day to bring their total to $700 plus dinner expenses. For that same amount, stay for free and spend your hard earned money on a second day with a guide fishing for beautiful brook trout and landlocked salmon. It's a different style of accommodation, but we're thinking folks are really going to enjoy it!! We're building a 24' x 28' cabin that will have a bedroom on the first floor that holds a full sized bunkbed, which could sleep 4 people comfortably. There will a kitchen with normal appliances and a bathroom with sink, shower and toilet. The loft will be above these three rooms I just mentioned and will have two full sized beds up there, bringing our sleeping total to a comfortable number of 8. When your wife has 8 siblings, you plan for these things! The living room area will hold a full sized table for dining, a recliner chair and a love seat, as well as a wood stove for the shoulder months. The porch will be screened in and will hopefully serve as a nightly cribbage area while sharing stories from our day in the woods. There will be a fire pit beside the cabin, and I'm hopeful that down the road we'll build a small bunkhouse with sleeping accommodations for 4 that will not have any systems in it. We'll be starting the groundwork in July and hope to have the shell up by snowfall (famous last words) Stay tuned for pictures and updates this summer! 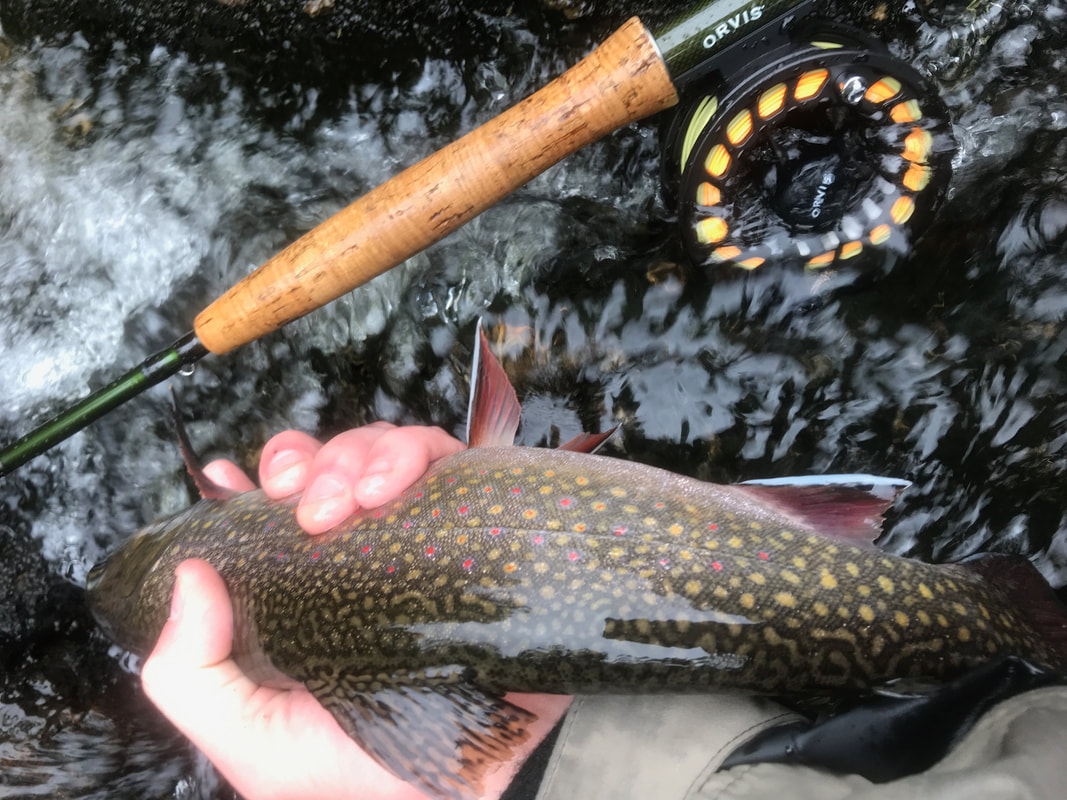 Vince and I have been putting together some really great options for clients for this season and for years to come. Piggybacking the idea off our good guide friend, Kevin McKay, we have created options to offer clients FREE lodging when they book two trips with us. Instead of spending money for two nights at a local hotel, why not use that money to spend a second day on the water?
Our main goal is to offer free lodging accommodations to guests in three different parts of the state. Currently, Vince has lodging accommodations for the 2019 season available in two places. The first location is in Scarborough, which is 10 minutes for downtown Portland, for clients who would like to do smallmouth bass and pike float trips here in Southern Maine. Vince has an apartment attached to his home that he uses for AirBnB, which has two beds, a full bathroom, and a small kitchenette. The beauty of this option is that you can spend the day on the water having a blast chasing smallmouth bass or pike and then have dinner at one of Portland's many amazing restaurants in the evening. You could easily drive or take an Uber ride to downtown Portland. Or bring your own cooler items and grill your dinner right in the backyard. There's a gazebo on site to keep you away from mosquitoes and share your stories while enjoying a beverage or two! The second location is in a town that you've probably never heard of called Brookton. Brookton is a small town located about 1 ½ hours northeast of Bangor. It's also just thirty minutes from Grand Lake Stream, which is famous for landlocked salmon and brook trout fishing in the spring and fall. If you want to come in the summer, the smallmouth fishing is out of this world. You'll be on the water all day, and most likely not see another person. If you want that remote feeling, this is the place for you. This option includes two beds, a kitchen and rustic toilet accommodations :) Vince is working on putting finishing touches on these two spots for the upcoming season. We'll be sure to upload many pictures and videos of lodging accommodations in the coming months! Our second piece of news is that I have purchased land in Rangeley, and I'll be spending most of this season (when not guiding) building a cabin that can sleep up to 8 people. The property is within walking distance of a great brook trout pond, and within 10 minutes of downtown Rangeley. The Magalloway and Kennebago rivers are both within a 25 minute drive. I'm very excited to be able to offer FREE lodging to clients in the Rangeley region. When you fish with me in Rangeley, I don't just have you stay in one spot all day and watch a strike indicator. Don't get me wrong, we will nymph fish, but I'll have you catching fish on dries, streamers and emergers as well. I like to move around a lot and find fish. In other words, I like to help you HUNT for big trout and salmon. Keep checking back in as I'll be posting regularly as we build the cabin in Rangeley this summer. Check in to see the different stages and progress that we make throughout the season! We have about ⅓ of our schedule booked up for the season as of today (3/28). Book two days with us and get FREE lodging. We love the waters that we fish on and we know them well. We'll help you have successful days on the water and most likely teach you some new fly fishing techniques in the process! 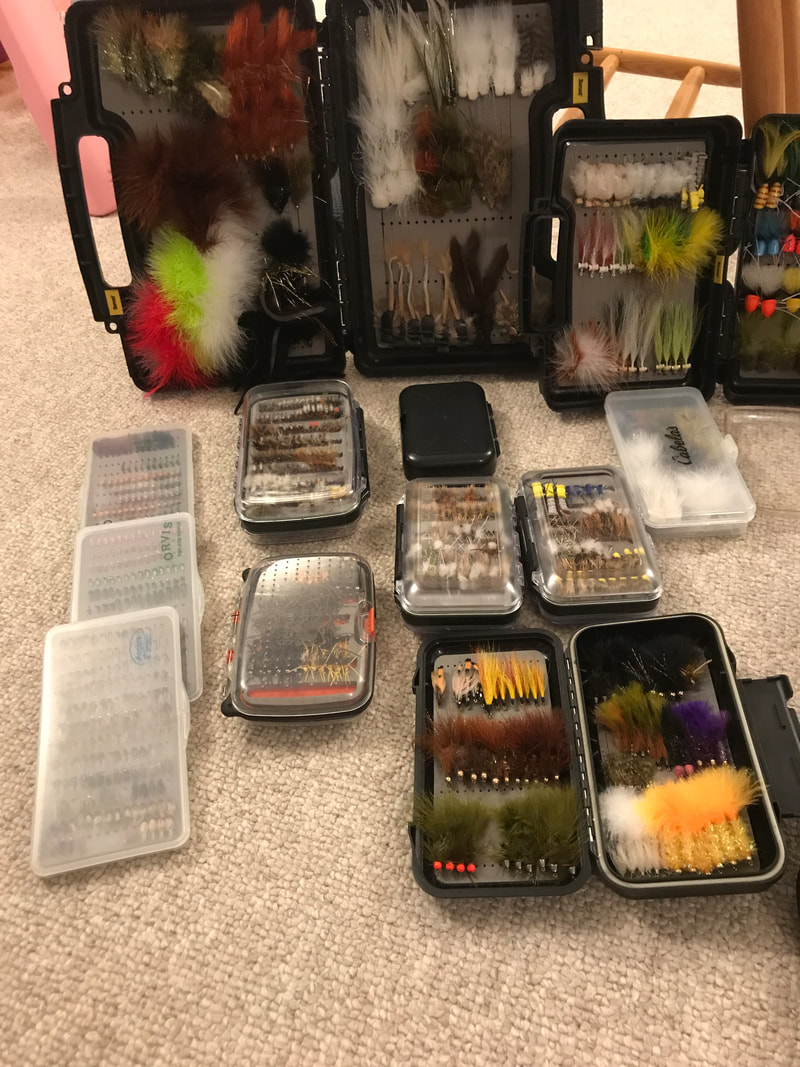 I've been spending time this winter writing blogs for Maineflyfish.com. It's a great website with a ton of great resources and people who contribute years and years of fly fishing knowledge. It's a great website that you should check out if you live in Maine or are going to visit Maine. We’re days away from the traditional opener here in Maine, and I totally get it. Like you, I’m getting sick of watching fly fishing films, reading new fly fishing books and rereading old ones, and searching Google Earth to try to find that new secret pond to try out this summer. I’m over the fly fishing shows (except for the Eldredge Bros Expo this weekend) and “winter” fishing, which feels more like just getting out for some fresh air, and dodging ice chunks. I know April isn’t the most productive month, but it beats the heck out of February fishing. You’re probably feeling like sitting at the vise is becoming more of a chore than a pleasure at this point. I get it. You’re ready to go! My intentions for this article are to point out some of the necessary preparations for the upcoming season. My hopes are that I’ll point out some things that may be new to you or at least a good reminder. If I’m missing something, please feel free to drop a line in the comment section. Fly Maintenance The first thing I do every winter is go through every fly box that I have and take inventory. I take every fly out of its slot and check for rust and durability/sharpness. I throw out flies that are chewed up or rusting, and I make a list of all the flies that I need to tie (or buy) to replenish my box. When I discover new flies, I like to add them to the list, but sadly, I probably won’t really try them because I’ll revert to my “old reliables.” If it ain’t broke, why fix it? As you can see from my pictures above, I have a good number of flies and I usually sort this process out over the months of January, February and March. I’m sure there are plenty of you out there though that think I don’t have enough flies! Rods and Reels To be honest, I don’t really take my rods out over the winter for inspection. It probably wouldn’t be a bad idea to use the wax to clean the ferrules so my rods don’t stick together all season. I do, however, make it a huge priority to give all of my fly lines a good hard scrubbing and change out leaders that are frayed or worn. This year I found that two of my reels had been either stepped on or dropped and they were warped. Both Redington reels… hmmm. I won’t go there, but it was good that I caught it in January instead of getting out there in May with a client and handing them faulty gear. Waders and Boots If you put away your waders with no leaks back in the fall, you probably won’t have any issues with them. There’s really no good way to know if you’ve sprung a leak until you get in the water. If you fish in April, you’ll know pretty quickly if you have a leak. For wading boots, I’ve found it helpful to change out laces that are ripping or using gorilla glue if parts of the boots are starting to rip apart. Don’t use too much though or it’ll look like you have spray foam insulation coming out of your boots! Other items I like to check my fly fishing vest pack and empty all of the pockets. It’s always good to restock things like Ben’s 100 bug spray or small bottles of sunscreen. I always ask for those two things and a fishing license each Christmas. They make great stocking stuffers. Check your floatant options and make sure they haven’t hardened up. Put some fresh batteries in your headlamp. Throw some waterproof matches in your pack and a ziploc bag with bandaids. Restock strike indicators and split shot. Check your nippers to make sure they’re not dull. Make sure you throw some fresh TP in your wading vest or boat. Lastly, don’t forget your 2019 fishing license. I always feel like a kid waiting for Christmas to come this time of year. I hope you enjoy your season. If you haven’t been fishing a lot in recent years, move it up the priority list this season. You only live once after all! I'm excited to help others chase some early season brook trout like this one caught on the Magalloway River last year in April. 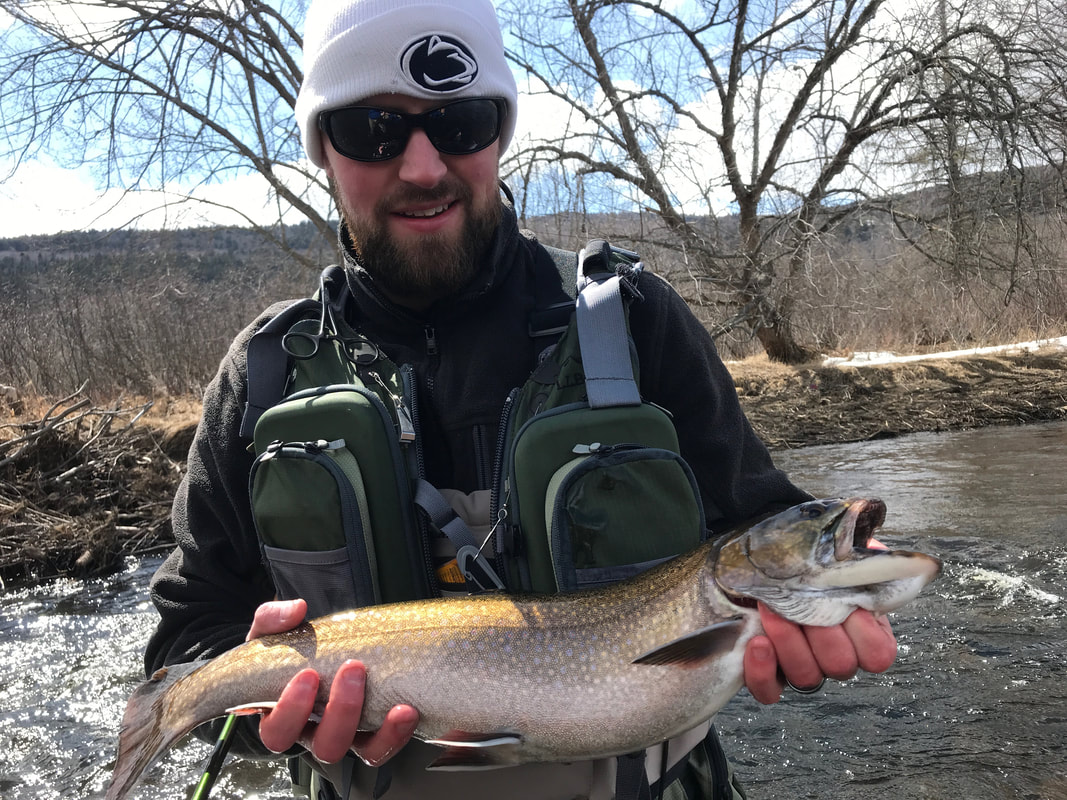 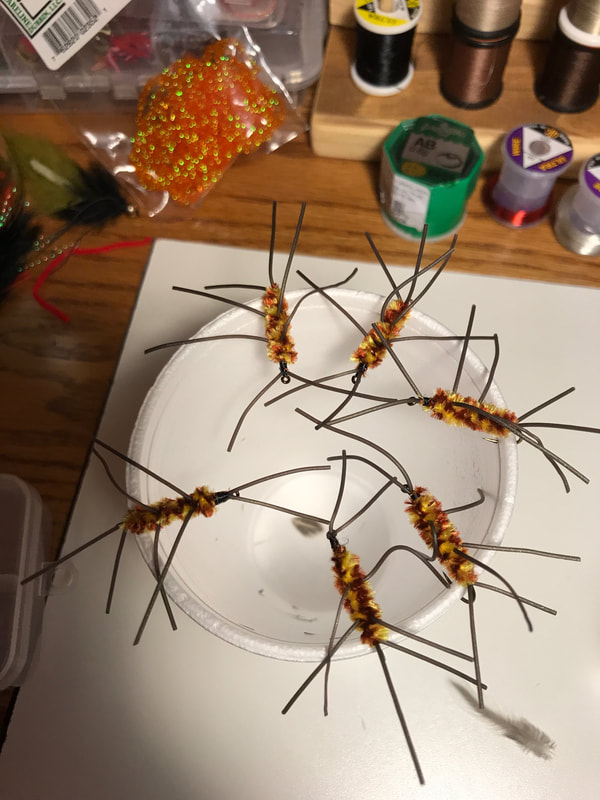 If you've never fished a Pat's Rubber Legs for trout and salmon then I'd say you're missing a great tool for your toolbox. This fly can imitate a number of bugs, but most notably it imitates a tasty looking stonefly nymph. You can fish this pattern almost year round with success. I almost always start with this fly as my lead fly on a traditional suspension nymph rig. A little secret is tying them in two different sizes and fishing them in tandem.
It's not a bad tie. I taught this pattern in my final class for beginning fly tiers at Eldredge Brothers Fly Shop, and the students did a great job! Start with a size 8 nymph hook that has a 3XL hook shank. Wrap .025 non-lead wire from a hook eye length away from the hook eye back to the hook point. Secure the non-lead wire with black thread and tie in your rubber leg antennae and tail. Tie in the chenille near the bend of the hook and advance your thread forward to the hook point, tie in a set of rubber legs (about 2 inches long) then advance to the front of the non-lead wire and do this again. Wrap your chenille to the head of the fly, build a small head and whip finish. I like to apply head cement just to secure it some more. Hook: Size 8 3XL nymph hook Wire: .025 non-lead wire Body: Medium black/coffee variegated chenille Legs: Brown perfect round rubber legs 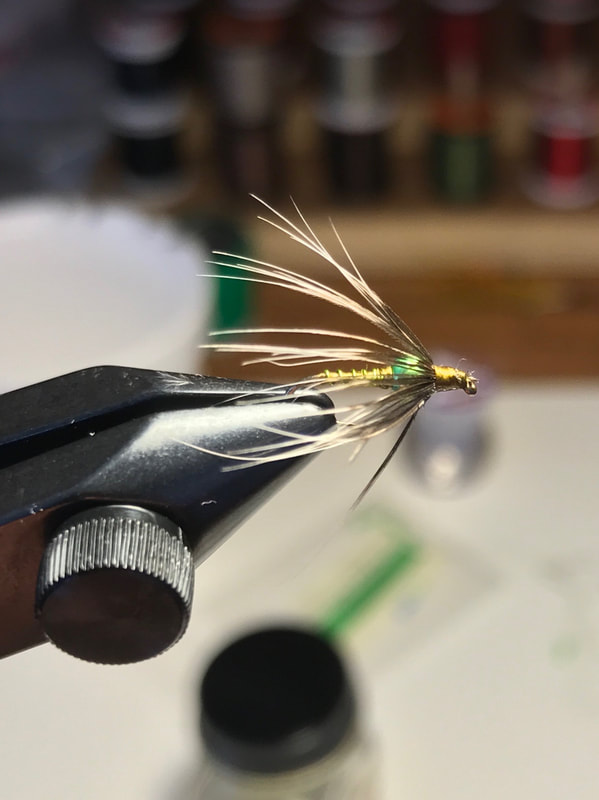  The soft hackle emerger is commonly called the Partridge and Green, Partridge and Orange, or Partridge and whatever you choose for the body. I like to tie these sometimes with a bead and sometimes without a bead. I generally tie these in sizes 14 - 18 to imitate caddis or mayfly emerging from the bottom. I'll fish these behind a strong floating dry fly, often attached by 18 inches of 5x tippet, and you really just dead drift your dry, let it swing at the end, and can even hold your tight line there until you feel a take. It's an extremely effective pattern and very easy to fish. In the old days in Europe, they fished this fly with just thread and some partridge feather wrapped around the front of the fly.
It's a pretty easy tie. Start with the thread color of your choice by the hook eye. Tie in a piece of wire (copper, gold, silver, etc) and wrap over it to the hook bend. Advance your thread back forward to about a hook eye length behind the hook eye. Take your wire and spiral wrap it to your thread then tie it off and cut it. Strip back one partridge chest feather from the base of the quill up until you take off all of the fluffy part of the weather. Tie in the tip of your feather and take two wraps around your hook going towards the hook eye. Hold the feathers towards the back of the fly, tie them in securely, build a small head, whip finish, and add a touch of head cement. Hook: Size 14 through 18 dry fly hook Thread: Your choice of color Wire: Typically copper, silver, gold or a bright green Feather: Whiting Brahma Hen Hackle or your personal partridge chest feathers 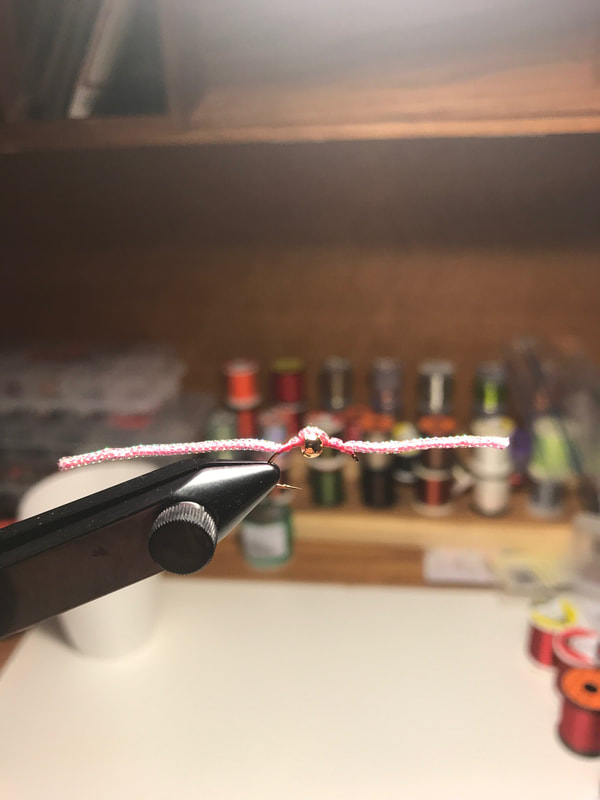 Pink Sparkle Worm
This fly is such an easy tie, and super effective in all seasons. I've caught trout and salmon on this fly in almost every month of the year (I don't fish much January-March). I generally use this fly as the lead fly in a nymph rig, but in shallower water in the summer I'll use a foam dry fly and drop this underneath. Worms are an effective pattern in high water or are a good rain, and this fly is no exception. As far as tying this pattern, I like to use an emerger hook and an oversized gold bead. It doesn't matter if this bead goes right over the hook eye because you're going to secure it in the middle of the hook shank. Once you have the bead secure in the middle you just tie back to the hook bend and put on a 3 inch section of pink pearl core braid. Tie it in like you would a normal San Juan Worm at this point, and whip finish behind the hook eye. These are an easy tie, and a pattern that you want to have in your box! Hook: Size 14 emerger hook Thread: Pink or Red UTC 70 Bead: Size 3/32" gold bead (good for size 14 in this case) Body: Micro Pink Pearl Core Braid (from Dubbin) 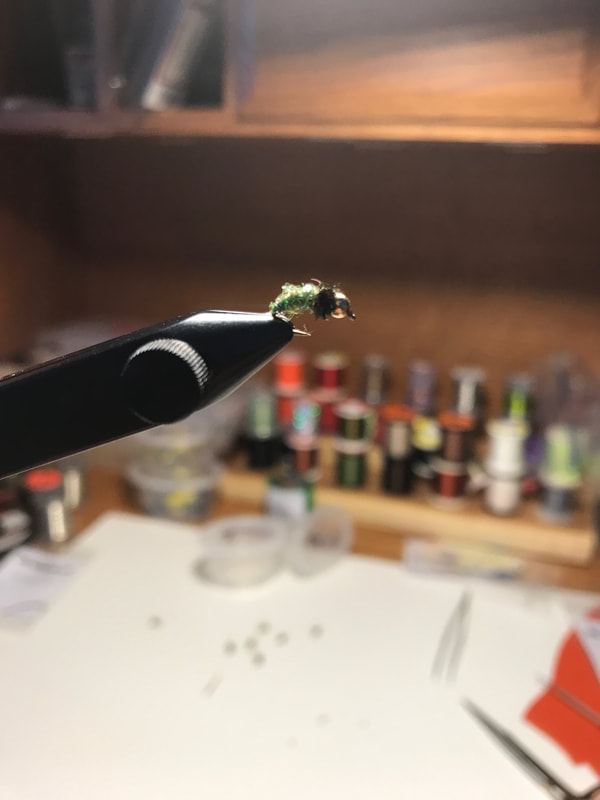 Green Sparkle Maggot
Unfortunately, this picture doesn't do this size 18 gem any justice. It's very sparkly, and acts as a great attractor fly. This nymph is used either at the bottom of the water column or can be used as a dropper from a dry in some instances to imitate a caddis larva or an emerging caddis. If you flip over rocks in the spring time, as water temps reach the mid 40s, you'll start to see what we call green rock worms, otherwise known as green caddis larva. They can be everywhere! And when they are, it's in your best nature to dead drift these guys through a likely holding spot. The great thing about this fly is that it's an incredibly easy tie. Good thing because I lose a ton of them on rocks or logs. You simply place an appropriate sized gold bead near the eye of the hook and then make a body of UTC 70 black thread. Apply some green caddis ice dubbing from the bend of the hook to just about behind the bead. Leave room for your peacock herl, and wrap a whole piece in behind the bead. Tie it off, whip finish and your down. Hook: Size 16 emerger hook Thread: Black UTC 70 Bead: Size 3/32" gold bead (good for size 16) Body: Green Caddis Ice Dubbing Thorax: Peacock Herl 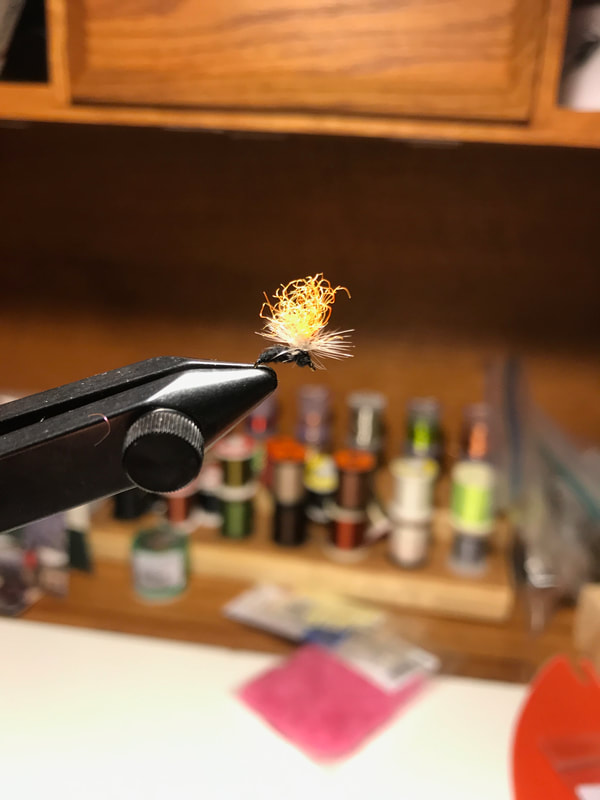 Parachute Ant
I’m calling this a Parachute Ant, but really I use it for a lot of different presentations. I might use it to imitate a black or brown caddis, but I also use it in smaller sizes to imitate midge dries as well. This fly doesn’t sit on top of the water entirely, which I also like. If you grease up the parachute with a gel floatant, this thing will ride just below the surface looking like a struggling bug… right in the trout’s strike zone. The parachute post can be tied in white or orange. I like the orange sometimes because a lot of rivers in Maine are tannic colored and hard to locate white because of all of the foam on the water. As far as tying, look up a klinkhamer video and basically copy it. The only difference is that you’ll just use dubbing for the whole fly and can leave the peacock herl on the tying bench. It’s a pretty easy tie, and once you get the hang of it you can whip up a couple dozen in 2 hours. Materials Hook: Emerger hook down eye size 16, 18 & 20 Thread: Black UTC 70 Hackle: Black or tan dry fly hackle Post: Mcflylon in white or orange Each year I'm trying to get better at the whole multimedia side of fly fishing. Unfortunately, I'm doing this all with an iPhone, so the quality isn't as good as people who are doing this with professional cameras. One thing I'm learning is that I need as many film clips as possible, and to have a vision before I just start shooting film. I hope you enjoy some of our favorite memories from the 2018 season!! 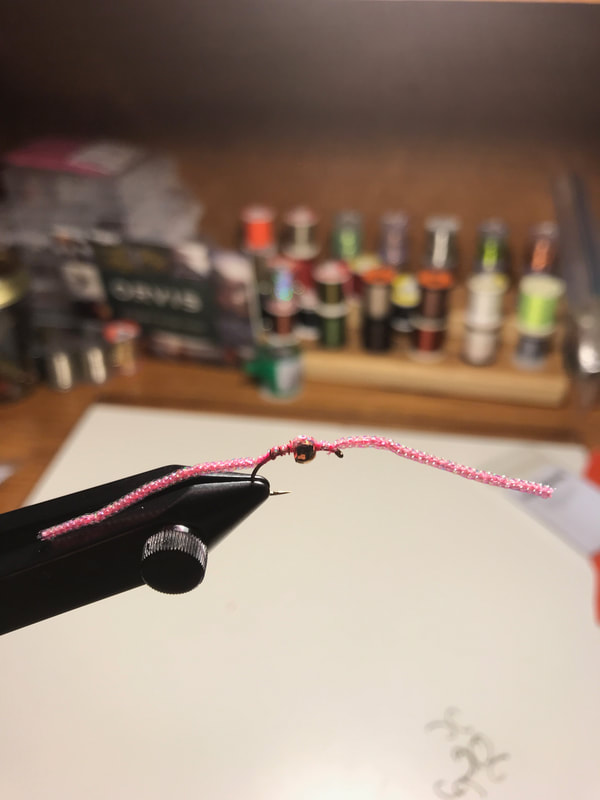 Pink Sparkle Worm The Pink Sparkle Worm is what I like to call my "sunny day" fly. This fly works well for trout and salmon in almost every season. I've even caught a couple of fish on it in December. It's a pattern that I'll tie on first on a dropper rig. Sunny days and receding waters are the best times to fish this pattern. I've had particularly good luck with this fly in months like August when trout fishing can be slow in the midday, especially when we've had little rain and low water conditions are prominent. This fly ties very easily. Whipping out a dozen of these in under an hour is not hard, even for the beginning fly tyer. You just start with a gold bead head (I use a ⅛" bead on a size 12 emerger hook) and tie your pink braid onto the back of the fly. The key is to tie the bead into the middle of the hook shank and then wrap the pink braid over the top. It's really no different than tying a San Juan Worm, you're just adding a bead in the middle. I like to also tie this pattern with the traditional red chenille and tan chenille. Materials Hook: Emerger hook down eye size 12 or 14 Thread: Fluorescent Pink UTC 70 Bead: ⅛" Gold Bead Body: Micro Pearl Core Braid Pink (from Hareline Dubbin, Inc.) 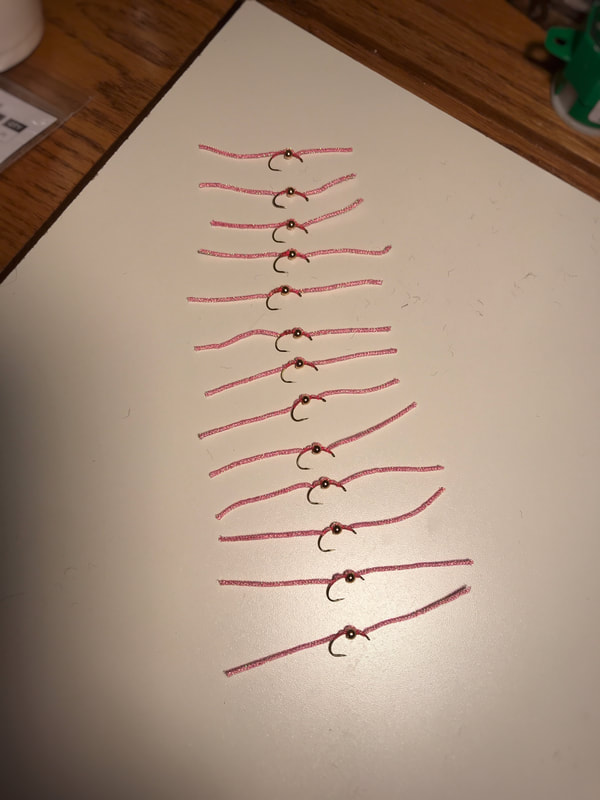 |
AuthorAaron Broaddus is a passionate fly fisherman and a Maine guide. Archives
February 2023
Categories |


 RSS Feed
Headin' North just always feels right